Loading...
Loading...
Loading...
Loading...
Loading...
Loading...
Loading...
Loading...
Loading...
Loading...
Loading...
Loading...
Loading...
These are the rules designed to give the entire user guide a somewhat unified style. You may apply them with some freedom.
The goal of the user guide is to provide explanations on how to perform various tasks in Audacity.
Documenting features seems like the obvious thing to do: Audacity has various menus, so better have a list of what every option in that menu does. However, this leads to the situation where some pages are completely unfindable as a reader already needs to know where certain options are in the menu in order to find out what the page would be called. For example, the feature containing the slider for the recording and playback volumes is called Mixer Toolbar. But nobody except the people most intimately familiar with Audacity know it's called that!
To combat this, try to write your guides as a way towards a goal, or a task. The above example, instead of naming the page after the feature, name it after the task it does, so: Setting recording and playback levels
Tasks aren't necessarily tied to individual features. For example, Noise reduction & removal can talk about several tools as once as they all are means towards a common goal.
If a feature has many different modes or options that are unrelated to the task you're describing, avoid making long lists of what all the feature can do. Focus on the task-related ones instead.
If a feature has several ways to access it, use the most accessible option. For example, for an "how to play audio" article, simply mention the big green play button and the shortcut Space. Don't also mention Transport > Playing > Play/Stop.
There are some exceptions to this, especially when documenting more "advanced" features like Macros which need extensive guiding about how to operate it. Instead of a linear "go here, then here and there, and then you're done", split them up into sub-tasks (for macros: creating macros, editing macros, etc.) and keep these unrelated tasks on one page. Avoid breaking it down to the point where you are explaining individual buttons (don't say "the cancel button cancels the effect without applying it")
Rule of thumb: If a feature is easy to use, but hard to find, document it like a task, ie answering the question "how do I do x". If a feature is hard to use, document how to use the feature as a series of sub-tasks if possible.
Audacity's user base consists largely of casual users. As such, you can't expect the readers of your guide to understand even fairly common audio terms (for example: compressor or loudness vs volume), unless it's directly connected to the topic you're writing about.
For example, if you write a guide about compressing and expanding audio, you don't need to hold yourself up on explaining what a compressor is, since the only people who'll ever end up reading that guide are people who already know about that. However, if you were to mention a compressor on a page about general audio editing, you would need to explain what a compressor is good for.
That said: If it's possible to describe a feature without needing to resort to lingo, use it even if it's slightly less accurate. For example, "punch-in repair" would be the accurate term for Re-recording a section, but also is way harder to understand and thus to find.
While there's a lot of things you can write about in relation to Audacity, keep in mind that this site is focused on user guides (or how-to guides, or tutorials - they all have the same idea). We want to minimize work on contributors while maximizing impact, so guides should be kept as general as possible. Only use qualifiers such as "for podcasters" or "for musicians" if their use case shares almost no resemblance to what everyone else would be doing anyway.
Caution: The following topics are out of scope:
Audio-related content beyond Audacity, like: "how to build a quiet recording booth"
Reviews and recommendations of software/plugins/...
Technical documentation about the internals of Audacity.
You can address the reader directly ("you"). You should remain impartial in the process though, so no "I" or "my".
The overall tone should be friendly but not patronizing, and the language should have a healthy middleground between casual and technical.
Titles should reflect the task you're trying to teach. For example, if you're teaching how to add reverb, the title should be "Adding reverb"
The title should be concise (try keeping it below 60 characters).
Page titles should be written in sentence case. So generally, the first is capitalized while everything else is not, except proper nouns and acronyms ("Audacity", "FFMPEG").
Note: When the title explicitly refers to an option within Audacity itself, use the spelling found inside Audacity. So for example, "Using the Noise Reduction effect" would have "noise reduction" capitalized, but "Reducing noise in Audacity" would not.
Underneath the title is a field for page descriptions. These descriptions are the first thing users see of the article when looking at Google, or seeing an embed to it somewhere.
As such, they should give a good summary of what the page is going to be: In a few words, how will a goal be achieved? What features will be used?
Instructions should be written in a step-by-step list where useful. For example:
Do This
then that
then a third thing
If you need to interrupt the steps for explanations, you can either do
Do this
then that (shift+enter) Note: This is an explanation on a new line
then a third thing
If instructions are different depending on the operating system or other factors, you can use tabs, like this:
Windows Instructions
MacOS instructions
Linux instructions
Tabs aren't part of standard Markdown, so they probably won't show up properly if you're using github or a local editor. They'll show up just fine on Gitbook though.
Note: Tabs are quite big blocks, visually speaking. When using them, make sure that what you're showcasing is worth this space. For example, if you're just saying that undo is Ctrl+z on Windows and Linux, you can just put brackets behind it for the mac instructions - "press Ctrl+z (Cmd+z)"
If a task has a main way of working, but may benefit from additional context, you can use the Expandable block:
You can take screenshots using the clipping tool or tools like ShareX. ShareX has the advantage that it has built-in tools like arrows, step-by-step bubbles and labels which can help you visualize several steps at once.
With images, there always is a tradeoff between easy maintainability, clarity and context. So crop them as much as possible without losing important context, and use them in a way that makes updating them as painless as possible.
Gitbook offers 4 types of info boxes.
Info: Use these for information which is useful to know, but not necessary to fulfill the task. These boxes should be started with
Info:, Note: or Tip: for general additional information
Shortcut:Key + Combinationfor shortcuts
Warning: Use these for information where things might go wrong and the user might get undesired results. These boxes should be started with
Caution: or Warning: depending on which feels more appropriate in terms of urgency
Danger: Use these for super important information only, where ignoring the danger box would lead the user to irreparable damages (lost data, broken audio, ...). These boxes should be started with
Danger: for super important info
NEVER or DON'T if you need to go straight into the warning, where "danger" would look silly.
Success: Use these for things the reader should do. These should be started with
Best practice: or Do: for best practices
Checklist: if you want to provide a checklist
These info boxes aren't part of standard markdown, so if you're not using gitbook itself, but edit through Github or a local editor, they will look a bit silly in your preview (but show up correctly here).
If an image is worth a thousand words, a video tutorial can be worth a million: At it's best, it can tell the entire story the written guide would make in a way that always has all necessary context and requires no lengthy description of where to find things.
However, video tutorials can go out-of-date incredibly quickly and then cause a lot of confusion among viewers.
Because of this, a video tutorial must follow these rules to be added to an Audacity Support page:
The video must clearly state what version of Audacity it's referring to in the beginning.
The video must be in the language of the Audacity Support page it's meant to be embedded in. Right now, that's English only.
The video must be a dedicated Audacity tutorial or how-to guide.
The video must refer to Audacity Support as the place to get up-to-date help from.
The video must not contain a sponsorship read, and it is preferred to have the video completely ad-free.
The video should be licensed Creative Commons-Attribution (see YouTube help). This way, if your video goes out of date, other people can update only the part of your video that goes out of date.
The video and the Audacity Support page it's supposed to be embedded in should match the steps they take. If the video tutorials goes on a tangent unrelated to the initial task, the written guide may omit the tangent and instead place the contents of the tangent in a "See also" section.
The following points are considered best practice for video tutorials:
Start with the purpose and version number and then go straight into the content: "To do XYZ in Audacity 4.2.0, first go to..."
Use a script which you follow when making your video. This will automatically eliminate the following two points, and also get you a long way towards making subtitles.
Avoid going off-topic, eg "hey guys, and welcome back to another video! my sister's aunt's nephew requested I make a tutorial so he can cook his eggs using Audacity to which I said..."
Go through your tutorial linearly step-by-step, and avoid jumping back to earlier sections much later in the video. For example, if you are in Step 9 already, jumping back with a "oh yeah, I forgot to add that in Step 3, you need to also do..." is majorly confusing.
Add subtitles to your videos. Not only do they make your tutorial more accessible to deaf people, they also are useful to people who have trouble understanding your dialect or accent, or who want to auto-translate the subtitles into their own language.
Use chapters on YouTube to mark major steps in your video. They work by putting the following in your video description:
This is a living document. It contains the best practices, as determined by the community. Feel free to discuss additions and changes on the discussions page, or in the discord.
(this probably is a category on its own, but let's write it on this page for now)
Tutorials are an awesome way to help out Audacity users. So if you know how to use Audacity, you might be just the right person to teach others! You can either write guides, or make videos.
Go to audacityteam.org/gitbook-access to get editor access to this site
Go to audacityteam.org/gitbook-plugins to get access to the Plugins site
Or check out Editing through GitHub to edit with a local text editor or on Github.com
Audacity welcomes contributions to both Audacity Support and , whether it's a small spelling correction or an entirely new guide. If you're not sure what to start with, check out some good first issues:
Gitbook works a bit like a wiki in that you can edit all pages freely, but unlike a wiki, it uses git's "everyone has their own branch" principle. That is to say that the changes you make are independent of everyone else's changes, and won't show up on the main (live) website until the branches are merged.
To some degree, this means that you can do whatever you want in your branch. That said, there's some things which make things easier for everyone involved:
Best practice
Doing so makes it easier to understand what your changes are exactly, and should one of your changes be rejected, most of your other work won't get blocked by it.
Only submit complete pages. Your progress is saved automatically, so if you want to call it for the day, simply close the page and continue the next day. If you accidentally hit "submit", simply start editing again to convert your branch to a draft branch again.
Be aware of the others, to avoid duplicate work. You may connect with other editors in our discord servers.
Follow the Style Guide, to give this entire site a somewhat uniform style.
When editing on Gitbook, you can edit existing pages, but you cannot create new ones. If you'd like to make a page about a new topic, write to LWinterberg in the discord server. You also can hand in Markdown files or Word documents to him directly to add. This restriction does not apply when Editing through GitHub, however, there are other technical oddities when editing through GitHub.
Video tutorials are highly appreciated as part of a guide. You can upload them to YouTube (or Vimeo/Dailymotion/...) and embed them in your guides, or in other people's guides, like this:
We have some requirements for which video tutorials are accepted into Audacity Support pages (see the Style Guide #video-tutorials for more info)
Any page of both support.audacityteam.org and plugins.audacityteam.org can be edited either on Gitbook (see #writing-tutorials-and-user-guides for instructions) or using Markdown syntax on GitHub.
Note: Various formatting options available in Gitbook cannot be previewed on GitHub and most local Markdown editors. Be aware of the differences between
Gitbook-hosted pages (plugins/support.audacityteam.org)
The reverse isn't true however: All Github-flavored markdown is supported in Gitbook.
A link for GitHub is shown either on the right-hand side or in an overflow menu of any page:
Once you are on GitHub, you will see a pencil in the top right of the file.
You now can make your changes to the page.
Best Practice: Frequently switch between the Code and Preview tabs in GitHub to get a general sense of what your edit will look like.
Also, if you haven't already, now is a great time to familiarize yourself with the Style Guide.
Once you are done, press Propose Changes
This brings you to a page where you can review your changes. If you are satisfied, click Create Pull Request.
After you click "create pull request", it will show up on https://github.com/audacity/audacity-support/pulls and await review by an Audacity team member.
You can edit Markdown in any text editor. More advanced editors like VSCode may show useful shortcuts and visualizations for easier and faster editing, but in principle, even the simplest text editors like Windows Notepad can be used to create them.
Caution: Avoid using office suites like Microsoft Word, LibreOffice or Google Docs to edit Markdown. They tend to use very different formatting options, which don't transfer to plain text. As a rule of thumb, if it doesn't save in .txt or .md, it's not the right app to use as a Markdown editor.
To get started, first clone the repository, either using git clone https://github.com/audacity/audacity-support.git by clicking the code button on https://github.com/audacity/audacity-support and opening it in GitHub Desktop
Note: You will need to use some form of Git to make a pull request, so just downloading the ZIP will not work.
Once it's cloned, you'll find the files of support.audacityteam.org in the main branch, and the files of plugins.audacityteam.org in the plugins branch. Any additional branches have been split off from the main branch to preserve documentation for previous versions of Audacity.
Further information on using git with VScode can be found in the VSCode docs.
Outside from the syntax requirements, there are some more technical things you need to be aware of:
The sidebar menu is handled through SUMMARY.md, not the file structure itself. If you want the page you created to show up in the sidebar, you will need to update this file accordingly. That said: Try to match the structure of SUMMARY.md with the folder structure.
While you technically can work directly in your fork's main/plugins branch, it is highly recommended to make a new branch based on upstream/main or upstream/plugins instead for your changes. This way, you can always fast-forward merge the latest changes into your fork.
When updating your fork's side-branches to the latest state of main, rebase it if possible.
A page showing the Markdown for all the basic and fancy options there are. Also compares it to Github's Markdown. This block is the page description.
Contrast this page to:
(shows up in the outline)
(also shows up in the outline)
(does not show up in the outline)
Headings can be used anywhere, including inside other blocks.
Bold,
Italics,
Code,
Strikethrough,
Link,
internal link,
anchor link,
page link: Style Guide,
page anchor link: #inline-text-formatting-options,
colored text,
colored background,
both colored,
LaTeX:
These can be used anywhere.
Unordered
List
Ordered
List
List with
sub-items
can have
...
Lists can be used anywhere, including inside other blocks. They can only include inline content and other (nested) lists.
Infoboxes:
Hint
Caution
Danger
Success
A quote block
These blocks can be used inside of Tabs. The code block can also be used in Expandables, but cannot have other blocks inside it. The quote block and infobox can have headings, inline content and lists inside it.
Image block:
Attached file:
Embeds cannot be used inside of other blocks except the Tabs block, nor can other blocks be placed inside them.
text
text
text
Select-option and files columns appear empty in Markdown. Avoid using them.
Tables cannot be used inside other blocks except the Tabs block, nor can other blocks be placed inside them. Inline content works inside of text columns only.
content of first tab
content of second tab
content of third tab
Tabs cannot be used inside other blocks. Tabs can have most other blocks inside them, except of other tabs, expandables, and API blocks.
Expandables cannot be inside other blocks. Expandables can have headings, lists, code blocks, and inline content inside them.
A Gitbook-specific drawing thing, generating SVGs. Likely useless when using Markdown.
Cannot be placed inside of other blocks except the Tabs block. That said, an inline variant is available which can go pretty much anywhere.
GET https://example.com/example
shows itself up in the outline. Example of all available parameters follows:
id
String
Description
id*
String
Description
id
String
Description
id
String
Description
id
String
Description
Cannot be used inside other blocks. Can only contain plain text. Unfortunately very tailored towards web APIs only.
Pages under this section are just stubs. Feel free to work on them. Check out the and for more info
From
Due to licensing restrictions Audacity cannot be distributed with built-in support for ASIO. However You can build Audacity for your personal use and include ASIO support.
Audacity can record and playback audio on your Windows PC using one of the following three alternative interfaces:
MME
Windows DirectSound
Windows WASAPI
ASIO (Audio Stream Input / Output) is an additional proprietary interface to record and playback audio in Microsoft Windows. ASIO bypasses the Windows audio mixing components to provide lower latency direct communication between computer audio software and hardware. Most audio recording interfaces manufacturers provide a driver to support ASIO.
ASIO supports 24-bit sampling which is only otherwise available using or WDM-KS (Windows Driver Model Kernel Streaming). 24-bit sampling allows greater dynamic range, lower theoretical and greater resolution at lower audible volumes.
An unmixed ASIO output is "bit identical" to the original source.
Multiple physical input and output channels of the hardware are accessed over one single device.
Windows interface protocol support multi-channel recording on some sound devices, but not the very low latencies that are possible on ASIO.
Do one task per branch. Want to make a new guide on a new feature? Make a new branch. Want to remove all instances of the oxford comma? Make another branch. You can click the branch icon in the top bar to make new branches.
Inline image:
TODO


A Macro is a sequence of pre-configured commands (mainly effects) in a set order that can be applied automatically to projects or audio files.
Macros in Audacity can be used for:
Batch processing: Apply one or more effects to multiple audio files and export the processed audio into a new file.
To use this select the Apply Macro to: Files... button in the Macros Palette or the Manage Macros dialog.
For more detail on batch processing please see this page.
Effects automation: where the selected audio in the track or tracks in the current project is subjected to the same prescribed sequence of effects, and optionally, a file exported from the entire audio.
Macros can contain Select commands to make their own selections as the Macro runs
Effect presets: where selected, commonly used, effects are stored with your preferred settings for quick re-use.
You can manage and apply Macros using the Tools Menu:
Tools > Macros... to manage Macros: to create, edit and test them
Tools > Apply Macro > Palette... for a toolbox of Macros
Tools > Apply Macro > named Macro to apply one named Macro
There are some examples of Macros and tips on using them.
Use Tools > Macros... if you need to create a new Macro or to edit an existing Macro.
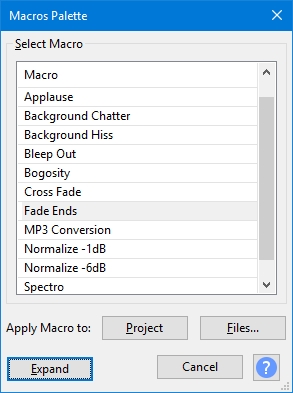
Use the Shrink button to show a reduced Macros Palette dialog which lists the existing Macros.
This dialog is also available directly via Tools > Apply Macro > Palette...
Click Expand on the Macros Palette to return to the full Manage Macros dialog.
Both the Manage Macros dialog and the Macro Palette dialog have Apply Macro to buttons:
Project applies the selected Macro to the current project.
Files... applies the selected Macro to selected external audio files that are in a single directory.
It is recommended not to process more than 500 files at a time.
For more details see the Macros Palette page.
Commands that call Effects, Generators, Analyzers or Tools, use the same familiar graphical interface (GUI) as appears when they are used from the normal top level menus.
Many of the other commands provide a simple GUI comprised of checkboxes and text entry boxes. Typical examples can be seen in the Scriptables I and Scriptables II menus.
It is strongly recommended that you set parameters for the commands that you use in a Macro. Otherwise Audacity will use the last-used parameter setting(s) when you ran the effect(s) manually.
Also note carefully that settings used in Macros will not affect or change the last-used parameter settings for any effect when next run manually.
Basically to paraphrase: "What happens in Macros stays in Macros".
Please see Manage Macros for more details.
You can export a Macro as a TXT file using the Export button in Manage Macros and send it to another user, or copy it to another computer for use there
You can import another user's Macro, or a copied macro of your own, into your Macros folder by using the Import button in Manage Macros.
You can also edit Exported Macros with a text editor and Import them back in if required.
Each Macro is automatically saved as a separate text file with TXT extension in the Macros folder in Audacity's folder for application data:
Windows: Users\<username>\AppData\Roaming\audacity\Macros
Mac: ~/Library/Application Support/audacity/Macros
Linux: ~/.audacity-data/Macros
In order to see the Macros folder on Windows, macOS or GNU/Linux, you must show hidden files and folders or type the folder location into your file manager's address bar.
Windows: In the tree on the left of Explorer, double-click "Users" then double-click your username, then on the right, double-click the AppData or Application Data folder and navigate through that. If necessary, show hidden files and folders on Windows or type %appdata%\audacity\Macros or shell:appdata\audacity\Macros into the Explorer address bar then press Enter on your keyboard.
macOS: Open Finder, use the Go menu, choose Go to Folder and type ~/Library/Application Support/audacity/Macros, or set Finder to show your User Library folder.
See the Macros Examples page for examples of using Macros


