
Loading...
Loading...
Loading...
Loading...
Loading...
Loading...
Loading...
Loading...
Loading...
Loading...
Loading...
Loading...
Loading...
Loading...
Loading...
Loading...
Loading...
Loading...
Loading...
Loading...
Loading...
Loading...
Loading...
Loading...
Loading...
Loading...
Loading...
Loading...
Loading...
Loading...
Loading...
Loading...
Loading...
Loading...
Loading...
Loading...
Loading...
Loading...
Loading...
Loading...
Loading...
Loading...
Loading...
Loading...
Loading...
Loading...
Loading...
Loading...
Loading...
Loading...
Loading...
Loading...
Loading...
Loading...
Loading...
Loading...
Loading...
Loading...
Loading...
Loading...
Loading...
Loading...
Loading...
Loading...
Loading...
Loading...
Loading...
Loading...
Loading...
Loading...
Loading...
Loading...
Loading...
Loading...
Loading...
Loading...
Loading...
Loading...
Loading...
Loading...
Loading...
Loading...
Loading...
Loading...
Loading...
Loading...
Loading...
Loading...
Loading...
Loading...
Loading...
Loading...
The recording and playback levels can be set using the sliders in the Recording and Playback meter toolbars:
The slider with the microphone icon sets the recording volume on a system level. If the operating system is prohibiting this action, this slider will be inactive.
The slider with the speaker icon sets the playback volume relative to the system volume. It does not affect the volume of exported files, use the gain sliders on each track to edit those.
Audacity is an easy-to-use, multi-track audio editor and recorder for Windows, macOS, GNU/Linux and other operating systems. This page will guide you through the download & installation process.
Audacity is available from the .
Go to the .
Click Get in Store App.
Best practice: Before starting to record, click on the microphone icon and select Start Monitoring to activate the recording level meter. If it enters the yellow or red area (-9 dB to 0 dB) when testing with a normal volume, lower the recording level to prevent clipping and distortions in the real recording.
If you selected 1 (Mono) Recording Channel on the Audio Setup > Recording Channels the meter will only display the level on the Left channel


The Microsoft Store app will open. Click Install to install Audacity.
When Windows asks you if the installer may make changes to the system, click Yes.
Audacity is now installed. You can start Audacity from the start menu.
Head to the download page: https://www.audacityteam.org/download/windows/ It will automatically download the latest version of Audacity after 5 seconds.
If prompted, click Run or Save.
If you clicked Save, head to your downloads, locate the Audacity installer and double-click it.
In Windows 11 it is possible that you get a warning about Audacity being a non Microsoft-verified app. Click Install anyway.
When Windows asks you if the installer may make changes to the system, click Yes.
Select the language to use during the installation and click OK.
In the Welcome page click Next.
In the Information page you will links to learn more about Audacity and its license. Click Next to proceed.
In the Select Destination Location page you can select a different folder to install Audacity using the Browse... button or simply use the recommended destination. Click Next to continue.
In the Select Additional Tasks page you can choose that the installer adds a shortcut to Audacity in your Desktop.
If you have installed Audacity previously you will have the option to Reset Preferences.
Verify your choices and click Install
Wait a few seconds until the setup process completes.
Please take some time to know how to get community support through the Audacity Forum and how to make suggestions or report bugs.
Click Finish to close the installer and Launch Audacity
Head to the download page: https://www.audacityteam.org/download/mac/
It will automatically download the latest version of Audacity after 5 seconds.
If prompted, click Save.
Once the download has completed to your Downloads folder, double-click the DMG file to mount it.
Drag the Audacity.app icon rightwards onto the "Applications" folder shortcut.
You can also drag Audacity out of the DMG to any other location. You need the administrator password to copy Audacity to "Applications".
Launch Audacity.app from /Applications or from your chosen location. Note: Do not double-click the "Audacity" icon in the DMG to launch Audacity from there.
Once the program has opened press "OK" to start editing!
Additionally, you may check the "Don't show this again at start up" prompt.
Head to the download page: https://www.audacityteam.org/download/linux/ It will automatically download the AppImage after 5 seconds.
Make the downloaded AppImage runnable. To do this, you can right-click the file -> Properties -> Permissions or run the following command in the terminal:
chmod +x <path to your Audacity.AppImage>Double-click the AppImage to run Audacity.
Additionally, your Linux distribution (for example Ubuntu, Fedora or Debian) may have a version of Audacity as part of the repository. This version is typically older than the latest AppImage, but may be better integrated into your distribution.

FFmpeg allows you import/export additional audio file formats into/from Audacity
Due to patent restrictions, FFmpeg cannot be distributed with Audacity itself. However, FFmpeg is required to import and export a variety of audio formats, including M4A and WMA.
You can download and install FFmpeg as follows:
Download the FFmpeg installer from For most computers, the 64-bit Windows version is correct.
Crossfades blend the end of one song with the beginning of the next one. There are several methods to achieve this in Audacity.
If you have two clips in one track you'd like to crossfade, you can use Crossfade Clips effect. To use it:
Have two clips in one track.
Select the region you'd like to apply the crossfade to. Try to select roughly the same amount of time in both clips.
From
(this probably is a category on its own, but let's write it on this page for now)
Note: If you have trouble opening the AppImage, try installing libfuse2. Exact steps for various distributions can be found at


Read and accept the license
Select the location to install FFmpeg. By default FFmpeg will be installed into C:\Program Files\FFmpeg for Audacity
Finish the installation
Restart Audacity
Audacity should now automatically detect FFmpeg and allow you to use it.
If you prefer a manual installation of FFmpeg you can download a ZIP file from a different source:
Or by compiling it from source as described here: https://trac.ffmpeg.org/wiki/CompilationGuide
If you have installed FFmpeg from a different source, or installed it in a different location, you'll need to tell Audacity where to find it. To do this:
Go to Edit > Preferences > Libraries
Click on the Locate... button.
If the following message appears, Audacity has automatically identified FFmpeg:
You can click No as Audacity already knows where to find FFmpeg.
If this message does not appear, proceed with the next steps.
In this dialog window, click Browse... to locate the avformat-*.dll from the FFmpeg folder you downloaded/installed elsewhere
Once you've found it, click Open, then OK, then OK again to close the preferences.
This is a universal binary installer. It automatically matches your system architecture.
Download FFmpeg for macOS from https://lame.buanzo.org/ffmpeg.php
When you have finished downloading, open the .pkg. You will be guided through the installation
Click through the steps in the installer.
On some Macs the process may look as though it has stalled on "Validating packages" - just be patient and wait for it to complete.
Restart Audacity if it was running when you installed FFmpeg then Audacity should detect FFmpeg automatically.
If you have problems with Audacity detecting FFmpeg, follow the steps below to manually locate FFmpeg.
One way to install an FFmpeg version that matches your system architecture is using . You can install it through the Terminal.app by typing in:
And once you have Homebrew, the following command installs FFmpeg:
Audacity should now automatically detect the installation after a restart. If not, follow the steps of a manual installation.
You can download or compile FFmpeg yourself as described here:
If you have installed FFmpeg from a different source, or installed it in a different location, you'll need to tell Audacity where to find it. To do this:
Go to Audacity > Preferences > Libraries
Click on the Locate... button.
If a "Success" message appears, Audacity has successfully found FFmpeg. You can click No as Audacity already knows where to find FFmpeg.
If you're using an Apple Silicon ("M1", "M2") system, make sure that your FFmpeg and Audacity architectures match:
arm64 (Apple Silicon) Audacity needs arm64 FFmpeg,
x86_64 (intel, also known as x64 and amd64) Audacity needs x86_64 FFmpeg.
Additionally, make sure you're using the latest version of Audacity.
On Linux, you generally can install FFmpeg as well as LAME through the package manager. You can use the following command in your Terminal/Console to install it:
Debian, Ubuntu, Pop_OS!, Mint
sudo apt install ffmpeg lame
Fedora, Redhat, CentOS
First install the and check for updates, then
sudo dnf install ffmpeg lame
Arch, Manjaro
Once you have installed FFMPEG and LAME, restart Audacity. It will automatically try to detect them.
If your FFmpeg or LAME installation didn't get detected, you'll need to tell Audacity where to find it. To do this:
Go to Edit > Preferences > Libraries
Click on the Locate... button of the relevant library.
If a "Success" message appears, Audacity has successfully found the library. You can click No as Audacity already knows where to find the library.
Note: In previous versions of Audacity, LAME was required to export MP3 files. It is now included with Audacity by default on Windows and macOS. Make sure you are using the latest version of Audacity if you're getting any LAME errors.
Note:
Audacity 3.1 and later supports avformat-55.dll, avformat-57.dll and avformat-58.dll. Audacity 3.2 and later also supports avformat-59.dll. Audacity 3.3 and later also supports avformat-60.dll. You can check which dll is in which FFmpeg release .
Use Effects > Fading > Crossfade Clips to crossfade the clips.
To crossfade between tracks, use the following steps:
Position the clips on the tracks so that they overlap in the range you want to crossfade, and select the audio in the overlapping region in both clips:
Use Effects > Fading > Crossfade Tracks to crossfade the tracks.
With Audacity 3.2 and onwards, you can easily share audio online.
With Audacity 3.2 you can quickly share audio online using the new service audio.com. To do this, simply click the Share Audio button.
You can now upload your audio by pressing Continue. If you'd like to link an existing audio.com first, you can do that by clicking Link Account.
Audacity will now prepare the track for upload and upload your audio.
Note: This may take a few minutes depending on how fast your computer is, how fast your internet connection is, and how long your audio is.
After your audio has been uploaded, press Continue. You will be taken to the audio.com website.
On audio.com you now can either create an account to use this with, or copy the anonymous link. To share the link,
Close the sign up panel,
click the share button (shown below) and
select Copy Link
You now can share your audio by sending this link to people.
Linking your audio.com account to Audacity lets you get the sharable link from Audacity itself. To link your account,
Press the Share Audio button. Note: You need to have some sort of audio present in your project for this button to work
Your browser will open audio.com
Login or sign up if you aren't yet logged in
Audacity 3.2 and onwards supports realtime effects
While Audacity doesn't yet ship with realtime effects, you can download plugins for it. Currently supported plugin formats are Audio Units (macOS only), VST3, VST, LV2, and LADSPA. We have collected some plugins which we know to work on but you can find many more across the web. Once you install the plugins, they should be detected by Audacity once you restart it, if not, see the installation instructions.
You can add realtime effects using the following steps:
Note: Realtime effects always apply to an entire track. Since they're calculated realtime, they won't change the source waveform.
You can change the effect settings by clicking on the effect's name. This will open a settings window, often with a graphical interface which looks nothing like Audacity itself. You still can interact with the main Audacity window while the effect settings are open.
You can press the blue power button next to an effect (or the entire effects stack) to bypass it, causing it to be not applied to your audio.
It generally is not necessary to apply the effect stack. The stack is automatically applied when .
That said, you can apply the effect stack to the waveform by first selecting the track and then going to Tracks > Mix > Mix and Render.
The setup program may return one of the following exit codes:
0
Setup was successfully run to completion or the /HELP or /? command line parameter was used.
1
Before returning an exit code of 1, 3 or 4 an error message explaining the problem will normally be displayed.
Future versions may return additional exit codes, so applications checking the exit code should be programmed to handle unexpected exit codes gracefully. Any non-zero exit code indicates that Setup was not run to completion.
If you see an error when importing an MP3 file, it can have the following causes:
Your file isn't using the MP3 codec, but instead is using a codec associated with another file extension (for example, the Advanced Audio Codec (aac) usually is found in .m4a files, and PCM Wave is usually found in .wav files). A true MP3 file will show MPEG Audio, Version 1, Layer 3.
To solve this error, you can use MediaInfo to find out what the actual codec used in the file, and change the file extension accordingly (for example rename the audio.mp3 file to audio.m4a).
Your file is partially broken (Huffman Data Overrun). This is a bug with Audacity versions 3.1.3 and earlier, and you can fix it by of Audacity.
Your file is fully broken. If it can't be opened in Audacity, or anywhere else, your file might just be broken. This itself may have several reasons:
If you just recently downloaded it from the internet, you may want to try downloading it again - in case there was a transmission error.
If you just created it yourself, it might be that there was a write error. If possible try saving the file again, re-installing the app that was used to create it, or using a different app to create it.
There can be several reasons for this. Some things to try:
If using a wired headphone, make sure that the wire is plugged in and that the plug is clean.
Make sure that the headphones are selected in the Audio Settings output. Note: On some devices, the internal card - usually called something among the lines of "HD Audio" are handling both internal speakers and headphones, depending on which is plugged in. You may need to select this option anyway even if it says "Speaker" instead of "Headphones"
If you connected the headphones after starting Audacity, you may need to go to Transport -> Rescan Audio Devices to make them show up in the Audio Setup list.
This page is an overview of prominent new functionality that has been introduced in Audacity 3.0.4
Version 3.0.4 is a hotfix release.
Fixed a bug with envelope points, which could multiply uncontrollably and cause Audacity to crash. In particular:
: Envelope points are multiplied when using Filter Curve EQ or Graphic EQ
Setup failed to initialize.
2
The user clicked Cancel in the wizard before the actual installation started, or chose “No” on the opening “This will install…” message box.
3
A fatal error occurred while preparing to move to the next installation phase (for example, from displaying the pre-installation wizard pages to the actual installation process). This should never happen except under the most unusual of circumstances, such as running out of memory or Windows resources.
4
A fatal error occurred during the actual installation process.
Note: Errors that cause an Abort-Retry-Ignore box to be displayed are not fatal errors. If the user chooses Abort at such a message box, exit code 5 will be returned.
5
The user clicked Cancel during the actual installation process, or chose Abort at an Abort-Retry-Ignore box.
6
The Setup process was forcefully terminated by the debugger (Run | Terminate was used in the Compiler IDE).
If you had the file on your computer for a long time and it worked in the past, it might be that your hard drive is starting to fail.
In the "Locate FFMPEG" dialog, click Browse... to locate the avformat-*.dylib from the FFmpeg folder you downloaded/installed elsewhere.
Once you've found it, click Open, then OK and OK again to close the preferences.
In case of FFMPEG: In the "Locate FFmpeg" dialog, click Browse... to locate the libavformat.so.* from the FFMPEG folder you downloaded/installed elsewhere. In case of LAME: In the "Locate LAME" dialog, click Browse... to locate the libmp3lame.so that you downloaded/installed elsewhere.
Once you've found it, click Open, then OK and OK again to close the preferences.
Different versions of FFmpeg may have different codecs enabled in them. In particular, AMR (narrowband) is not featured in the recommended installer.
/bin/bash -c "$(curl -fsSL https://raw.githubusercontent.com/Homebrew/install/HEAD/install.sh)"brew install ffmpegsudo pacman -Syu ffmpeg lame
Note:
Audacity 3.1 and later supports avformat 55, 57 and 58. Audacity 3.2 and later also supports avformat 59. Audacity 3.3 and later also supports avformat 60.
Make sure to download or build the shared versions (with .dylib's) as only those can be used by Audacity.
Different versions of FFmpeg may have different codecs enabled in them. In particular, AMR (narrowband) is not featured in the recommended installer.
Caution: Audacity supports FFmpeg's libavformat in version 55 (all Audacity versions), 57 and 58 (Audacity 3.1+), 59 (Audacity 3.2+) and 60 (Audacity 3.3+). If your distribution ships with a different version, it may not get detected, or may not work correctly. In that case, you may need to uninstall FFmpeg again and make a shared build of a supported version from source.
Click on "Link audacity".
You may see a popup asking you whether you want to open in Audacity. Click the option that opens Audacity
All uploaded audio is private by default. Only people with access to the link can listen to it.


With the release of Audacity 3.0.0 the project file structure of Audacity was changed significantly with the entire project contained in a single unified database file.
If you have already updated to any 3.x version you should already be aware of this.
But if you are updating from any earlier 2.x Audacity version please read Updating from Audacity 2.x to Audacity 3.x.
Audacity 3.x can usually open AUP files created in older 2.x.x versions of Audacity, but saving the project in 3.x will prevent it opening again in Audacity versions prior to 3.0.0.
Note that this will leave behind the old AUP file and its associated _data folder which you will probably want to delete to recover disk space.
Audacity version 3.x should be able to open projects from Audacity 1.1 onwards - but not from 1.0
Tip: If you want to completely remove an effect from the stack, press the triangle next to the effect name and select "No Effect".
Caution: When selecting several tracks at once, the Mix and Render option will mix all tracks together.


You can download various plugins here:
Most plugins get automatically activated once you install them on your system.
Caution:
64-bit Audacity can only run 64-bit plugins, and 32-bit Audacity can only run 32-bit plugins.
If a plugin doesn't get found by Audacity, or doesn't come with an installer, move the plugin files to one of the following locations:
You can access the Common Files folder quickly by hitting 🪟 WINDOWS key + R to launch Run and typing %ProgramFiles%\Common Files
VST2: C:\Program Files\Common Files\VST2 or C:\Program Files\Steinberg\VSTPlugins
VST3: C:\Program Files\Common Files\VST3
LV2: C:\Program Files\Common Files\LV2
Note: Always copy the complete .lv2 folder
LADSPA: C:\Users\<username>\Appdata\Roaming\audacity\Plug-ins\ Note: You can quickly access this folder by hitting 🪟 WINDOWS key + R to launch Run and typing %AppData%\audacity\Plug-ins
Vamp: C:\Program Files\Vamp Plugins\
Nyquist: See below
All Plugins can be installed per-user (~/Library/Audio/Plug-Ins/...) or system-wide (/Library/Audio/Plug-Ins/...). In following, only the system-wide path is named
Audio Unit: /Library/Audio/Plug-Ins/Components/
VST2: /Library/Audio/Plug-Ins/VST/
LV2: ~/.lv2, /usr/local/lib/lv2 (for 32-bit) or /usr/local/lib64/lv2 (for 64-bit)
Note: Always copy the entire .lv2 folder
VST2: ~/.vst or /usr/local/lib/vst
To install a Nyquist Plugin, follow these steps:
Download the plugin(s) in question.
Open Audacity, and go to Tools > Nyquist Plugin Installer
Click Browse and locate your downloaded plugin(s)
Go to Tools > Plugin Manager
Select the plugins or effects you want to deactivate
Click Disable.
You can adjust volume and panning per track on the left-hand side of any track:
Note: If you collapse a track or make it vertically smaller, Audacity will hide the pan and volume sliders from view. To see them again, expand the track by dragging down on it's lower edge.
You can access the Mixer Board via View > Mixer Board.
This shows all track controls side-by-side, with a volume slider on the left per track, as well as per-track volume meters.
By default, the icon for each track is the Audacity logo, but it can be changed if the track name contains the following keywords:
acoustic piano, acoustic pno = acoustic piano
back vocal, back vox, bg = backing vocal
electric piano, electric pno, key = electronic keyboard
loop = loop track
sax = saxophone
synth = synthesizer
trumpet, horn = generic brass instrument
turntable = record player
vibraphone, vibes = vibraphone
vocal, vox = lead vocal
acoustic guitar, acoustic gtr = acoustic guitar
electric bass, bass, bs = electric bass guitar
electric guitar, guitar, gtr = (standard) electric guitar
clap = handclaps
drums, dr = drum kit
kick = kick drum
Once you have your changes to mixing, panning and other real-time effects final and want to apply them onto the waveform itself, you can render the mix using Tracks > Mix > Mix and Render. This replaces all selected tracks with the mix. If you have used many tracks and real time effects, this may considerably improve performance.
Tutorials are an awesome way to help out Audacity users. So if you know how to use Audacity, you might be just the right person to teach others! You can either write guides, or make videos.
Go to to get editor access to this site
Go to to get access to the Plugins site
Audacity welcomes contributions to both Audacity 3.x and , whether it's a small spelling correction or an entirely new guide. If you're not sure what to start with, check out some good first issues:
Gitbook works a bit like a wiki in that you can edit all pages freely, but unlike a wiki, it uses git's "everyone has their own branch" principle. That is to say that the changes you make are independent of everyone else's changes, and won't show up on the main (live) website until the branches are merged.
To some degree, this means that you can do whatever you want in your branch. That said, there's some things which make things easier for everyone involved:
Best practice
Do one task per branch. Want to make a new guide on a new feature? Make a new branch. Want to remove all instances of the oxford comma? Make another branch. You can click the branch icon in the top bar to make new branches.
Doing so makes it easier to understand what your changes are exactly, and should one of your changes be rejected, most of your other work won't get blocked by it.
When editing on Gitbook, you can edit existing pages, but you cannot create new ones. If you'd like to make a page about a new topic, write to LWinterberg in the discord server. You also can hand in Markdown files or Word documents to him directly to add. This restriction does not apply when Editing through GitHub, however, there are other technical oddities when editing through GitHub.
Video tutorials are highly appreciated as part of a guide. You can upload them to YouTube (or Vimeo/Dailymotion/...) and embed them in your guides, or in other people's guides, like this:
We have some requirements for which video tutorials are accepted into Audacity Support pages (see the for more info)
Audacity 3.1.2 was released on 16. Nov 2021.
Audacity 3.1.2 is a hotfix release for Audacity 3.1.
It fixes the following bugs:
Fixed UTF8 support in clip titles #2135
Fixed data loss on joining clips
Fixed a crash with exporting resampled tracks
Fixed a crash when opening projects with very small double values
Windows
Audacity 3.1.x requires the CPU to support the instruction set which should be available on any Intel hardware produced after 2001 and any AMD hardware produced after 2003.
To check what SSE levels your CPU supports, you can install .
If your hardware only supports SSE, you may download Audacity 2.0.6 see the page on the Audacity Website.
macOS / Mac OS X
Audacity 3.1.x is for Intel Macs running OS X 10.7 and later and macOS.
There are legacy versions for older OS X at .
Linux
Linux support is tested on Ubuntu Linux.
Other Linux distributions should work, but aren't tested by the Audacity team.
Audacity 3.2.1 was released on 05 Oct 2022
This is a patch release for Audacity 3.2. It fixes some bugs.
#3686 Fixed Audacity crashing on startup on some systems.
#3694 Fixed a crash when applying Waves Berzerk Distortion Mono to a mono track.
Fixed a freeze when very quickly starting and stopping playback.
macOS: Homebrew FFmpeg installs are now found automatically.
macOS: Fixed Melda VST Plugin UI.
Building with VST3 support is now possible without Conan.
A full list of changes can be found .
Windows
Audacity 3.2 supports Windows 10 & 11
Windows Vista, 7 and 8.1 should still work, but are no longer tested.
Downloads for older versions are available on the page on the Audacity Website.
macOS / Mac OS X
Audacity 3.2 supports OS X 10.9 and later, and macOS.
There are legacy versions for older OS X at .
Linux
In addition to the traditional update path via package managers, Audacity 3.0.3 and onwards are distributed as an AppImage. The AppImage gets updated at the same time as the Windows and macOS versions, so if you collaborate with users on those platforms, you may want to use the AppImage over your distribution's package manager.
Linux support is tested on Ubuntu 20.04.
Other Linux distributions should work, but aren't tested by the Audacity team.
Audacity 3.1.1 was released on 11. Nov 2021.
Audacity 3.1.1 replaces all previous versions.
This is a hotfix release. It fixes the following bugs:
Fixed FFMPEG imports only importing the left channel
3.1.x does not support Windows XP.
You may try 2.2.2 on XP, but it is unsupported.

There are several ways to contribute to Audacity. All of them tremendously help out other Audacity users.
Changelogs and release notes for historic versions of Audacity
Audacity is being developed on Github. Most information necessary to contributing code can be found there, such as building instructions.
Note that Audacity currently is undergoing major restructuring. As such, we can't promise a swift review or merge of any pull requests you make.
As the codebase is over 20 years old, it's not massively beginner-friendly (though this should get better once the refactor is complete). If you are new to C++, you may want to try doing something else instead first - developing a plugin might be an idea.
Pages under this section are just stubs. Feel free to work on them. Check out the Style Guide and Making Tutorials and User Guides for more info
We maintain a list of free VSTs and similar plugins on plugins.audacityteam.org. You can find, test and add plugins to the list.
To do this, you can get access to the plugins space via https://www.audacityteam.org/gitbook-plugins and then edit the relevant sections.
Exact details can be found here: https://plugins.audacityteam.org/contributing/adding-plugins-to-this-site
VST3: /Library/Audio/Plug-Ins/VST3/
LV2: ~/.lv2 or /Library/Audio/Plug-Ins/LV2,
Note: always copy the entire .lv2 folder
Vamp: /Library/Audio/Plug-Ins/Vamp
Nyquist: See below
VST3: ~/.vst3 or /usr/local/lib/vst3
LADSPA: ~/.ladspa or /usr/local/lib/ladspa
Vamp: ~/.vamp or /usr/local/lib/vamp
Nyquist: See below
Restart Audacity.
The plugin should now be available in the corresponding Generate, Effect or Analyze menu.
Click OK to close the Plugin Manager and save your settings.
"Instrument" versions of plugins (VSTi, LV2i) are not supported.
Macros (formerly known as Chains) let you chain together multiple commands to automate repetitive tasks.


Changelogs and release notes for current versions of Audacity
Fixed a crash with detach at silences #2072
Fixed clip name corruption when applying effects to adjacent clips #1889
Fixed a crash with the time shift commands #2061
Fixed custom themes not working #2043
Other than that, this release is identical to Version 3.1.0.
Windows
Audacity 3.1.x requires the CPU to support the SSE2 instruction set which should be available on any Intel hardware produced after 2001 and any AMD hardware produced after 2003.
To check what SSE levels your CPU supports, you can install CPU-Z.
If your hardware only supports SSE, you may download Audacity 2.0.6 see the Legacy Windows page on the Audacity Website.
3.1.x does not support Windows XP.
You may try 2.2.2 on XP, but it is unsupported.
macOS / Mac OS X
Audacity 3.1.x is for Intel Macs running OS X 10.7 and later and macOS.
There are legacy versions for older OS X at http://audacityteam.org/download/legacy-mac/.
Linux
Linux support is tested on Ubuntu Linux.
Other Linux distributions should work, but aren't tested by the Audacity team.
string, violin, cello = generic stringed instrument
perc = percussion
snare = snare drum
tambourine, tambo = tambourine
Caution: When rendering, all tracks are added onto each other, which may cause clipping. If this happens, undo the mix and lower the volume for all of your tracks.
Best Practice: If you have a several stereo tracks, but don't need a stereo-effect for them (ie. any left/right panning), consider mixing down to mono using Tracks > Mix > Mix Stereo Down to Mono. Exporting a mono track to a lossy format (like MP3) will let you have a higher quality at the same bitrate, or let you use a lower bitrate (and thus lower file size) at the same bitrate.
Only submit complete pages. Your progress is saved automatically, so if you want to call it for the day, simply close the page and continue the next day. If you accidentally hit "submit", simply start editing again to convert your branch to a draft branch again.
Be aware of the others, to avoid duplicate work. You may connect with other editors in our discord servers.
Follow the Style Guide, to give this entire site a somewhat uniform style.

Any page of both support.audacityteam.org and plugins.audacityteam.org can be edited either on Gitbook (see Writing Tutorials and User Guides for instructions) or using Markdown syntax on GitHub.
Note: Various formatting options available in Gitbook cannot be previewed on GitHub and most local Markdown editors. Be aware of the differences between
(plugins/support.audacityteam.org)
A link for GitHub is shown either on the right-hand side or in an overflow menu of any page:
Once you are on GitHub, you will see a pencil in the top right of the file.
You now can make your changes to the page.
Best Practice: Frequently switch between the Code and Preview tabs in GitHub to get a general sense of what your edit will look like.
Also, if you haven't already, now is a great time to familiarize yourself with the .
Once you are done, press Propose Changes
This brings you to a page where you can review your changes. If you are satisfied, click Create Pull Request.
After you click "create pull request", it will show up on and await review by an Audacity team member.
You can edit Markdown in any text editor. More advanced editors like may show useful shortcuts and visualizations for easier and faster editing, but in principle, even the simplest text editors like Windows Notepad can be used to create them.
To get started, first clone the repository, either using git clone by clicking the code button on and opening it in GitHub Desktop
Once it's cloned, you'll find the files of support.audacityteam.org in the main branch, and the files of plugins.audacityteam.org in the plugins branch. Any additional branches have been split off from the main branch to preserve documentation for previous versions of Audacity.
Outside from the , there are some more technical things you need to be aware of:
The sidebar menu is handled through , not the file structure itself. If you want the page you created to show up in the sidebar, you will need to update this file accordingly. That said: Try to match the structure of SUMMARY.md with the folder structure.
While you technically can work directly in your fork's main/plugins branch, it is highly recommended to make a new branch based on upstream/main or upstream/plugins instead for your changes. This way, you can always fast-forward merge the latest changes into your fork.
Using the Audacity Project Tools to recover corrupted projects
This article addresses the following error codes in Audacity:
Error code 11
Error code 13
Error code 101
"Audacity failed to read a file in C:" (or D:, E:, ...)
Make sure you use the latest version of Audacity. See for more information.
Sometimes, just opening the file in the latest version automatically recovers the project. If not, proceed with the following steps:
First, download the latest version of the Audacity Project Tools:
After downloading, follow the instructions relevant to your system. Note: macOS is not supported yet.
In your Downloads folder, create a new sub-folder "AudRepair".
Unzip the audacity-project-tools zip which you downloaded
Move the two .exe files from the unzipped folder into AudRepair.
Audacity 3.0.4 was released on 24. Aug 2021.
Audacity 3.0.4 replaces all previous versions.
This is a hotfix release that fixes a bug with envelope points, which could multiply uncontrollably and cause Audacity to crash. In particular:
#1476: Envelope points are multiplied when using Filter Curve EQ or Graphic EQ
: Filter Curve EQ will crash if there is an envelope point outside of the selection
This fix re-introduces an earlier, but way less destructive bug:
/ : Some effects delete Envelope Control Points, or do not move them when timeline changes
Other than that, this release is identical to Version 3.0.3.
Windows
Audacity 3.0.4 requires the CPU to support the instruction set which should be available on any Intel hardware produced after 2001 and any AMD hardware produced after 2003.
To check what SSE levels your CPU supports, you can install .
If your hardware only supports SSE, you may download Audacity 2.0.6 see the page on the Audacity Website.
macOS / Mac OS X
Audacity 3.0.4 is for Intel Macs running OS X 10.7 and later and macOS.
There are legacy versions for older OS X at .
Linux
Linux support is tested on Ubuntu Linux.
Other Linux distributions should work, but aren't tested by the Audacity team.
Audacity 3.2.5 was released on 1 Mar 2023
This is a hotfix release. It fixes the following bug:
Windows
Audacity 3.2 supports Windows 10 & 11
Windows Vista, 7 and 8.1 should still work, but are no longer tested.
Downloads for older versions are available on the page on the Audacity Website.
macOS / Mac OS X
Audacity 3.2 supports OS X 10.9 and later, and macOS.
There are legacy versions for older OS X at .
Linux
In addition to the traditional update path via package managers, Audacity 3.0.3 and onwards are distributed as an AppImage. The AppImage gets updated at the same time as the Windows and macOS versions, so if you collaborate with users on those platforms, you may want to use the AppImage over your distribution's package manager.
Linux support is tested on Ubuntu 20.04.
Other Linux distributions should work, but aren't tested by the Audacity team.
TODO


If Audacity shows you an error message when trying to record or playback audio start using Transport > Rescan Audio Devices to update the list of devices.
After rescanning audio devices try selecting a different host using the Audio Setup button and make sure the desired device is selected as your Recording or Playback Device
If the error is still present try changing the Project Rate to a different value:
Verify that the Recording Meter Toolbar and the Playback Meter Toolbar sliders are set to an appropiate level. Place the mouse cursor over the meter and Audacity will display the corresponding level
This page lists Audacity error codes and provides some troubleshooting steps on how to fix them.
This error indicates a problem with the hardware used for playback, whether it is permissions, drivers, connections, or if you ask the device to do something it cannot do. You can attempt the following steps to resolve it.
This error indicates a problem with the hardware used for recording, whether it is permissions, drivers, connections, or if you ask the device to do something it cannot do. You can attempt the following steps to resolve it.
These errors can occur when attempting to load a damaged .aup3 project file. Damaged project files can be recovered as described in the following article.
This error indicates that the device that's being attempted to use is not valid, for example:
Each effect in Audacity comes with a predefined set of values that you can change and save according to suit your needs and workflow.
When you select an effect to apply to your audio (for example Effect > Noise Removal & Repair > Noise Gate...) Audacity will show you the effect settings window where you can change the different values according to your needs.
After you find the settings that best suit your needs you can use the Presets & settings button to save your settings for future use:
Click the Presets & settings button and select Save preset...
Answering user questions is the most direct way of helping users. It also will net you the most "thank you"s
If you know Audacity well, but don't want to , you can help users out directly. The most active communities in this regard are:
The ,
the , and
You can reset Audacity by going to the following menus:
To reset the toolbars only: View -> Toolbars -> Reset Toolbars
To reset everything: Tools -> Reset Configuration
If you cannot open Audacity or want a more thorough cleanup, you can also delete the configuration files manually. They can be found in the following locations:
Due to licensing restrictions Audacity cannot be distributed with built-in support for ASIO. However You can build Audacity for your personal use and include ASIO support.
Audacity can record and playback audio on your Windows PC using one of the following three alternative interfaces:
MME
Windows DirectSound
Audacity 3.2.4 was released on 27 Jan 2023
This is a hotfix release. It fixes the following bug:
# Fixed the meters not retaining size
A full list of changes can be found .
Windows
ASIO (Audio Stream Input / Output) is an additional proprietary interface to record and playback audio in Microsoft Windows. ASIO bypasses the Windows audio mixing components to provide lower latency direct communication between computer audio software and hardware. Most audio recording interfaces manufacturers provide a driver to support ASIO.
ASIO supports 24-bit sampling which is only otherwise available using Windows WASAPI or WDM-KS (Windows Driver Model Kernel Streaming). 24-bit sampling allows greater dynamic range, lower theoretical noise floor and greater resolution at lower audible volumes.
An unmixed ASIO output is "bit identical" to the original source.
Multiple physical input and output channels of the hardware are accessed over one single device.
Windows DirectSound interface protocol support multi-channel recording on some sound devices, but not the very low latencies that are possible on ASIO.
3.0.4 does not support Windows XP.
You may try 2.2.2 on XP, but it is unsupported.
the Audacity subreddit.
Audacity 3.2 supports Windows 10 & 11
Windows Vista, 7 and 8.1 should still work, but are no longer tested.
Downloads for older versions are available on the Legacy Windows page on the Audacity Website.
macOS / Mac OS X
Audacity 3.2 supports OS X 10.9 and later, and macOS.
There are legacy versions for older OS X at http://audacityteam.org/download/legacy-mac/.
Linux
In addition to the traditional update path via package managers, Audacity 3.0.3 and onwards are distributed as an AppImage. The AppImage gets updated at the same time as the Windows and macOS versions, so if you collaborate with users on those platforms, you may want to use the AppImage over your distribution's package manager.
Linux support is tested on Ubuntu 20.04.
Other Linux distributions should work, but aren't tested by the Audacity team.
Windows: C:\Users\<yourname>\AppData\Roaming\audacity\
macOS: ~/Library/Application Support/audacity/
Linux: ~/.config/audacity/
Additionally, the XDG folders ~/.cache/audacity, ~/.local/share/audacity and ~/.local/state/audacity are used on Linux.
You can delete all contents of the folder to get Audacity back to "factory settings". Alternatively, you can also only delete certain elements of it:
audacity.cfg is responsible for all preferences
pluginregistry.cfg contains a registry of all plugins and whether they can be used.
pluginsettings.cfg contains last used settings of effects as well as user presets.
Additionally, you may find some other files and folders there, eg. for macros, custom themes or plugins. These can also be deleted though, typically deleting the audacity.cfg and pluginregistry.cfg is enough in most troubleshooting scenarios.
Hint: These folders usually are hidden by default. You may need to show hidden files, or access their path directly, to access them.
When updating your fork's side-branches to the latest state of main, rebase it if possible.
The reverse isn't true however: All Github-flavored markdown is supported in Gitbook.
Caution: Avoid using office suites like Microsoft Word, LibreOffice or Google Docs to edit Markdown. They tend to use very different formatting options, which don't transfer to plain text. As a rule of thumb, if it doesn't save in .txt or .md, it's not the right app to use as a Markdown editor.
Note: You will need to use some form of Git to make a pull request, so just downloading the ZIP will not work.
Further information on using git with VScode can be found in the VSCode docs.


Copy your defective .aup3 project file into the AudRepair folder.
Rename the file to broken.aup3.
Press Windows-key + R, and type cmd. A (black) cmd screen will appear.
Navigate to your AudRepair folder by typing cd Downloads\AudRepair and pressing Enter.
Type dir and press Enter. The following three files should be listed: audacity-project-tools.exe, broken.aup3, and sqlite3.exe
Type audacity-project-tools -drop_autosave broken.aup3 and press Enter.
The message "Project requires Audacity 3.0.0" will appear.
When the command prompt (C:\Users\(yourname)\Downloads\AudRepair\>) reappears, type dir again.
If a broken.recovered.aup3 file appears, open it in Audacity.
If that file works as expected, go to File -> Save As... and save it to your usual location. The recovery process is now over, you can continue working as normal.
If that file does not appear, or is still broken, continue with the following steps:
Type audacity-project-tools -recover_db -recover_project broken.aup3 and press Enter.
The messages "Project requires Audacity 3.0.0", and "Using 'sqlite3.exe' for recovery" will appear. Later the message "Executing query #xxxx...." will appear as the rescued file is being recreated.
Note: This process can take quite a while depending on your specific machine. There is no status (or % completion) indicator, so you just have to be patient.
You should plan 15-30 minutes per GB, though it may be faster if you have a fast PC.
Keep an eye on available disk space.
Due to a glitch, sometimes a single character can appear when the program is done, eg "z". If this happens, simply press Backspace.
When the process completes, your should be able to open the "broken.recovered.aup3" in Audacity. The message "File not saved properly" will appear the first time you open the recovered project. This is normal and you can ignore this message.
If the messages "Invalid block xxxx: Block not found", check to see if some audio was silenced - typically near your most recent edits. Usually these messages are spurious.
In your downloads folder, create a new sub-folder called "AudRepair".
Unzip the audacity-project-tools ZIP file that you downloaded
Move the unzipped files into AudRepair
Copy your defective .aup3 project file into AudRepair
Rename the .aup3 file to broken.aup3
Open the Terminal or Konsole program.
Navigate to the AudRepair folder by typing cd ~/Downloads/AudRepair and pressing Enter
Type ls and press Enter. **** The following three files should be listed: audacity-project-tools, broken.aup3 and sqlite3
Make the audacity project tools and sqlite3 executable by typing chmod +x audacity-project-tools sqlite3 and pressing Enter.
Type ./audacity-project-tools -drop_autosave broken.aup3 and press Enter.
The message "Project requires Audacity 3.0.0" will appear.
When the command prompt (you@pc:~/Downloads/AudRepair$) reappears, type ls again.
If a broken.recovered.aup3 file appears, open it in Audacity.
If that file works as expected, go to File -> Save As... and save it to your usual location. The recovery process is now over, you can continue working as normal.
If that file does not appear, or is still broken, continue with the following steps:
Type ./audacity-project-tools -recover_db -recover_project broken.aup3 and press Enter.
The messages "Project requires Audacity 3.0.0", and "Using 'sqlite3' for recovery" will appear. Later the message "Executing query #xxxx...." will appear as the rescued file is being recreated.
Note: This process can take quite a while depending on your specific machine. There is no status (or % completion) indicator, so you just have to be patient.
You should plan 15-30 minutes per GB, though it may be faster if you have a fast PC.
Keep an eye on available disk space.
Due to a glitch, sometimes a single character can appear when the program is done, eg "z". If this happens, simply press Backspace.
When the process completes, your should be able to open the "broken.recovered.aup3" in Audacity. The message "File not saved properly" will appear the first time you open the recovered project. This is normal and you can ignore this message.
If the messages "Invalid block xxxx: Block not found", check to see if some audio was silenced - typically near your most recent edits. Usually these messages are spurious.
Caution: Make sure you have plenty of space left on your computer. You will need roughly 4 times the size of your .aup3 for a successful recovery. If you have a 10GB file, you should have at least 40GB available.
Note:
There is no guarantee that all content will be able to be restored, or any at all.
Some additional commands for the Audacity Project Tools can be found on Github.
If a section of audio is missing, you may need to manually re-record it. See for more information.
Some operating systems may block access to the microphone for untrusted apps. You need to allow microphone access for Audacity in order to record.
Open Settings
Go to Privacy or Privacy & Security
Go to Microphone
Toggle on Microphone Access, Allow apps to access your microphone, and, if available, Let desktop apps access your microphone
On your Mac, choose Apple menu > System Preferences then click Security & Privacy in the left-hand menu and the click the Privacy tab.
Click Microphone in the left-hand menu.
Select the checkbox next to an application (Audacity) to allow it to access the microphone.
If you have installed Audacity as a Snap or Flatpak, you may need to go to the System settings > Application settings
If your microphone is not listed under the Audio Setup > Recording Device dropdown, select Transport > Rescan Audio Devices to refresh the list of recording devices. If it still doesn't appear after rescanning it could be disabled in your operating system audio settings. You need to enable it in order to record.
Open the Sound control panel and select the Recording tab
Make sure that Show Disabled Devices is selected
Look for your microphone and Enable it
After enabling your microphone use the Audacity Transport - Rescan Audio Devices option to update the list of available devices.
It is recommended to update drivers for audio devices you are using. The way to do that depends on the specific device but in general it is recommended to visit the manufacturer support website.
Some audio devices install a complementary application that provides options to check for firmware and driver updates.
Windows users can try to manually update drivers using Device Manager, before looking for drivers on the Internet. This is easiest, but may not necessarily find the latest or most appropriate drivers.
Windows 10 / Windows 11: Right click the Start button and select Device Manager
Windows 8 / Windows 7 / Windows Vista: Click Start > Control Panel then using the "Category" view, click "Hardware and Sound", find "Devices and Printers" near the top of the screen then click on "Device Manager" (the last item in the list underneath). "Icons" views have a direct link to Device Manager, as does "Classic View" on Windows Vista only.
Then expand Sound, video and game controllers by clicking on the + sign, right-click over the sound device and click Update driver.
After the update (even if more recent drivers were not found), you should right-click over the device again, click Properties and then on the Driver tab to check the "Driver Provider". You don't want drivers from Microsoft - in most cases these are only generic drivers, not specifically matched to your hardware. This often leads to problems such as not being able to select the correct input, or recordings not being made correctly. These must be replaced with drivers made by the manufacturer of your hardware, so they are correctly matched to that hardware.
If you have now got updated non-Microsoft drivers, try them and see if your recording problem is solved.
Use the Recording Meter Toolbar to check the audio level that Audacity is receiving from the selected Recording Device. Click on the microphone icon to Start/Stop monitoring the audio level.
If there is no level present on the meter check if the microphone is muted in your operating system audio settings:
You can also check if your device provides some physical control to mute or set the audio level.
If the controls on your device are properly set you should check the connections between the computer and the recording device.
Due to a Windows limitation, you cannot use WASAPI on a USB device while listening back on an onboard audio card. Use MME or DirectSound instead, or use the USB device for both the input and output (if possible).


The device has a faulty or loose connection
The device itself is faulty or not a real audio device.
This error can also occur when you are trying to record a number of channels that is not supported in the current configuration
This error can also occur when using Audacity on Windows with Windows WASAPI as the Host if the selected recording device is being used exclusively by another application. Some applications that could make use of the recording device exclusively are ASIO4ALL, Voicemod (when configured to do so) or Voicemeeter (when configured to do so).
You can attempt to fix this issue with the following methods:
Use a different USB port and USB cable. This will resolve the issue if the fault was in the cable.
Use a different audio host. Sometimes WASAPI works when MME doesn't, sometimes it's the other way round.
Use a different number of channels. For example, some Realtek only work when recording in Mono, while some others only work in Stereo when recording a (loopback) stream.
This error can indicate an unsupported sample rate. Double-check that both your OS settings and the Audacity project rate are set to a supported sample rate (usually 44100 Hz or 48000 Hz).
This error can also occur when using Audacity on Windows to record a track while listening another existing track (also known as overdubbing) with Windows WASAPI as the Host if the sample rate of the recording device is different than the sample rate of the playback device. If possible set the same sample rate for your devices or use MME as the Host.
This error can also occur when you are trying to record a number of channels that is not supported in the current configuration To fix this, you can do the following:
Use a different audio host. Sometimes WASAPI works when MME doesn't, sometimes it's the other way round.
Use a different number of channels. For example, some Realtek only work when recording in Mono, while some others only work in Stereo when recording a (loopback) stream.
This error means "something is wrong", most commonly
A lost connection to a USB audio device
Missing microphone permissions from the operating system.
Your device is unable to playback other tracks while recording. Turning off Overdub via Transport -> Transport Options may fix this.
You can try the Common troubleshooting steps, or attempt any of the other workarounds of this page.
This error occurs when the file you're trying to open has no decoder available. You can attempt the following things to fix it:
Install FFMPEG. FFMPEG allows you to open most kinds of media files. Read more: Installing FFmpeg
Check if the file you're trying to open actually is what it says on the tin. For example, some lower-quality programs name any audio file *.mp3, regardless of whether it actually is an MP3 file. Read more: Can't open an MP3 file
Check if your file is an actual audio file. Some files which are used to output audio in certain programs don't actually contain sound themselves, but are instructions for for the program to make some sounds. Try to see if the program used to create the file has an export button. If not, you can also try recording desktop audio while playing back the file in another program. Read more:
Check if you have accidentally created custom import rules. In Edit -> Preferences -> Extended Import (on macOS: Audacity -> Preferences -> Extended Import), make sure that you have not created any custom rules. If there are any rules, you can safely delete the rules.
Import the audio as RAW. This only works on uncompressed audio. You can do so via File -> Import -> Import raw data...
This is caused by a corrupted audacity.cfg file, such as when upgrading from Audacity 3.1.3 to Audacity 3.2. You can solve this issue by upgrading to Audacity 3.2.1.
This is caused by missing realtime effects. You can replace any missing effects from the effects sidebar.
If you are on a low-end machine, this may be caused by insufficient resources, specifically memory.
This also can happen if you assign yourself a static IP in the hosts file. If that's the case, simply commenting out the assignment may solve this.
This is caused by an unexpected system state. Rebooting the computer resolves it.
If your issue isn't listed here, or the troubleshooting steps aren't working for you, feel free to ask in our communities:
Audacity currently looks for plugins in absolute paths. This means that if you open a project that was created on a different computer, Audacity will continue to check for the plugins in the exact same locations as they were on the old computer.
After saving your presets you can recall them the next time you need to apply the same effect. Click the Presets & settings button, select User Presets... and select the name of the previously save presets:


To restore the factory default settings select Presets & settings > Factory Presets > Defaults
Audacity has several methods available to change speed and tempo of audio.
Caution: Changing speed without affecting the pitch always leads to artefacts. Avoid repeatedly applying these effects.
To change the speed while preserving the pitch, select the audio you want to apply the effect on and go to Effect > Change Tempo
Drag the slider or enter some numbers to change how much you want to speed up or slow down your audio. The controls are linked, so you just need to change the value you care about, the rest will update accordingly.
For extreme slowdowns (10x slower to thousands of times slower), you may want to use Effect > Paulstretch instead.
Note: Paulstretch is only capable of slowing down, so the stretch factor relates to how many times you want to slow down your audio.
The time resolution decides on whether the algorithm will focus on frequencies and pitch at the expense of rhythm (high time resolution), or whether it will focus on rhythm at the expense of pitch (low time resolution). Generally. 0.25 is a good compromise for most music
To change speed and pitch at the same time, use Effect > Change Speed.
Unlike , the Change Speed effect keeps the waveform mostly intact, so you can use this method repeatedly without any major loss in quality.
You can change the speed of an entire project over time using Time Tracks. To add one, go to Tracks > Add New > Time Track. You only can have one time track per project.
Then click on the blue line and drag it upwards or downwards to change the speed at that time. Every time you click, a new control point is added, allowing you to change the speed over time
If you want to preview your audio at a faster or slower rate than normal, but without affecting the final product, you can use the Play-at-Speed toolbar
To use it, drag the slider to the desired speed (between 0.01x and 3x) and then click the small play button next to it to playback your audio at that speed. You can use the normal stop and pause controls to stop/pause playback.
There are two ways to get your work out of Audacity: Saving the project, and exporting audio.
You can save projects using the File > Save Project menu. A saved project (.aup3) has the most information about your project available, but can only be opened in Audacity. There are three options available, each useful for a different use case:
Save Project (Ctrl+S/Cmd+S) will save your current project. If you save for the first time, you may need to specify where to save it to.
Save Project As... will save your project in a new place and continue editing on it, should you want the original project to remain untouched.
Backup Project... will save the current state of the project in a new file, but won't switch to it.
You can export your project into an audio file using the File > Export menu. Exported audio (.mp3, .wav, .ogg, and more) can be opened with a wide variety of programs, and uploaded to some social media, but may have worse quality and lose some Audacity-specific information.
In the File > Export menu, you'll see a few different options:
Export as MP3, Export as WAV and Export as OGG will export your project into the selected format.
Export Audio... (Ctrl+Shift+E/Cmd+Shift+E) will provide you options to export to more uncommon formats, such as FLAC, M4A, AC3, WMA, AMR, MP2 and custom FFMPEG exports.
There are also two additional options which export non-audio data:
Export Labels... will export labels if you have any.
Export MIDI... will export the currently selected note track as a MIDI or Allegro file. You can only export one note track at a time.
Audacity 3.0.5 was released on 29 Sep 2021.
Audacity 3.0.5 replaces all previous macOS versions.
This is a hotfix release that fixes a bug on macOS that could corrupt project files when being opened via cmd+o on languages where the decimal separator wasn't a dot.
Other than that, this release is identical to Version 3.0.3.
Windows
Audacity 3.0.5 requires the CPU to support the instruction set which should be available on any Intel hardware produced after 2001 and any AMD hardware produced after 2003.
To check what SSE levels your CPU supports, you can install .
If your hardware only supports SSE, you may download Audacity 2.0.6 see the page on the Audacity Website.
3.0.5 does not support Windows XP.
You may try 2.2.2 on XP, but it is unsupported.
macOS / Mac OS X
Audacity 3.0.5 is for Intel Macs running OS X 10.7 and later and macOS.
There are legacy versions for older OS X at .
Linux
In addition to the traditional update path via package managers, Audacity 3.0.3 and onwards are distributed as an AppImage. The AppImage gets updated at the same time as the Windows and macOS versions, so if you collaborate with users on those platforms, you may want to use the AppImage over your distribution's package manager.
Linux support is tested on Ubuntu Linux.
Other Linux distributions should work, but aren't tested by the Audacity team.
Testing Audacity is one of the best ways to find bugs.
You can download the latest master build from https://audacityteam.org/nightly. These builds reflect the state the master branch. Anything in the master branch has passed at least a quick round of QA to validate that the features the change touched still work for the common use cases.
Before features go into the master branch, they live in pull requests. Each pull request comes with its own builds, available through the "Checks" tab inside the PR and then the "Artifacts" dropdown in the top right. Additionally, you can get builds which are still in development from https://github.com/audacity/audacity/actions. Both methods require a Github account.
Note: When testing pull requests, report any bugs regarding it as a comment inside the pull request.
When you do find something that breaks, make sure to file a bug (or comment on the pull request that introduces the bug if it's unmerged)!
Before each release, a branch is split off master named "release-x.x.x". This release branch contains all features which will be part of the next Audacity release. Bug fixes which go towards this release will be made inside this branch. You can get builds for it via ; the nightly link will continue to give you master branch builds.
During the release process we may designate certain builds as "alpha" or "beta" and release them on . This is to invite testing from a wider audience.
Audacity comes with some tools to aid you with testing.
See - these can make it easier for you to do repeated tasks.
Journaling is a feature that records all your actions and lets you replay them. This feature is currently under development and not really ready.
start Audacity in journaling mode, <<TODO: HOW??>> do a certain task, and then close Audacity again. This will generate a journal file, which you can find in <<WHERE>>.
Copy the journal file to a new folder (eg: QA-tests) and name it so that you can easily find it again.
Launch Audacity from the command line, like this:
This page is an introduction to creating background beats and audio loops from a pre-existing audio file.
Audio loops are a type of music that plays a few bars on repeat over and over. They can be created by taking a sample out of pre-existing content and looping it seamlessly.
To enable playback looping, simply click onto the loop button (1). When you do this, you'll note the blue looping region appear in the timeline (2). You can move the region and it's in and out point individually by dragging it.
Tip: You can always create a new region by dragging anywhere outside the existing region within the timeline.
When making a loop out of music, you often will be able to see repetitions in the waveform as your source material will probably contain some loop already (for example a drummer playing the same beat throughout the song). You can use these to roughly find good looping regions and position your looping region above it.
Notes:
If you're having trouble finding a good region with a stereo track, you may want to convert it to mono first: Tracks > Mix > Mix Stereo to Mono
When positioning your loop region, try to aim
To make the loop seamless, you may need to zoom in some more, using Ctrl+Scroll (Cmd+Scroll) or the magnifying glass.
Once your loop sounds right, you can select it's length in the waveform. A yellow line will appear when your cursor is lined up with the loop region properly. Once you have made the selection, you now can simply right-click > Split Clip (Ctrl+I, Cmd+I).
Once you have the clip, you can copy-paste it anywhere in your project.
Audacity 3.3.2 was released on 5. May 2023.
This is a hotfix release.
#4629 Linux AppImage fails to start.
#4637 Issues with selection and time toolbars on Linux packages.
Missing duration input in generators on Linux packages.
Potentialy extreme memory usage with Jack host.
Anonymous upload to is disabled.
Windows
Audacity 3.3 is tested on Windows 10 & 11
Windows Vista, 7 and 8.1 should still work, but are no longer tested.
macOS / Mac OS X
Audacity 3.3 is tested on macOS 12 & 13
OS X 10.9 and onwards should still work, but are no longer tested.
Linux
In addition to the traditional update path via package managers, Audacity is distributed as an AppImage. The AppImage gets updated at the same time as the Windows and macOS versions, so if you collaborate with users on those platforms, you may want to use the AppImage over your distribution's package manager.
Linux support is tested with AppImages on Ubuntu 20.04 & 22.04.
Other Linux distributions should work, but aren't tested by the Audacity team.
Audacity is not yet compatible with Conan 2.
Audacity 3.3.1 was released on 28. Apr 2023.
This is a hotfix release.
#4600 Fixed cut lines massively inflating project size.
#4612 Fixed custom project sample rates being uneditable.
Fixed crash reporting being disabled.
Audacity now shows an error if the upload to audio.com exceeds file size limits.
Fixed an error in calculating channels when uploading to audio.com.
Windows
Audacity 3.3 is tested on Windows 10 & 11
Windows Vista, 7 and 8.1 should still work, but are no longer tested.
macOS / Mac OS X
Audacity 3.3 is tested on macOS 12 & 13
OS X 10.9 and onwards should still work, but are no longer tested.
Linux
In addition to the traditional update path via package managers, Audacity is distributed as an AppImage. The AppImage gets updated at the same time as the Windows and macOS versions, so if you collaborate with users on those platforms, you may want to use the AppImage over your distribution's package manager.
Linux support is tested with AppImages on Ubuntu 20.04 & 22.04.
Other Linux distributions should work, but aren't tested by the Audacity team.
Audacity is not yet compatible with Conan 2.
The click removal effect can automatically remove clicks across an entire track.
To use it:
Select the audio you want to remove the clicks from. Tip:
Go to Effect > Click Removal
Set the threshold and max spike width. The default should work in most cases. You can preview the effect to get a feel of how it'll affect the track.
Click OK to apply the effect.
The Repair effect can be used to repair short clicks. To use it:
Select a short (max 128 samples) part of audio. Tip: You can set the selection clocks in the bottom toolbar to display start and length of the selection, and change the clocks to display samples rather than milliseconds.
Go to Effect > Repair.
In most cases, having brief amounts of silence is preferable to loud clicks, so completely muting clicks is a valid strategy if other methods fail. For this, simply select the click and press the Silence button (Shortcut: Ctrl+L / Cmd+L).
These help articles have been created by the following people:
Leo Wattenberg
Gonzalo Guzmán
(add your name here if you're editing some pages!)
Contents on this page are licensed under the license. This does not necessarily apply to embedded videos.
has been made possible by a tremendous amount of effort from the following people:
Gale Andrews
Richard Ash
David Bailes
Translators:
Carmelo Battaglia (Italian)
Leo Clijsen (Dutch)
Olivier Humbert (French)
Some of their efforts have been ported over to this site.
Audacity 3.2.3 was released on 27 Dec 2022
This is a patch release for Audacity 3.2. It adds ability to share audio publicly and fixes some bugs.
#3884 Audio can now be shared publicly on audio.com
#4040 fixed the screenshot tool
selecting audio no longer marks the project as changed
a new toolbar with cut/copy/paste buttons has been added
Plain UI for VST3 effects no longer show MIDI CC parameters
the effects sidebar no longer can fill the entire screen
A full list of changes can be found .
Windows
Audacity 3.2 supports Windows 10 & 11
Windows Vista, 7 and 8.1 should still work, but are no longer tested.
Downloads for older versions are available on the page on the Audacity Website.
macOS / Mac OS X
Audacity 3.2 supports OS X 10.9 and later, and macOS.
There are legacy versions for older OS X at .
Linux
In addition to the traditional update path via package managers, Audacity 3.0.3 and onwards are distributed as an AppImage. The AppImage gets updated at the same time as the Windows and macOS versions, so if you collaborate with users on those platforms, you may want to use the AppImage over your distribution's package manager.
Linux support is tested on Ubuntu 20.04.
Other Linux distributions should work, but aren't tested by the Audacity team.
Audacity comes with 4 themes preinstalled: Light, Dark, Classic and High Contrast. You can switch between themes by going to Edit -> Preferences -> Interface (macOS: Audacity -> Preferences -> Interface)
Once you have chosen a theme, click OK to close the preferences dialog and load the new theme.
Custom themes commonly are distributed as files called ImageCache.png. You can find some custom themes here:
To install a custom theme, place the ImageCache.png in the following folders. You may create the folders if they aren't present.
Windows: C:\Users\<username>\AppData\Roaming\Audacity\Theme\custom\
MacOS: ~/Library/Application Support/audacity/Theme/custom/
Linux: ~/.local/share/audacity/Theme/custom/
Then,
restart Audacity,
open the Preferences -> Interface page,
select Custom as the theme and
Punch-in repair of recordings is an easy and fast way to fix short sections of a recording by re-recording it.
If your audio recording broke and you immediately noticed it (for example because you misspoke your script or had to cough), it is possible to stop the recording and immediately fix the mistake by using Punch-and-roll recording. To use it:
Record as normal until you make the mistake.
Stop the recording.
This page describes some methods to try to isolate vocals in stereo tracks.
If the vocals are panned in the center of a stereo track this method can sometimes be effective by removing what is common to both tracks (that is, the vocals), leaving behind what is different (that is, the instrumentals).
Audacity includes the Vocal Reduction and Isolation effect which provides the Remove Vocals option that you can use to try to remove vocals from a stereo track.
Vocal Reduction and Isolation also lets you specify the audio frequency range for vocals (by default 120 to 9000 Hz). This can help cure the common problem where center-panned bass or Hi-hat is also removed when removing vocals.
You can also use the effect to attempt to isolate the vocals by choosing one of the Isolate Vocals options from the dropdown menu in the dialog.
Audacity can record various types of microphones and other audio devices.
You can connect your mic by plugging it into the appropriate port. In general, this means:
If you have a USB mic, plug it into a USB port.
If you have a mic with a 3.5mm jack, plug it into a mic-in port.
You can enable a more musical view in Audacity as follows:
Right-click the Timeline Ruler and select Beats and Measures.
Go to View -> Toolbars and enable Time Signature Toolbar (beta).
Apply this normalization effect to set the target loudness required by podcast platforms, television/radio programmes and some websites
Audacity provides you with two different built-in normalization effects available through the Effect -> Volume and Compression menu:
Loudness Normalization
Normalize
Normalize
Export Multiple... (Ctrl+Shift+L/Cmd+Shift+L) will let you export different parts of the audio based on either tracks or labels.
Warning: Avoid saving active projects on external drives, USB sticks, or network storage. Audacity requires fast, uninterrupted access to your storage when recording and editing.
Note: You may need to install FFMPEG to access some of these options.
Caution: Muted tracks are not exported. What you hear when playing in Audacity is what will be exported.
Matt Brubeck
John Colket
James Crook
Steve Daulton
Scott Granneman
Greg Kozikowski
Leland Lucius
Dominic Mazzoni
Edgar Musgrove
Tony Oetzmann
Alexandre Prokoudine
Peter Sampson
Martyn Shaw
Vidyashankar Vella
Bill Wharrie
Leo Wattenberg
Thomas De Rocker (Dutch)
Daniel Winzen (German)


path\to\audacity.exe -j QA-tests\yourtest.txtpath/to/audacity -j QA-tests/yourtest.txtpath/to/audacity -j QA-tests/yourtest.txtBe aware that custom themes may break from one Audacity version to the next.

You can adjust the looping region even when playback is on.
Best practice: Set your looping points at a zero crossing, where the waveform (blue line) crosses 0 (black line):
Tip: If you want to use the clip on repeat, use Effect > Repeat.

Choose a splicing point by clicking into the audio before the mistake happens. For spoken content, this should be between words so you can drop in easier. Note: All audio on the track after the splicing point will be deleted.
Start a Punch-and-roll recording with Transport > Recording > Punch and roll record (Shift+D). This will playback a couple of seconds of your recording so you can find the right rhythm and tone as before, and at the splicing point you set in step 3, it will switch to recording mode and make a crossfade.
From here on out you can continue recording as usual. If you make the same mistake again, you can stop the recording and undo (Ctrl+Z / Cmd+Z) and try again. If you make another mistake later on, you can do another Punch and Roll recording by repeating the steps above.
If your audio recording broke at one specific point in time (for example because an ambulance drove by), but you only notice it after having recorded everything, it is possible to re-record this section using punch-in repair.
To use it:
Select the bad part of the recording and silence it. You can do this by clicking the Silence Audio Selection button (found next to the undo and cut/copy/paste buttons), or by pressing Ctrl+L (Cmd+L)
Select a couple of seconds of audio before and after the bad part. With overdubbing turned on, recording will playback the recording back to you and help you match the timing.
Do the re-recording on a new track. To do this, Shift-click the record button or press Shift+R. It will automatically start recording from the beginning of your selection.
To hide the cut a bit better, a crossfade may help: Making crossfades
If your new take is slightly longer or shorter than the gap left in the original recording, you can split the clip: Splitting up clips
You can use a similar technique to continuously fix mistakes as they occur during a recording session using Latency Compensation
Best Practice:
Make sure that Overdubbing is turned on in Transport > Transport Options.
Make sure that your latency settings are correct.
Tip: You can change the amount of pre-roll audio and crossfade in the Preferences > Recording in the Punch and Roll recording section.
Best Practice:
Make sure that Overdubbing is turned on and Software Playthrough is turned off. Both settings can be found in Transport > Transport Options
Note that the end result may not be total vocal isolation or even satisfactory isolation of the vocals; it all depends on how the original recording was engineered.
To use AI models in Audacity, you first need to download the current alpha with this feature from https://interactiveaudiolab.github.io/project/audacity
Once you have installed this version, you can download and apply AI models via Effects → Deep Learning Effects.
Note: There is no reliable way of separating vocals. The methods described in the article depend on the position of the vocal track in the stereo field.
Select Split Stereo to Mono from the stereo audio track dropdown menu
After splitting the stereo track you will end up with 2 mono tracks similar to this:
Invert one of the mono tracks by selecting it and then choosing Effect -> Invert
Play back the result.
This will remove everything panned in the center, not just vocals and returns a dual mono result (both channels have the same audio). In some music this could mean removing instrumental parts. Removal of the vocals can often be incomplete leaving artifacts behind; this is especially true where there are backing vocals or where reverb (echo) has been applied as this spreads sound sources and makes them very hard to extract from each other.

Note: This is an experimental feature not yet part of the normal Audacity installation.
Deep Learning Effects are computationally very intensive. Depending on the model used and your computer, it can take several minutes to hours to apply the effect to a single song. It is highly recommended to test out whether the model is satisfactory on a short section (less than 10 seconds) before applying it to an entire track.
The exact details depend on both your exact computer model and your microphone model. Please see their respective manuals or support pages for further information. You may need adapters if your computer is missing appropriate ports.
Select the microphone to record from the list of available recording devices in the Audio Setup toolbar
You may see some unexpected devices here (for example, webcams), as well as virtual devices (software pretending to be a microphone). Choose the entry that matches the microphone you actually want to use.
You can also use the Audio Setup toolbar to select whether you'll be recording in Mono or Stereo.
Turn on the monitoring (shown below) and tap onto your mic. If you see the green bar move when tapping the mic, you have selected the correct device in the previous step.
Then try to speak in a normal volume. In general, the volume should remain in the green zone throughout (in general, between -18 and -12 dB is best).
Next, make a test recording. To start recording your voice in Audacity, simply press the red record button.
When you have made the recording, listen back to it. If everything went well, you should now hear your voice clearly and you should now be able to continue with the next steps.
If you run into trouble with any of these steps, you may find the solution here:
Once you've made your recording, make sure to save your work. This applies regardless of whether you intend on editing it later or not. Saving and exporting projects
If you want to edit your recording afterwards: Editing audio
Note: Many Laptops and Notebooks feature built-in microphones. While they may be good enough to record your voice to an intelligible standard, the recordings they produce tend to be somewhat unpleasant to listen to.
Note: Most microphones are in Mono, and Mono is generally the best choice for recordings. Only use Stereo if you do need directionality.
Caution: If your input volume is too low (below -42 dB) or too high (frequently in the red area), your audio quality will likely suffer. See this page for how to fix this:
In the Time widget, select beats or for more subdivisions, beats and 16th.
Enable Snapping, and set the snapping interval to a musical option (eg 1/4, 1/8 or 1/16).
Once you have enabled all of them, your Audacity may look something like this:
It is important to enter a tempo that matches your content, otherwise none of the features outlined above work properly.
If you're recording music on your own, try playing to a metronome to ensure you stay in tempo.
If you're using music downloaded from the web, try figuring out its tempo. In some cases, a web search for song title tempo is sufficient.
You also can download a bpm detection plugin. The features several tempo detection plugins, such as:
IBT - INESC Beat Tracker
Simple Fixed Tempo Estimator form the Vamp SDK example library
Tempo and Beat Tracker: Tempo from the Queen Mary University of London
Audacity will snap the beginning of the clip to the beats and measures grid, depending on your tempo and snapping setting. If your first beat doesn't start exactly at the start of the clip, you can trim the beginning of the clip. To trim a clip, simply drag the upper edge of it inwards.
Once you have everything set up and snapping enabled, simply dragging your clips will align them to the beat and measures grid.
Notes:
As of Audacity 3.3, these features are still in beta.
A measure and a bar are the same thing. Audacity uses "bar" in places where "measure" would be too long.

Audacity is not yet able to handle midway tempo changes during a song.
When trimming a clip, you may need to turn off snapping to make finer adjustments.
By comparison Loudness Normalization will calculate the perceived loudness of the selected audio and then apply gain or reduction to the audio so a desired loudness level is reached. You set the desired loudness (in LUFS, Loudness Units relative to Full Scale).
To apply Loudness Normalization:
Select the region containing the audio that you want to normalize. It could be an audio clip or the entire track.
Click Effect -> Volume and compression -> Loudness Normalization... to open the Loudness Normalization window
Set the target loudness in LUFS units using the Normalize perceived loudness to field.
Keep Normalize stereo channels independently disabled If you are normalizing a stereo track (Left and Right channels) with the audio levels already balanced as this mode will preserve its original stereo balance.
Disable Treat mono as dual-mono (recommended) if you are normalizing a mono track.
Best practice: Adjusting the audio's amplitude with this effect is normally best performed as a final editing step prior to export of the production audio.
Tip: By default, the range goes from 90% to 110% speed. If you want to extend that, right-click the vertical scale (going from 90-110) and select Range... to set a new range. The new range may be between 10% and 1000%.
Caution:
The Click Removal effect requires a somewhat large audio selection (4096 samples) to function. It may not work when selecting single clicks.
If you have rapid soft clicks (such as the crackling of Vinyl), using may work better.
This article only applies to Audacity versions up to 2.4.2.
If Audacity crashes or the computer loses power, Audacity should normally recover the projects automatically when you restart. The steps on this page describe how to recover audio from the project's _data folder or Audacity's temporary folder if:
Automatic Crash Recovery does not work correctly
You saved a project without apparent crash, but Audacity was shut down before the AUP project file was written or you do not have a usable AUP file.
The steps on this page will only recover unedited recordings (and stereo recordings may be recovered with sections of left and right channel in the wrong channel).
If you saved an AUP project file, the _data folder you need to recover from will be in the directory to which you originally saved the AUP file.
If you never saved an AUP project file, you need to recover from Audacity's temporary folder. You can see the exact location in Directories Preferences, otherwise you can see the location in the "TempDir" line in the audacity.cfg settings file. By default the Audacity temporary folder should be as follows.
Windows: C:\Users\<your username>\AppData\Local\Audacity\SessionData
Mac: /Users/<your username>/Library/Application Support/audacity/SessionData
GNU/Linux: /var/tmp/audacity-<your username>
If you are upgrading from previous Audacity, that version's temporary directory may be changed to the relevant safe location above if the previous location was known to be prone to deletion by cleanup applications or system restart.
In the tree on the left of Explorer, double-click "Users" then double-click your username, then on the right, open the AppData or Application Data folder, then the "Local" or "Locale Settings" folder and finally the "Temp" folder.
If you cannot see those folders, you can type %localappdata% into the Explorer address bar then look for the "Temp" folder. Otherwise, see how to .
Open Finder, use the "Go" menu, choose "Go to Folder" and type the required path.
If that does not work, try to make the Finder show its hidden files and folders by entering the following commands in the terminal:
If you only have a few AU files to recover, use the "Import Audio" command to open all the .au files from the Audacity temporary folder or project _data folder. Use shift-click or control-click to select multiple files. The files will be in approximately 6-second chunks and will be on separate tracks in the Audacity screen. Files from stereo tracks will alternate between left and right channels.
Click in the Track Control Panel (by the Mute/Solo buttons) of the topmost track.
Shortcut Z or Select > Region > Ends to Zero Crossings.
Edit > Remove Special > Trim.
Play the result.
Cut and paste as needed if any files are found to be in the wrong order or the wrong channel.
Tools written for legacy Audacity 1.2 can automate data recovery.
Open Audacity's temporary or project _data folder in your system file manager. Sort the files by timestamp order (earliest first), then rename them using a consecutive alphanumerical sequence, lowest number first. An arrangement looking something like this should work:
b001.au 15:56:02 b002.au 15:56:02 b003.au 15:56:10 b004.au 15:56:10
On Windows, Explorer cannot rename to a sequence acceptable to the recovery tools. You can use instead the Mass Rename tool in the 21-day trial Professional or Ultimate versions of . These versions will let you recover an unedited stereo recording with exact allocation of left and right channels, if Windows is running the file system. The cannot guarantee correct channel allocation.
(only in the Professional and Ultimate versions) Click View > Raw Contents to enable maximum date resolution.
Open a terminal then "cd" into the directory that contains the .AU files.
Type the following command in a terminal to sort and rename the files into numerical timestamp order:
mkdir "renamed" | find -type f -name "*.au" -printf "cp %h/%f renamed/%h/%TY%Tm%Td-%TH%TM%TS_%f\n"|sh
The file names produced in the "renamed" folder are not in a consecutive sequence suitable for the Audacity recovery utilities. Instead, use the plugin
There is a 2 GB maximum size for any WAV file created from the reconstructed temporary files. This implies no more than 2000 .au files can be recovered. Sometimes (probably due to bugs in the utilities) there can be errors when recovering only 1000 or so files. In that case you would need to split the .au files in the temporary or_data folder into two or more folders, each containing consecutively numbered files, and recover a separate WAV file from each folder.
Recovery of unedited mono recordings should be correct in most cases.
Recovery of unedited stereo recordings may recover with transposed left/right channels in places. Channel allocation will only be correct if you are using the NTFS (Windows) or
There is no implication that these tools will necessarily do what you want, nor have they necessarily been tested by Audacity Team.
audacity_rescue.sh
This can reassemble a few thousand .au files. It may be simpler to apply (at a bash terminal) than some of the solutions mentioned on this page, particularly for mono recordings.
Using , make a copy of the temp directory and its files from a mono recording:
cp -r /tmp/audacity1.2-jbn ~/rescue
Convert the AU files into raw (headerless) files. The files must already be time-sorted and numbered with leading zeroes:
for f in *.au ; do sox ${f} -t raw ${f}.raw ; done
Audacity 3.3 was released on 24. Apr 2023
This release is mostly focused on under-the-hood changes
Some of the built-in effects are now realtime capable (Bass & Treble, Distortion, Phaser, Reverb and Wahwah).
#4352 Added a new effect: Shelf Filter.
Added an initial (beta) version of Beats and Bars. See for further info.
reworked the bottom toolbar dock:
Project Sample Rate is now found in Audio Setup -> Audio Settings (formerly known as Project Rate).
The Snapping Toolbar (formerly known as Snap-To) is now independent of the Selection Toolbar.
Improved Zooming behavior slightly (more to come in the future).
Added a new ruler, Linear (dB). This ruler goes from 0 dBFS to -∞ dBFS and better reflects the volume as shown in the recording/playback meters.
When copying clips between projects, you now can choose between whether to copy smart clips or just the visible portion.
added a delete button to the Cut/Copy/Paste toolbar.
Audacity no longer dithers tracks unnecessarily.
Linux playback now handles output latency better (less stutters).
The EQ effect no longer resets clip names.
FFmpeg 6 (avformat 60) is now supported.
Moved from Breakpad to Crashpad.
Extracted various libraries from within Audacity.
A full list of changes can be found .
Windows
Audacity 3.3 is tested on Windows 10 & 11
Windows Vista, 7 and 8.1 should still work, but are no longer tested.
macOS / Mac OS X
Audacity 3.3 is tested on macOS 12 & 13
OS X 10.9 and onwards should still work, but are no longer tested.
Linux
In addition to the traditional update path via package managers, Audacity is distributed as an AppImage. The AppImage gets updated at the same time as the Windows and macOS versions, so if you collaborate with users on those platforms, you may want to use the AppImage over your distribution's package manager.
Linux support is tested with AppImages on Ubuntu 20.04 & 22.04.
Other Linux distributions should work, but aren't tested by the Audacity team.
Audacity is not yet compatible with Conan 2.
This is a suite of Audacity tools and process to help you produce an audiobook reading that reaches ACX Technical Compliance.
Download and install the plugin which will help you check the levels of your recording.
If you are using a version of Audacity previous to 2.4.1 you will also need to download and install
Start this process with an unedited recording. No processing, adjustments or fixes.
Export a WAV (Microsoft) 16-bit sound file of your raw reading and save it in a safe place—ideally not on the machine. You should never be stuck reading a chapter again because of an accident. Saving an Audacity Project is not recommended for this.
To automate the audiobook mastering process, first download the macro:
Then, in Audacity, go to
Audacity 3.1.3 was released on 23. Dec 2021.
Audacity 3.1.3 is a patch release for Audacity 3.1.
It improves the following aspects:
Improved performance. Loading in projects especially should now be up to 50x faster compared to 3.1.0.
This page lists features which got removed from Audacity, as well as their replacements.
The Audacity Wiki has been shut down.
You may find the information you were looking for in the following places:
A wikidump of the Audacity Wiki as of March 31, 2023 can be found . It can be accessed and worked with in the same way as .
In Audacity version 3.3.0, the Device preference page has been renamed to
Audacity can record computer audio (including sound from YouTube, Spotify and more).
Click on Audio Setup and select Windows WASAPI as the Host
Select the output you want to use (the device you're using to listen) as the input. It will be marked with a (loopback) after it's name.
This page is an introduction tutorial to editing in Audacity. It covers how to import files, making cuts, rearranging clips, and applying effects!
To start editing, you need some sort of sound to edit. You can either , or import an existing sound file (for example, an MP3 or WAV) by dragging & dropping it into the project window. You can also import files via the File > Import menus.
Once you have that, you will see a waveform of your sound:
This waveform is a visual representation of the song. The larger the blue "blob" is, the louder the section. Lines standing alone ("spikes") indicate sudden and short loud sections such as clicks, snaps, claps and drum hits. With a bit of practice, you can use the waveform to quickly find your way around an audio file.
To remove a section of an audio file, first select the section by clicking and dragging in the waveform.
Added a new Time Signature Toolbar (beta). It is hidden by default. See Aligning music to beats and measures for further info.
#4417 Resampling a track no longer trims it.


Added new shortcuts for looping: Shift+L for "Set Loop to Selection", Shift+Alt+L for "Clear Looping Region" #2209
Added a new selection region indicator in the timeline (identical in function as the one found pre-3.1, but with updated visuals) #2067
Changed error messages to look less like a crash report #2178
Re-added the Quick Play indicator (green triangle and line) that got lost during 3.1.0 development #2122
Fixed Play-at-speed not updating the playback speed dynamically #2149
Fixed looping regions being created unintentionally when attempting to use Timeline Quick Play #2182
Fixed looping sometimes playing the wrong audio #2103
Fixed a bug that could cause data-loss when joining multiple clips #2226
Fixed scrub preview visibility #2294
Fixed a bug when trying to locate FFMPEG manually #2282
Fixed a glitch with Loop Playback #2314
Fixed a crash when releasing a clip handle #2147
Fixed a freeze when closing Audacity with the logging window open #2114
Fixed a crash when loading a saved project using certain compilers #2216
Fixed a crash on paste after running macros #2021
Fixed a crash when cancelling a nyquist prompt #2239
Windows
Audacity 3.1.x requires the CPU to support the SSE2 instruction set which should be available on any Intel hardware produced after 2001 and any AMD hardware produced after 2003.
To check what SSE levels your CPU supports, you can install CPU-Z.
If your hardware only supports SSE, you may download Audacity 2.0.6 see the Legacy Windows page on the Audacity Website.
3.1.x does not support Windows XP.
You may try 2.2.2 on XP, but it is unsupported.
macOS / Mac OS X
Audacity 3.1.x is for Intel Macs running OS X 10.7 and later and macOS.
There are legacy versions for older OS X at http://audacityteam.org/download/legacy-mac/.
Linux
Linux support is tested on Ubuntu Linux.
Other Linux distributions should work, but aren't tested by the Audacity team.
Click in the Track Control Panel of the first track you want to join to the topmost track.
Shortcut Z or Edit > Find Zero Crossings.
Shortcut Z or Select > Region > Ends to Zero Crossings.
Click after the end of the topmost track.
Press End on the keyboard.
Click Edit > Paste and the cut track will attach to the end of the topmost track.
Repeat as necessary to join all the tracks onto the topmost track.
Ctrl + A to select all the files.
File > Mass Rename.
In the "Mass Rename Wizard", click in "Target name template" and type the letter e with a $ after the letter. For example, e$0001.au will rename the files to e0001.au, e0002.au and so on. Use enough zeros in the file name so that all the .au files will have the same number of digits.
Press "Preview", and if the preview looks correct, hit "Rename"
On Mac, try Applications > Automator.
On Linux, try the file manager Thunar included in the xfce desktop See here for help running Thunar on the Ubuntu desktop.
If any of the project data has been edited, it is unlikely to recover correctly.
Concatenate the raw files together to make one long raw file. Concatenating the AU files together (each with its own header) would produce noise at the joins between each AU file.
cat *.raw > bigfile.raw
Finally, import the raw file into Audacity specifying the appropriate encoding, endianness, channels and sample rate.
Do not close or save the project if the automatic crash recovery fails to properly recover your project.
If you need to shut down the computer before manually fixing an incorrect Automatic Crash Recovery, force quit Audacity in the system task manager. This will preserve the temporary data for next launch of Audacity.
If you had successfully saved the project just before the crash, it may be simpler to discard the unsaved project in the Automatic Crash Recovery dialog then open the saved AUP file.
Tip: In order to see the default location of the Audacity temp folder on Windows or Mac you need to show hidden files and folders or type the folder location into your file manager's address bar.
All these utilities require the .au files to be input in consecutive alphanumerical order. Audacity names files randomly so files will need to renamed.
defaults write com.apple.finder AppleShowAllFiles TRUE
killall FinderYou now can apply the Audiobook Mastering Macro via Tools -> Apply Macro -> Audiobook-Mastering-Macro similarly to how you would apply any individual effect.
These instructions are in short-form: Menu > Tool : Options > Apply
Select the whole reading or chapter by clicking the Select button at the bottom of the Track Control Panel.
Effect > EQ and Filters > Filter Curve EQ... : Presets & settings > Factory Presets > Low roll-off for speech > Apply.
Effect > Volume and Compression > Loudness Normalization... : Normalize RMS to -20dB > Apply.
Effect > Volume and Compression > Limiter... : Soft Limit, 0.00, 0.00, -3.50dB, 10.00, No > Apply.
Analyze > ACX Check.
The first two readings, Peak (no louder than -3dB) and RMS (between -18dB and -23dB) should be nearly perfect. If the noise is quieter than about -65dB (-60dB limit), and the show sounds reasonable, you may be done.
The tool settings are sticky and you don't have to keep typing them in. If you do no other editing, mastering a chapter comes down to:
Select the audio track or clip.
Effect > EQ and Filters > Filter Curve... > Apply.
Effect > Volume and Compression > Loudness Normalization... > Apply.
Effect > Volume and Compression > Limiter... > Apply.
If you fail noise, then the process can be a great deal more interesting. See Noise Compliancebelow.
ACX has their own help pages, tutorials and videos: https://help.acx.com/
This mastering suite addresses technical considerations. Nothing here will address theatrical errors such as harsh sibilance, gritty voice or wet mouth noises. There is no acting filter. You have to know how to read aloud.
The quality of the original recording is very important. It's easy to record mistakes that can't be fixed later. Record to a reasonable volume (occasional peaks at -6dB) in a quiet room with no echoes.
When you get done with a chapter, File > Export the work as WAV (Microsoft, 16-bit) and save the sound file with a unique name somewhere safe. That's your emergency backup so you don't have to read it again if you damage the work or lose your edit.
Only then start editing, processing, filtering and correcting. Keep testing the work with the ACX Check plugin as you go. Select the work and Analyze > ACX Check.
Peaks no louder than -3dB.
RMS (performance loudness) between -18dB and -23dB.
Noise no louder than -60dB.
Those are the three values displayed in the ACX Check panel
Human Quality Control at ACX (the theatrical test after you pass ACX-Check technical test) does not like heavy processing. You should be as gentle as you can with as few corrections as possible. Don't even think of submitting readings that sound like a bad cellphone, speaking into a wineglass or reading in a bathroom.
We assume you've already been through Audiobook Mastering and failed ACX Technical Compliance because of noise (louder than -60dB) or your performance has odd background sounds you don't like. Noise is common in a home studio.
This is a gentle spring rain in the trees sound behind your voice. Microphone systems make noises like this naturally and it's your job to make your voice loud enough so nobody notices the noise, but not so loud your voice distorts.
If the hiss isn't too bad, try a gentle correction such as Noise Reduction of the Beast (6, 6, 6) or Edit > Undo and try 9, 6, 6. You can hear the hiss getting quieter and recede into the background as you increase the first number. Apply Nose Reduction and then try ACX Check again. If you need reduction as high as 12, 6, 6, your voice may get wine-glassy or honky and the show may not pass ACX inspection.
The solution may be to change your announcing style or even the microphone. You should be about a shaka away from the microphone...
... or as close as a fist (louder and more intimate) but you may need a pop and blast filter.
Computer fan, air conditioning, refrigerators or other machines.
If possible turn off fans or machines while you're presenting. And yes, we understand the contradiction of needing to watch the Audacity screen, remove the noisy computer from your room and keep the computer one USB cable away from your USB microphone all at the same time.
People have done it by extending the keyboard, mouse and monitor outside their studio, but you are warned against extending a USB cable, particularly with audio (or video) production.
Do not block computer vent holes.
If machine noises are constant and not seriously loud, they may respond to Effect > Noise Removal and Repair > Noise Reduction...
Try a gentle correction such as Noise Reduction of the Beast (6, 6, 6) or UNDO and try 9, 6, 6. You can hear the hiss getting quieter and recede into the background as you increase the first number: Nose Reduction. Try ACX-Check. If you need reduction as high as 12, 6, 6, your voice may get wine-glassy or honky and the show may not pass ACX inspection.
Some computers and USB microphones hate each other and produce mosquito whine sound.
Whine doesn't respond well to Effect > Noise Removal and Repair > Noise Reduction.
Get and install Mosquito-Killer4.
Effect > n / a > Mosquito-Killer4: ...Mosquitoes to kill?: 8 > Apply.
We expect the tool to make common USB whine vanish, but there are some versions of whine that don't perfectly respond. Listen carefully and if Mosquito_Killer4 fails or doesn't work enough, Edit > Undo and post a help message on the Audacity Forum or the Audacity Server on Discord with a sample of the work.
I don't know of any easy, foolproof way to permanently fix a USB microphone once you have the whine sound. The most likely fix is change the computer. ACX did it by not using a USB microphone. They used a very high quality analog microphone plugged into a stable USB interface.
There are no tools to remove noises that constantly change. If jets overhead, traffic noises, dogs barking and the TV next door are included in your show, they are now your permanent performance partners. Read the work again in a quieter room. Gating doesn't help.
Nobody said you can't have more than one noise. The ACX Audiobook noise test can be rough to pass with a home recording system. If you just can't get there with the above tools, or you can't get your voice to sound right, post to the Audacity Forum or the Audacity Server on Discord with a sound sample and send a clean, raw clip. Mention the three-digit Audacity number.
SeeNotes and Comments at the end for general information about this process
Check Installing Nyquist pluginsfor instructions on how to install the ACX Check plugin
Peak. Look at the blue waves on the timeline. The very tips of the waves are never allowed to go all the way up or down. That’s overload (1.0 on the timeline – 0dB on the bouncing sound meters). That can cause audible crunching and distortion. ACX doesn’t even want you to get close, so that’s their -3dB (70%) limit.
RMS. Loudness. Root Mean Square is a standard electrical measurement which, when applied to audio, happens to work out to loudness. RMS should be between -18dB and -23 dB.
Noise. How loud is the show when you stop talking? This can be a combination of dogs barking next door, air conditioner noise, and the ffffffff noise the microphone is making. All of it lumped into one number. Noise should be quieter than -60dB.
The Audiobook metaphor is listening to someone telling you a story over cups of tea. Anything that distracts from that ideal should be avoided.
See for further details.
See for further details.
Follow the instructions provided to
Follow the instructions provided to
In Audacity version 3.3.0, the Project Rate has been renamed to Project Sample Rate and moved into the Audio Setup button -> Audio Settings
The Cut, Copy and Paste buttons have been removed from the Edit Toolbar in version 3.2.0.
Audacity version 3.2.3 introduced the Cut/Copy/Paste Toolbar which is disabled by default. Check View > Toolbars > Cut/Copy/Paste Toolbar to enable it.
You can also access the Cut/Copy/Paste functionality in the following ways instead:
Right-click the selected audio and choose Cut/Copy/Paste
In the Edit menu, choose Cut/Copy/Paste
Use shortcuts:
Ctrl+X is cut (Cmd+X on macOS)
Ctrl+C is copy (Cmd+C on macOS)
Ctrl+V is paste (Cmd+V on macOS)
The Device toolbar has been replaced by the Audio Setup button in version 3.2.0. However, you can re-enable it via View -> Toolbars -> Device Toolbar.
The Zoom Tool has been removed in version 3.2.0. All of it's functionality can be accessed via the Zoom buttons, or via Ctrl+Scroll (Cmd+Scroll)
Audacity's Time Shift Tool has been removed in version 3.1.0. It got replaced by drag handles at the top of every clip. You now can time-shift audio without having to switch into a special mode.
Note: MacOS does not have built-in desktop audio recording capabilities. You'll need to download Soundflower to record desktop audio.
Caution: Soundflower is not compatible with Apple Silicon-based machines ("M1", "M2", ...)
Download Soundflower from https://github.com/mattingalls/Soundflower/releases/ and follow the instructions provided there to install it.
Open the Audio MIDI Setup app (found in /Applications/Utilities).
Press the + button in the bottom left corner and select "Create Multi-Output Device".
In the panel that appears to the right, select Built-in Output and Soundflower (2ch).
Press the gear button in the bottom left and select "use this device for sound output". Note: If you don't set an option, you won't hear anything after completing the following steps.
Start Audacity
Click the Audio Setup button and set Soundflower (2ch) as the recording device.
When using PulseAudio (default for Ubuntu, Linux Mint, and others):
Install PulseAudio Volume Control (pavucontrol). This should be in your repository already.
Use the Audio Setup toolbar to select ALSA as the audio host and select pulse as the recording device.
If your system uses Pulse by default, the pulse device may be called default.
Enable the recording meter by selecting Start Monitoring.
Open PulseAudio Volume Control and choose the Recording tab.
In the Capture from dropdown, select the "Monitor" option of the playback device used by the application you want to record from
Launch the application that you wish to record and begin playback.
In the "Recording" tab of PulseAudio Volume Control, drag the volume sliders so that the recording level in Audacity's Recording Meter is to left of 0 dB (-6 dB is a good level to aim for).
Recording the desktop audio will record all desktop audio, including notification-pings, games, and Audacity itself (for example, other tracks in the timeline if you're using overdub). So unless you specifically want these noises, make sure to turn them off.
Hit the record button to record your desktop audio.

When using the (default) MME device, you may find a virtual microphone called Stereo Mix, What you hear or similar in it. This also will record your desktop audio.
DON'T use software playthrough when recording desktop audio. Make sure it's off in the menu: Transport > Transport Options > Software playthrough (on/off) - The ✔️checkmark next to it must be turned off. You can turn off overdub here as well.
Delete or Backspace to delete it. Audacity supports clips, which are pieces of audio inside the project which can be moved independently. Technically, any audio you record or import already exists as a clip, denoted by the rounded clip handle bars above the waveform.
You can click + drag on the clip handle bar to move a clip around.
To split a clip into two independent clips,
Click into the waveform where you want to split the clip.
Tip: To make precise adjustments, zoom in first.
Right-click > Split Clip (Ctrl+I / Cmd+I)
To trim a clip, hover with your cursor around the upper third of the left or right edge of a clip:
Then click and drag the edge to trim the clip to it's desired length.
Audacity supports a wide range of effects and effect plugins. These effects can be used for Noise reduction & removal and more, and while each effect does different things, they all generally can be applied in the following way:
Select the audio you want to apply the effect to.
Go to the Effect menu.
Select the effect you want to use. Typically, a window like this will open:
Tweak the effect to your liking. You can click the Preview button to hear a short sample before applying it to the whole selection.
Press OK to apply the effect.
Note: To import proprietary file formats such as M4A or WMA, you need to install FFMPEG first.
Hint: You can zoom in using the Zoom+ icon, or by Ctrl+Scroll (Cmd+Scroll) to precisely adjust the beginning and end of the selection.
Note: If you select some audio instead, it will create a clip out of the selection.
Note: Trimming is a non-destructive operation. You can un-trim a clip at any time. If you have created your clip by a larger clip, you can even un-trim the current clip until it's at the length of the old clip. If you want to permanently remove the trimmed data, you can copy the clip to another project, choose Selected audio only when pasting, and move it back.
Best practice: If you want to apply an effect to an entire track, use instead. By doing so, you can change the effect at any point later on.
Downloading & Installing Audacity
Learn how to install Audacity on your computer
Installing FFmpeg
FFmpeg is required to import/export M4A & more
Editing audio
Learn the basics of editing audio and applying effects
Noise reduction and removal
Learn how to repair noisy audio recordings
Recording audio
Learn how to record yourself with Audacity
Related: Recording desktop audio
Troubleshooting Audacity problems
Sharing audio online
Learn how to share audio with our new sister service, audio.com
Aligning music to beats and measures (beta)
The first step to making Audacity more capable for music production
Download plugins
A directory of a wide range of free plugins you can use in Audacity


Audacity 3.0.3 was released on the 26th of July, 2021
Key improvements:
Windows version is now 64-bit
(Note: 32-bit plugins will not work on 64-bit Audacity)
A 32-bit build of 3.0.3 remains available for download
Improved default spectrogram colors
We now provide an official binary for Linux in the form of an AppImage
Update checking: Audacity can now check to see if there is a newer version available
Error reporting: this is a new dialog where users can choose to send us the details of a serious error
Multiple bugs fixed
Full details of new features in the visual guide to
Audacity 3.0.3 replaces all previous versions.
Windows
Audacity 3.0.3 requires the CPU to support the instruction set which should be available on any Intel hardware produced after 2001 and any AMD hardware produced after 2003.
To check what SSE levels your CPU supports, you can install .
If your hardware only supports SSE, you may download Audacity 2.0.6 see the page on the Audacity Website.
macOS / Mac OS X
Audacity 3.0.3 is for Intel Macs running OS X 10.9 and later and macOS.
There are legacy versions for older OS X at .
Linux
Linux support is tested on Ubuntu Linux.
Audacity may compile on Gentoo, Debian, Mint.
Audacity does not currently compile on SuSE Linux.
We probably track more bugs than you are interested in...
We used to have a separate page with a dynamic buglist for each version, but nowadays we recommend instead to visit our for current bug status.
We do use this detail in our own QA work.
Below are listed what we believe are the most common and important issues with 3.0.3 for most users.
Accessibility
Less of Audacity is properly accessible to visually impaired users than we would like. Currently the best supported platform for accessibility is Windows. We lost a lot of custom accessibility programming when we had to move to a more recent version of the wxWidgets library.
Internationalization
Audacity is only partially translated in many languages. We also have some issues, for example, with Right-To-Left Languages.
Selected Bugzilla-Tracked Bugs
Click on the bug numbers to see work done on these bugs.
This page provides some examples of how the Macros feature in Audacity can be used.
A batch processing Macro to compress and normalize WAV files then convert them to MP3:
Insert Compressor to reduce the dynamic range of each WAV, also normalizing them to maximum amplitude of 0 dB
Insert Export as MP3 to convert them to MP3 format
Click Apply Macro to: Files... to select the files on which to run the Macro.
Click OK to close the Manage Macros window
An effects automation Macro for the current project that applies noise reduction and equalization:
Insert with settings of:
Remove any
-10 dB (to allow for boosting later in the Macro without )
When later needed in your workflow, choose Tools > , select the NR&EQ Macro then click Apply Macro to: Project to apply the Macro to the selected track(s) in the current project window.
The Select command with 'Relative To=Selection' can be used to extend and contract a selection.
Command: "Select: RelativeTo=Selection Start=-1 End=1" Description: This command expands a selection by two seconds
Command: "Select: RelativeTo=Selection Start=1 End=-1" Description: This command contracts a selection by two seconds
Command: "Select: RelativeTo=Selection Start=1 End=1" Description: This command moves a selection right by one second
Command: "SelTrackStartToEnd" Description: This command (from Select > Region > Track Start to End) Selects all audio in all selected tracks.
Command: "SelNextClip" and "SelPrevClip" Description: These commands are useful with Clips
This Macro takes a single mono track, and converts it to a stereo track, with one channel a spectrogram and the other a wave.
It is one example of how to creatively abuse the Macro system, since audacity is not set up to handle mixed views on wave tracks.
Note the use of a TrackCount of 0.5 to select just one of two channels in a stereo track.
The TrackCount of 0 is used to unselect all tracks.
With normal project rate of 44100Hz, this selects about 126 samples centered on the cursor, and applies the 'Repair' effect to it. 'Repair' can only handle up to 128 samples.
Audacity 2.4.2 was released on 26th Jun 2020.
audacity-win-2.4.2.exe
SHA256 1f20cd153b2c322bf1ff9941e4e5204098abdc7da37250ce3fb38612b3e927ba
audacity-macos-2.4.2.dmg
SHA256 4730abe5b59d9c3dd000fde22d7037af6e6019a4305195a3e4e714f6c9f6380a
audacity-minsrc-2.4.2.tar.xz
SHA256 b3ea9b85f184cec4c1d0da50edb4a588132589d6d1709f6ef0147d52199d0b59
audacity-2.4.2.zip
SHA256 0c14f7c6850c93b9dacc14fe66876b8dc3397d92dbd849898783a21bad1fff55
audacity-manual-2.4.2.zip
SHA256 030b8da55738d80a181af212f6ce25205c4d047a90f21c15acd083c5a589a6c6
audacity-macosx-ub-2.1.1-screen-reader.dmg
SHA256 b1913d3362a9221609bae7fab848a5cae93d786d178234c6018e3c95ddfd9d62Audacity 2.4.2 replaces all previous versions.
Over 30 bugs fixed since 2.4.1
Full details of new features in the visual guide to New features in Audacity 2.4.2
Windows
Audacity 2.4.2 requires the CPU to support the instruction set which should be available on any Intel hardware produced after 2001 and any AMD hardware produced after 2003.
To check what SSE levels your CPU supports, you can install .
If your hardware only supports SSE, you may download Audacity 2.0.6 see the page on the Audacity Website.
2.4.2 does not support Windows XP.
You may try 2.2.2 on XP, but it is unsupported.
macOS / Mac OS X
Audacity 2.4.2 is for Intel Macs running OS X 10.7 and later and macOS.
There are legacy versions for older OS X at .
Linux
Linux support is tested on Ubuntu Linux.
Audacity may compile on Gentoo, Debian, Mint.
Audacity does not currently compile on SuSE Linux.
We probably track more bugs than you are interested in...
On the dynamic buglist page you can select to view:
Complete list of bugs in 2.4.1 that we have fixed for 2.4.2
Known bugs on the OS you use Mac, Windows or Linux.
Known bugs to do with accessibility or localization.
You can choose various combinations of these. However, there are probably too many minor bugs and too much detail on that for most users.
We do use this detail in our own QA work.
Below are listed what we believe are the most common and important issues with 2.4.2 for most users.
Accessibility
Far less of Audacity is properly accessible to visually impaired users than we would like. Currently the best supported platform for accessibility is Windows. We lost a lot of custom accessibility programming when we had to move to a more recent version of the wxWidgets library.
Internationalization
Audacity is only partially translated in many languages. We also have some issues, for example, with Right-To-Left Languages.
Selected Bugzilla-Tracked Bugs
Click on the bug numbers to see work done on these bugs.
By default Audacity will compensate the latency present in your system by 130 milliseconds. Using this procedure you can estimate and set the proper value for your system.
Note: Latency Compensation is only important for the following recording scenarios:
Overdubbing: recording a new audio track while listening to previously-recorded track(s). You want what you play to be synchronized with the tracks you are listening to.
There is an automated method available now, which is available at
It's currently in beta, so please leave your feedback in the forum thread
On Windows open the Edit menu and select Preferences... or press Ctrl + P in your keyboard. On macOS open the Audacity menu and select Preferences... or press Cmd + P
Select Devices in the left pane of the Preferences window
Select the preferred Interface Host: MME or Windows WASAPI should work
Verify your preferred Playback Device is selected
Verify your preferred Recording Device is selected
Set the Latency compensation to 0 (zero) milliseconds
Click OK to save your preferences
Select Recording in the left pane of the Preferences window
Enable Overdub: Check Play other tracks while recording (overdub)
Make sure Software playthrough of input is not checked
At the bottom of the Audacity window you will find the Selection toolbar
Disable snapping, if you have it enabled
Select Start and Length of Selection as your selection format
To measure the latency you will need to record the audio from your playback device using your microphone. To do this place your microphone next to your speakers/headphones
Open the Generate menu and select the Rhythm Track... option. Set Number of Measures (bars) to 2 and set the Beat Sound to Ping (short). Click OK to generate the track.
Press Shift + R to record a new track. The rhythm track will be played back and recorded on a new track.
Zoom in so you can see the clicks on the top track and its delayed version on the bottom track
Create a selection that goes from the start of one click to the next
You should see something like this:
You can read the latency directly from the second panel of numbers. In this case it is 0.184 seconds or 184 milliseconds.
Click on Edit > Preferences, click on Devices tab and enter the negative of this number in the Latency compensation box. In this case it would be -184. Press OK to save your preferences.
Delete the second track by clicking the close box in its Track Control Panel
Click in the Track Control Panel of the remaining track to select it
Press Shift + R to record a new track
After the recording is finished Audacity will apply the Latency compensation by pushing the newly-recorded track back by the Latency compensation value.
Audacity has several powerful spectral analysis tools: Spectrogram View per track, Plot Spectrum, as well as support for Plugins.
Each track in Audacity can be viewed in a Spectrogram view:
To access it, click on the track menu dropdown and select Spectrogram.
The track menu also features Spectrogram settings, where you can tweak the scale, the colors, the used algorithms and the window size.
Tip: To view the waveform and the spectrogram at the same time, choose Multi-view instead.
You may notice that the spectrogram is somewhat blurry usually, where even if you have a precise frequency, the spectrogram makes it look like a whole range of frequencies is being played. This is an inherent mathematical tradeoff related to the window size:
Depending on what you're after, you can change the window size to fit your analysis: Smaller window sizes benefit time resolution, larger window sizes benefit frequency resolution.
You can change both the window size and the algorithm in the spectrogram settings found in the Track Menu dropdown.
You can zoom vertically in Spectrogram View by right-clicking the frequency scale.
Additionally, while hovering over the frequency scale, you can
Ctrl+Scroll to zoom in/out on the frequency scale and
Shift+Scroll to scroll up/down while staying on the same zoom level.
To use Plot Spectrum,
select the audio you're interested in analyzing
go to Analyze -> Plot Spectrum.
Spectrum (default) Plots the fast Fourier Transform (FFT) of the data, with the FFT window size being determined by the Size dropdown. The amplitudes are normalized such that a 0 dB sine (pure tone) will be (approximately) 0 dB on the graph.
Autocorrelation These options measure to what extent the sound repeats itself. This is done by taking two copies of the audio, and moving one forward by one sample. The two copies are then multiplied together, and all the values added up. This is repeated for two samples difference and so on, up to the number of samples in the size option. This gives a small result if the waveform is random (for example, noise) and a large result if it is repetitive (like a musical note). By looking at the peaks in the plot, the key frequencies present can be determined even if there is a lot of noise.
Function offers choices like Rectangular, Hann, Hamming and others. We suggest you use the default Hann for most situations.
Click the Export... button to export the current view as a tab-separated value text file.
Audacity supports the Vamp plugin format among others. Many of them can be found in the .
Audacity 3.0.0 was released on 17th Mar 2021.
audacity-win-3.0.0.exe (application/x-msdownload) - 29378296 bytes
SHA-256 6a0cfed327b00cf8fefef4bd5c8ba85b5364f3e56345772410572f2d821ca14d
audacity-macos-3.0.0.dmg (n/a) - 41328807 bytes
SHA-256 f769a9e8c0f2352171933339681616ddab43ca6d7b688918e5af8bd1382a0fad
audacity-minsrc-3.0.0.tar.xz (n/a) - 13308836 bytes
SHA-256 d3bb1358b930ea4ef935ed83cc5a0f47006565762c5667c2fb376c6535876a6a
audacity-win-3.0.0.zip (application/x-zip-compressed) - 12507745 bytes
SHA-256 63c23df0731d02327ca964f01e0bd2ff533fa189ef18402e29c3e3992038217d
audacity-manual-3.0.0.zip (application/x-zip-compressed) - 23118171 bytes
SHA-256 9e3ab6ae3455db8be98e26cc09d90a89901e37b8eca671949f9959bbc1c7c2e8Audacity 3.0.0 replaces all previous versions.
Over 150 bugs fixed since 2.4.2
Full details of new features in the visual guide to New features in Audacity 3.0.0
Windows
Audacity 3.0.0 requires the CPU to support the instruction set which should be available on any Intel hardware produced after 2001 and any AMD hardware produced after 2003.
To check what SSE levels your CPU supports, you can install .
If your hardware only supports SSE, you may download Audacity 2.0.6 see the page on the Audacity Website.
3.0.0 does not support Windows XP.
You may try 2.2.2 on XP, but it is unsupported.
macOS / Mac OS X
Audacity 3.0.0 is for Intel Macs running OS X 10.7 and later and macOS.
There are legacy versions for older OS X at .
Linux
Linux support is tested on Ubuntu Linux.
Audacity may compile on Gentoo, Debian, Mint.
Audacity does not currently compile on SuSE Linux.
We probably track more bugs than you are interested in...
On the dynamic buglist page you can select to view:
Complete list of bugs in 2.4.2 that we have fixed for 3.0.0
Known bugs on the OS you use Mac, Windows or Linux.
Known bugs to do with accessibility or localization.
You can choose various combinations of these. However, there are probably too many minor bugs and too much detail on that for most users.
We do use this detail in our own QA work.
Below are listed what we believe are the most common and important issues with 3.0.0 for most users.
Accessibility
Less of Audacity is properly accessible to visually impaired users than we would like. Currently the best supported platform for accessibility is Windows. We lost a lot of custom accessibility programming when we had to move to a more recent version of the wxWidgets library.
Internationalization
Audacity is only partially translated in many languages. We also have some issues, for example, with Right-To-Left Languages.
Selected Bugzilla-Tracked Bugs
Click on the bug numbers to see work done on these bugs.
Removing background noise is core to most audio cleanup operations. Audacity has several tools to aid in this.
Best Practice: While it's possible to rescue an otherwise unusable file with noise reduction techniques, your recording will sound best if you take steps to ensure a noise-free environment before recording.
The Noise Reduction effect works best to remove a constant source of noise, like the hiss of fans, the hum of fridges, or whines, whistles and buzzes.
To use it, use the following steps:
Locate a section of your recording that's just your background noise, preferably a few seconds long, and select it.
Go to Effects > Noise Reduction and press the "Get noise profile" button.
Select all the audio for which you want to reduce the noise.
Go to Effects > Noise Reduction again. You now can tweak the settings of the reduction to your liking. Tip: While tuning the settings, use the "Residue" toggle to hear what sound will be removed.
Once you're satisfied with the result, click OK to apply it to the selected audio. Note: If you used the Residue toggle before, make sure to switch it back to Reduce before pressing OK.
The Noise Gate effect attenuates any sound quieter than a certain threshold while leaving sounds louder completely unaffected. To use it
Select a part of the audio that's just background noise.
Go to Effects > Noise Gate... to open the effect.
Click Select Function: Analyse Noise Level and press OK. Audacity will now tell you where your noise level lies and recommending a threshold.
The notch filter removes a hum or whistle at a specific frequency. To use it:
Select the audio you want to apply the effect on
Go to Effects > Notch Filter to open the effect.
Enter the frequency you want to reduce, together with the Q-value (how many frequencies around the main one you want it to affect - the higher the number, the less frequencies).

This page is an overview of prominent new functionality that has been introduced in Audacity 2.4.2
Version 2.4.2 is primarily a maintenance release for bug-fixing, so there are not many new features.
Details of all the major changes since 2.4.1 can be found in Audacity Release Notes 2.4.2.
A new command has been added to the Help menu: Help > Reset Configuration.
This resets your Audacity configuration, preferences (except Extended Import), export settings and toolbars, to default settings.
User presets in Effects, Generators and Analyzers are left untouched, as are any Macros you may have created and plug-ins.
Audacity now supports LAME's gapless playback info, allowing MP3s to be exported and imported without additional padding.
Other applications that support the LAME tag, for example audio player applications, will be able to read MP3 files exported by Audacity without the padding.
In less than a month we have foxed a further 29 bugs in this maintenance release.
Here is a small selection of some of the most important.
P1 - Windows: Crash when importing (or editing) to a disk with insufficient disk space available
P1 - Mac: Attempting to export as M4A(AAC) yields an FFmpeg error message
P1 - Windows: WAV Export runs 6 to 7 times slower than on 2.3.3
P2 - Undocking meter toolbars while playing/recording results in a frozen meter
P2 - A region label gets split on inserting audio when Sync-lock is turned on
P2 - Time toolbar displays incorrect time if project rate isn't 44100
- detailed release notes for this release of Audacity


This page is an overview of prominent new functionality that has been introduced in Audacity 3.0.3
Version 3.0.3 is primarily a maintenance release to fix bugs and increase the stability of the Unitary Project database structure.
Details of all the major changes since 3.0.2 can be found in .
For the first time, Audacity will now install as a 64-bit application on Windows devices. Due to this change, some processes and effects (e.g. certain sound generation processes & sliding stretch) will run much faster.
Audacity 3.2 was released on 22. Sep 2022
Added a new Effects button to the tracks menu, allowing you to place realtime effects.
Further information can be found on
Merged the mixer bar with the meter bars.
Select the audio you want to apply the effect to.
Go back into Effects > Noise Gate..., set it back to Select Function: Gate, and enter the threshold level from earlier.
Tweak the other parameters as sound best to you.
Press OK to apply the noise gate.
Press OK to apply the effect.
Tips:
If you set the sensitivity too low, or use a noise profile that doesn't properly represent the noise throughout your track, you may experience artifacts (random bursts of very short tones).
If you don't need to tweak the settings after setting the noise profile, you can press Ctrl+R/Cmd+R to immediately apply the effect to your selection.
Best practice: Use the noise gate after applying noise reduction. This way, you can use less aggressive noise reduction settings, which may grant you a cleaner end result.
Tips:
The "Mains hum" of the electricity grid is 60Hz in north and middle America, and 50Hz in most other countries.
Use Analyze > Plot Spectrum... to find the offending frequency if you're not sure where it is.
Sounds often have harmonics or overtones. They are at a multiple of the main frequency, so for a 50Hz sound, you may need to apply the notch filter as well at 100Hz, 150Hz, and so on to remove it fully.
P1 2459 - Macros with Nyquist effects don't apply saved parameters
P1 2471 - Mix Stereo down to Mono fails if space at start of track.
P1 2478 - Windows: with an empty rules list in "Extended Import" prefs - Tab or Home crashes Audacity
P1 2479 - Mac: AudioUnit effects are not applied if you initially use the preview
P1 2484 - Win/Linux: OPUS import fails
P2 2419 - Time toolbar: Opening and closing preferences resets format to hh:mm:ss
P2 2428 - Nyquist Effects do not display a Progress Dialog if run from a Macro.
P2 2431 - Real-time effects - Enable checkbox has no effect
P2 2439 - Mix and Render to New Track selects left channel of new stereo track
P2 2443 - Mac/Linux: Old (PowerPC) projects open flat-lined or with corrupted display on Intel machines
P2 2456 - audacity 2.3.3 config with Spectral Selection toolbar corrupts lower dock in 2.4.x and can crash
P2 2458 - Possible crash when clearing text field in Gain dialog
Be aware that this command acts immediately with no dialog and no choice of actions or chance to abort.
Undo is not available for this command.


Serious bugs and less serious bugs.
ID
P
Status
Summary
P3
RESOLVED
Plug-ins listed in reverse alphabetic order in Plug-ins Manager


Insert Noise Reduction
Insert Filter Curve EQ (to perform the frequency adjustment)
Insert another Normalize at different settings (without offset removal, setting a final amplitude of -1 dB)
Click OK to close the Manage Macros window
Alternatively you can choose Tools > Apply Macro..., select the Loud MP3 Macro then click Apply Macro to: Files... where you can select the files on which to run the Macro
If a Noise Profile exists, that Noise Profile will be used. It is often best to capture a suitable Noise Profile before running a Macro.
If a Noise Profile does not exist:
If the Macro is applied to the current project (as above), the current selection is used to create the Noise Profile. Therefore, other effect commands in the Macro will also only apply to that selection. If an export command is added, the entire file will be exported.
If the Macro is applied to files, the first file (all of it) is used to create the Noise Profile. It may be useful to prepare a file containing a suitable Noise Profile and name it so that it is alphabetically the first file of those to be run in the Macro.


SelectAll:
Duplicate:
Select:"Mode=Set"
SetTrack:Pan="-1"
Select:"Mode=Set" Track="1"
SetTrack:Pan="1"
Select:Mode="Set" TrackCount="2"
MixAndRender:
Select:Mode="Set" TrackCount="0.5"
SetTrack:Display="Spectrogram"
Select:"Mode=Set" TrackCount="0"SelectTime:End="0.00143" RelativeTo="Selection Start" Start="-0.00143"
Repair:Use_Preset="<Factory Defaults>"3.0.3 does not support Windows XP.
You may try 2.2.2 on XP, but it is unsupported.
P2
RESOLVED
Audacity crashes with Macros on files when the macro-output folder is in an unwriteable location
ID
P
Status
Summary (2 tasks) ⇒
P2
RESOLVED
If Temporary files directory is set to be unwritable then Audacity has a catalog of cryptic unhelpful errors
If you are a user of previous Audacity versions on Windows and had installed the optional FFmpeg library then you must now install the 64-bit versions of the FFmpeg library.
Otherwise your imports and exports that depend upon FFmpeg will no longer work.
See Installing FFmpeg for Windows for installation details.
Serious bugs and less serious bugs.
P3
NEW
Linux: PULSE-AUDIO issues. Freeze repeatedly starting/stopping streams
ID
P
Status
Summary (2 tasks) ⇒
P2
RESOLVED
Mac: Keyboard tabbing in Timer Record stuck in left hand panel.
Click OK to save your preferences
Note: If you change any of your recording or playback devices (for example, if you change from using the line input port on your computer to using a USB audio interface) or if you use the same device but change the Audio Host in Device Toolbar, then you will need to do this test again. The test you just did only applies for the specific inputs and outputs and host used during the test.


Cepstrum The cepstrum of an audio signal is related to the spectrum, but presents the rate of change in the different spectrum bands. It's particularly useful for properties of vocal tracks and is used, for example, in software to identify speakers by their voice characteristics.
Tip: If you change the algorithm from Frequencies to Reassignment, Audacity will attempt to sharpen both time and frequency resolution using the method of reassignment. This works best for signals that are separable in time and frequency with respect to the analysis window.
The fundamental principle at work here is that the way we observe our data changes what we see. The "true spectrum" of your project would be computed over the entire project and would provide very detailed frequency resolution but essentially no time resolution at all. In other words, this "true spectrum" would offer an average frequency distribution over the entire project. If we select a short interval of audio, the short-time spectrum has frequency resolution limited by the observation window time AND the result is affected by the spectrum of the window itself. For general audio analysis, the Rectangular window is least desirable, and the other options offer slightly different effects

It’s also possible to pass ACX-Check and still fail acceptance. If you got there by heavily processing and beating your voice to death, the work will fail Human Quality Control. The voice is distorted and the failure is “Overprocessing.”

Installing the 64-bit FFmpeg library will not overwrite or delete your 32-bit FFmpeg library if you have one installed.
A new colorway has been introduced on Audacity 3.0.3 for Spectrograms.
The image below shows a sample track in Spectrogram view with a spectral selection:
If you wish to revert to the former colorway just go to and choose the Spectrograms tab and from there in the Scheme dropdown menu select Color (classic).
In addition to the Grayscale which was available as a choice for Spectrogram displays in earlier versions of Audacity there is now also an Inverse grayscale.
This too can be selected from the Scheme field in Spectrograms Preferences.
A new command has been added to the View menu, View > Track Name (on / off)
When this is enabled the audio track name is displayed superimposed translucently at top left of all audio tracks.
Note that the track name is always shown in the Track Control Panel but will be truncated if the name is too long to fit.
This has the same effect as the setting for Show track name as overlay in Tracks Preferences.
Audacity will now check for updates to see if a new update of Audacity is available. This is done on launch and then after every 12 hours while Audacity remains open.
The first time that you launch Audacity 3.0.3 you will see this dialog:
The dialog has a direct link to Application Preferences enabling you to turn update checking "off" in order to opt-out of update checking.
This is not an automatic update, update does not happen without you choosing to do so from the update checking dialog that appears when a new update is available.
This has long been one of the most-requested feature requests submitted by users to Audacity and it has finally been implemented.
You can opt-out of update checking by using a new preference in Application Preferences where you can turn this "off" or "on" at any time, the default setting is "on".
Now if and when Audacity crashes, or produces an error, there will be a dialog to enable you to optionally send error and crash reports back to the developers and Quality Assurance.
Not all error messages have the ability to automatically send back information to the developers and Quality Assurance.
We now provide an official binary for Linux in the form of an AppImage.
With the release of 3.0.3 Audacity has released the following Privacy Notice.
The Privacy Notice explains how Audacity collects and uses any information that, alone or in combination with other information, relates to you when you use the desktop application Audacity. We collect very limited Personal Data about you.
The Notice also sets out the rights that you have in relation to the Personal Data that we process about you and how you can exercise them.
In addition to the fixed bugs shown here, several changes have been made to increase the stability of the Unitary Project database structure.
P1 2754 - Change Tempo & Pitch and Sliding Stretch with selected audio in negative time crash Audacity on windows (error on Mac)
P1 2772 - Audacity crashes after failing to open corrupt project
P1 2793 - AUP3 projects fail to compact if project's path contains a single-quote
P1 - Audacity unresponsive after 'Fit to Height'
P1 - Audacity fails to export metadata with MP3 files
P2 2339 - On second run of Audacity "Filter Curve EQ" gets changed to "Filter Curve..." in the Effect menu
P2 2700 - "Failed to open the project database"
P2 2732 - Faux recovery offered on launch (very moonphase)
P2 - Audacity crashes with Macros on files when the macro-output folder is in an unwriteable location
P2 - If Temporary files directory is set to be unwritable then Audacity has a catalog of cryptic unhelpful errors
P2 - Linux: No support for Jack Audio System
P2 - Msgctxt feature of translation not working
P2 - The first use of the "window" command in LOF files is ignored by Audacity
P2 - The Macros output directory is in the top section in audacity.cfg
P2 - Open Project... under ScriptablesII can corrupt a project
P2 - Audio and MIDI files cannot be opened from FAT/FAT32 drives
P4 1309 - Paste with sync-lock can give error message but still do something
P4 1406 - Undoing envelope points by shortcut with mouse down creates spurious undo entries
P4 2466 - Linux: Filter Curve EQ GUI far too wide
P4 - Failed Macro command leaves empty undo item in history
P4 - Label Sounds fails when track sample rate is 22050 Hz
P5 1091 - Spectral Edit effects may have unpredictable results
With the release of Audacity 3.0.0 the project file structure of Audacity was changed significantly with the entire project contained in a single unified database file.
If you have already updated to 3.0.0 or 3.0.2 you should already be aware of this.
But if you are updating from any earlier 2.x Audacity version please read Updating from Audacity 2.x to Audacity 3.x.
Older Projects:
Audacity 3.x can usually open AUP files created in older 2.x.x versions of Audacity , but saving the project in 3.x will prevent it opening again in Audacity versions prior to 3.0.0.
Note that this will leave behind the old AUP file and its associated _data folder which you will probably want to delete to recover disk space.
Audacity version 3.x should be able to open projects from Audacity 1.1 onwards - but not from 1.0
Audacity Release Notes 3.0.3 - detailed release notes for this release of Audacity
As Audacity is now a 64-bit application, 32-bit plug-ins will not work on Audacity 3.0.3 or later.
The setting you make in Application Preferences for update checking is not changed by Reset Configuration.
But if you manually reset by deleting the audacity.cfg file in your Audacity settings folder this will get reset to "on" on next launch of Audacity.
Added a new Audio Setup button, replacing the Device Toolbar by default. The device toolbar can be re-added via the View > Toolbars menu.
The Effects menu has gotten a new sorting. Other sorting and grouping options can be found in the Effects preferences.
Updated the icons
Added a quick audio sharing feature.
More info can be found on https://support.audacityteam.org/basics/sharing-audio-online
VST3 effects are now supported.
VST3, LV2, Audio Units and LADSPA are now realtime capable
Plugins now automatically get scanned, tested and enabled when Audacity starts.
You can find plugins on
Apple Silicon (arm64) is now supported on macOS.
Note: When using an arm64 Audacity, you must use arm64 FFMPEG and plugins. Plugins for x86-64 (Intel macs) will not load.For the time being, Audacity will continue to offer x86-64 versions by default to avoid these incompatibilities, but you can download an arm64 version from Github releases.
FFMPEG 5.0 (avformat 59) is now supported, in addition to avformat 55, 57 and 58
Added support for Wavpack
On Linux, Audacity can now be compiled without JACK present.
Audacity now uses XDG directories on Linux. Note: If you are upgrading from a previous version, Audacity will keep using the ~/.audacity-data and ~/.audacity folders until you delete them.
Switched from mad to mpg123 as MP3 importer
Audacity has been added to .
Audacity binaries are now licensed under the GNU General Public License, Version 3. Most code files remain GPLv2-or-later, but VST3 support required this license update. More information can be found in the announcement post.
Removed the Zoom Tool
The Audacity Manual HTML pages no longer are included in the installation.
If you require offline access of the manual, you can download it here.You also can download PDFs of https://support.audacityteam.org straight from its sidebar (or the three-dot button in the top-right corner on smaller/mobile devices).
3079 Fixed Audacity sometimes not being able to import MP3 files (or reporting Huffman Data Overruns) by switching import library
2590 Fixed rare data loss bug when placing labels during recording
2272 Fixed clip titles being able to disappear off-screen when editing them
Fixed Punch and Roll not paying tracks in sync
Fixed clip titles changing name when applying some effects
During batch processing, Audacity will no longer stop to ask for a sample rate when an unsupported one is chosen, but choose the nearest supported one instead.
Fixed mod-script-pipe not being installed on Linux
Fixed GTK packaging in Appimages. This fixes various issues with icons, dropdowns and similar things not appearing properly.
Improved M4A/AAC support. Previously the target bitrate was not honored at all, now it can be set between 98 and 160 kbit/s (mono) or 196 and 320 kbit/s (stereo). The UI does not yet reflect these limits.
A full list of changes can be found on Github.
Windows
Audacity 3.2 supports Windows 10 & 11
Windows Vista, 7 and 8.1 should still work, but are no longer tested.
Downloads for older versions are available on the Legacy Windows page on the Audacity Website.
macOS / Mac OS X
Audacity 3.2 supports OS X 10.9 and later, and macOS.
There are legacy versions for older OS X at http://audacityteam.org/download/legacy-mac/.
Linux
In addition to the traditional update path via package managers, Audacity 3.0.3 and onwards are distributed as an AppImage. The AppImage gets updated at the same time as the Windows and macOS versions, so if you collaborate with users on those platforms, you may want to use the AppImage over your distribution's package manager.
Linux support is tested on Ubuntu 20.04.
Other Linux distributions should work, but aren't tested by the Audacity team.

Audacity 3.0.2 was released on 19th Apr 2021.
audacity-win-3.0.2.exe (application/x-msdownload) - 29534144 bytes
SHA-256 2fa8e586a339d9da8dcf49c21f4cd1cbaa24691b1dcc0d02f6c9f451ac8bea47
audacity-macos-3.0.2.dmg (n/a) - 41554455 bytes
SHA-256 57895aad20a5512aeb44d1ab5b7d01a68a5303d4225351528f377eb7686f281e
audacity-minsrc-3.0.2.tar.xz (n/a) - 13330160 bytes
SHA-256 728d6459931da006ed45a31e63b7fe6ca47a2547459a2aff3bf0880cef85c296
audacity-win-3.0.2.zip (application/x-zip-compressed) - 12588153 bytes
SHA-256 00b8f65fdffc6f213362bd01bb21e3c47f1b5cdf99b4fc5c8c0dd92a41e590e0
audacity-manual-3.0.2.zip (application/x-zip-compressed) - 23254582 bytes
SHA-256 5078ebf5c34af71abe60178b319cc6e6aae2e0d510bc400981e0899795ca362fAudacity 3.0.2 replaces all previous versions.
Over 30 bugs fixed since 3.0.0
Full details of new features in the visual guide to New features in Audacity 3.0.2
Windows
Audacity 3.0.2 requires the CPU to support the instruction set which should be available on any Intel hardware produced after 2001 and any AMD hardware produced after 2003.
To check what SSE levels your CPU supports, you can install .
If your hardware only supports SSE, you may download Audacity 2.0.6 see the page on the Audacity Website.
3.0.1 does not support Windows XP.
You may try 2.2.2 on XP, but it is unsupported.
macOS / Mac OS X
Audacity 3.0.2 is for Intel Macs running OS X 10.7 and later and macOS.
There are legacy versions for older OS X at .
Linux
Linux support is tested on Ubuntu Linux.
Audacity may compile on Gentoo, Debian, Mint.
Audacity does not currently compile on SuSE Linux.
We probably track more bugs than you are interested in...
We used to have a separate page with a dynamic buglist for each version, but nowadays we recommend instead to visit our for current bug status.
We do use this detail in our own QA work.
Below are listed what we believe are the most common and important issues with 3.0.2 for most users.
macOS Big Sur
Accessibility
Less of Audacity is properly accessible to visually impaired users than we would like. Currently the best supported platform for accessibility is Windows. We lost a lot of custom accessibility programming when we had to move to a more recent version of the wxWidgets library.
Internationalization
Audacity is only partially translated in many languages. We also have some issues, for example, with Right-To-Left Languages.
Selected Bugzilla-Tracked Bugs
Click on the bug numbers to see work done on these bugs.
Audacity 2.4.1 was released on 20th May 2020.
audacity-win-2.4.1.exe - 28245064 bytes
SHA-256 dde069264974b3bf7a0b556ea3037bb424630e3112735f99129f3d84921e547f
audacity-macos-2.4.1.dmg - 39745448 bytes
SHA-256 5d340b025b80eb0c3ea41ae2487a77b86527bc8fb0e058d32e37762ac3d85575
audacity-minsrc-2.4.1.tar.xz - 11368524 bytes
SHA-256 d476e25129846108d8a57f818ea0c0b90912d3dd4127eb7365cac5fbe0458dc6
audacity-2.4.1.zip - 11636331 bytes
SHA-256 23f388b22974eb9ee05672e52d34971000e9c5656551bfe9b348e16ac1c5e495
audacity-manual-2.4.1.zip - 22600322 bytes
SHA-256 a18186de8788510a34298b857947b55e49029b622ce8e6119e53db4c427b60d5Audacity 2.4.1 replaces all previous versions. It contains a rapid fix for a serious bug in the briefly issued Audacity 2.4.0 release.
Over 100 bugs fixed since 2.3.3
Full details of new features in the visual guide to New features in Audacity 2.4.1
Windows
Audacity 2.4.1 requires the CPU to support the instruction set which should be available on any Intel hardware produced after 2001 and any AMD hardware produced after 2003.
To check what SSE levels your CPU supports, you can install .
If your hardware only supports SSE, you may download Audacity 2.0.6 see the page on the Audacity Website.
2.4.1 does not support Windows XP.
You may try 2.2.2 on XP, but it is unsupported.
macOS / Mac OS X
Audacity 2.4.1 is for Intel Macs running OS X 10.7 and later and macOS including Catalina.
There are legacy versions for older OS X at .
Linux
Linux support is tested on Ubuntu Linux. Use the CMake build. The Automake build is no longer reliable.
Audacity may compile on Gentoo, Debian, Mint.
Audacity does not currently compile on SuSE Linux.
We probably track more bugs than you are interested in...
On the dynamic buglist page you can select to view:
Complete list of bugs in 2.3.3 that we have fixed for 2.4.1
Known bugs on the OS you use Mac, Windows or Linux.
Known bugs to do with accessibility or localization.
You can choose various combinations of these. However, there are probably too many minor bugs and too much detail on that dynamic buglist page for most users.
We do use this detail in our own QA work.
Below are listed what we believe are the most common and important issues with 2.4.1 for most users.
Accessibility
Less of Audacity is properly accessible to visually impaired users than we would like. Currently the best supported platform for accessibility is Windows. We lost a lot of custom accessibility programming when we had to move to a more recent version of the wxWidgets library.
Internationalization
Audacity is only partially translated in many languages. We also have some issues, for example, with Right-To-Left Languages.
Selected Bugzilla-Tracked Bugs
Click on the bug numbers to see work done on these bugs.
Translating Audacity is the best way to get involved right in Audacity's UI without having to code.
Audacity is translated into multiple languages by volunteers across the world. If you want to contribute to translation please join the audacity-translation mailing list and read the instructions below.
Before joining the Audacity project in Transifex please subscribe to the mailing list and check the status of the translation you would like to contribute to with others members of the list.
You can find and join the Audacity project at https://explore.transifex.com/klyok/audacity/
Click the JOIN THIS PROJECT button on the right side.
Select the language you would like to contribute to from the dropdown.
Click Join Project (if the language is Available to join) or Request Language if the language you want to contribute to is not available yet.
Once you have been approved as a translator you will receive a notification by email. After that you will see the project in your Dashboard and you can start to contribute.
Click Translate at the top right side
Select Audacity from the Resource Overview panel to start editing
Select the string to translate and type the corresponding translation
Audacity uses GitHub and you can explore the available translations at
Each language translation is stored in a PO file. For example it.po is the Italian translation and ko.po is the Korean translation.
These are some programs you can use to edit PO files:
for Windows, macOS and Linux
for KDE4
for Windows and macOS (beta version)
If there is no translation PO file for your language create a new one using the following steps:
Download the file from Audacity GitHub
Open poEdit and select Create new... (Create new translation from POT Template)
Select the audacity.pot file and click on Open
If you want to update an existing translation
Download the PO file for your language, for example it.po or open a previously translated PO file from your computer.
Download the file from Audacity GitHub
Open poEdit and select Browse files (Open and edit translation files)
To submit a translation, please send the completed .po file to the audacity-translation mailing list. A member of Audacity Team will commit the file and send a message to the list confirming this.
You can get an up-to-date alpha version of Audacity, NOT suitable for production use, but good for checking translations on, in the nightly version: . From there, you’ll find there are choices of builds for different platforms. Download the right one for your platform.
On Windows, open the “Languages” directory inside the unzipped Audacity folder, then open the directory with the same name as your .po file. On Mac OS X, right-click or control-click over Audacity.app > Show Package Contents then open the relevant LPROJ directory inside the “Resources” directory. On GNU/Linux, open the relevant “locale” directory in usr/share/ or usr/local/share.
Please read for more tips on translating the Audacity source code, and to learn how the Audacity software is translated.
You can apply any of the existing macros using the Macros Palette. To open it you can either:
Use the menu Tools > Apply Macros > Palette, or
Use the Shrink button in the Manage Macros dialog
Once invoked, the Macros Palette window will remain on-screen, actively available, at all times unless and until you dismiss it or close Audacity.
In the "Macro" list, left-click on a Macro (or use Up or Down keyboard arrow) to select the Macro you want to apply.
Use the Project button to apply the selected Macro to the current project.
The typical purpose of this option is effect automation - apply a sequence of effects to the project, using effect parameters and an order of applying the effects that you have found to work well for the type of audio you are processing. This saves time and provides consistency in your workflow.
The effects in the Macro are applied to the region of in the selected . Usually the selected Macro would not include an command so as to use the greater flexibility of the .
If an export command is included in the Macro, the entire project audio is exported irrespective of track or region selection. Therefore if the project contains multiple audio tracks, they will be together, unless any of the tracks are muted on the .
If the project has been Saved, then the exported files will be saved in a folder named macro-output. The macro-output folder will be in the location specified in .
If the audio in the project came from an imported file as its initial step (that is, it is a named project), the macro-output folder will also be in the location specified in .
If the project has not been saved and is un-named, the normal
The typical purpose of this option is batch processing - apply the Macro to multiple audio files so as to apply one or more effects to them, and/or convert them to another file format. You can convert from any file format to WAV, MP3, OGG or FLAC.
Use the Files... button to apply the selected Macro to selected external audio files that are in a single directory.
If you already have audio in the current project window, you must save and close that project using File > before applying a Macro to files.
You cannot process (for example, 5.1 surround sound files) using Macros, even if has been set to "Use custom mix". Any multi-channel files you import will be mixed down on export.
A standard File Open dialog box will appear. Choose a directory then you can select one or any number of supported audio files in that directory, including older AUP project files (but not AUP3 project files).
You cannot select files outside that directory, and files in folders inside that directory will not be processed.
It is convenient therefore to first put all the audio files you want to process into one folder before applying the Macro.
Use the Expand to return to the full-size, full-function dialog.
The apply Macro buttons are also available on the dialog - so all Macro operations can be made from that full dialog.
To dismiss the dialog simply click on the Cancel button
Otherwise the dialog will remain open on the screen, but allowing you to perform other Audacity functions.
Audacity 3.1 was released on 27. October 2021
Audacity 3.1 replaces all previous versions.
The old Time Shift Tool has been replaced by Clip handles. Clip handles are the rounded corners above the clip which feature the clip title. You can move clips around by simply clicking and dragging the clip handle, and you can rename clips by double-clicking the clip handle.
Label tracks don't feature clip handles, but they can be moved around just the same: Simply click on the label (the bar for region labels, the circle for point labels) and drag them to their new place.
Audacity now can trim clips non-destructively by dragging the upper edge of a clip. This means that you can make clips shorter, then do some edits and then decide it should be longer anyway - the data will still be there. Copy-pasting the trimmed clip also will have that info available!
Developer info
Bug tracker and code can be found on Github

Click Save Translation and select the next string to translate.
poEdit will ask you about the Translation Language. Select the language from the dropdown and click OK.
Select Translation > Properties... and verify that the Character option is set to UTF-8 otherwise poEdit will not save any translations with non-English characters.
Translate each one of the entries using the Translation textbox
Select File > Save to save as a PO file. Select a destination folder and type a name for the file. Click on Save. poEdit will save a .po file plus a .mo file for use in Audacity.
Select the existing PO file for your language and click on Open
Select Translation > Update from POT file... and look for the audacity.pot file you downloaded previously. This will update your PO file with the latest strings from the downloaded POT file.
Translate each one of the entries using the Translation textbox
Select File > Save to save as a PO file. Select a destination folder and type a name for the file. Click on Save. poEdit will save a .po file plus a .mo file for use in Audacity.
Rename the saved .mo file to “Audacity.mo”, and paste it into the directory you opened or created.
Open Audacity and in Preferences > Interface, choose your language and click OK. You should now see your translations.
To download a PO file from GitHub click on the link for the .po file for your language. On the page you come to, right-click the Raw button and then select then Save target or Save link as. Select the location to place the PO file.
Use the wxWidgets languageinfo.cpp file as a reference to the list of translated languages.
The following instructions use poEdit 3.1.1 to illustrate the process of translation
The following instructions use poEdit 3.1.1 to illustrate the process of translation


P3
NEW
Linux: High-dpi displays are not supported
P3
RESOLVED
Faux recovery offered on launch (very moonphase)
ID
P
Status
Summary (3 tasks) ⇒
ID
P2
RESOLVED
"Failed to open the project database"
Serious bugs and less serious bugs.
P2
RESOLVED
Linux: Unwanted messages in console.
P2
RESOLVED
Crash importing malformed MP3 file using libmad
P2
RESOLVED
Mac: Keyboard tabbing in Timer Record stuck in left hand panel.
P3
NEW
Linux: PULSE-AUDIO issues. Freeze repeatedly starting/stopping streams
ID
P
Status
Summary (5 tasks) ⇒
P1
RESOLVED
Mac: Zoomed in, playback meters slow to respond.
After selecting the audio files you want to process, choose Open.
Each file will be imported into Audacity and processed, exported to the format you chose in the Macro, then the processed audio will be removed so as to clear the temporary disk space that had been used.
The exported files will be saved in a folder named "macro-output" in the folder specified in the Macro output field in Directories Preferences. The original files are not altered.
If you leave the entry for Macro output blank in Directories Preferences then Audacity will default to creating a folder called "macro-output" in:
Windows: C:\Users\<your username>\Documents\Audacity
Mac: /Users/<your username>/Documents
Linux: /home/<your username>/Documents
Macros will work on pre-existing selections you make in your project prior to running the Macro. But the selection can be over-ridden by your Macro itself as there are macro commands available to effect selections in the audio. In particular All(Select All) will select the entire project and Select which is parameterizable (see the provided Fade Ends Macro for an example where the first and last one seconds of the audio are selected for the fades).
You cannot apply a Macro to multiple Audacity AUP3 project files, instead you need to use Python scripting.
The selected Macro must include an Export step, otherwise the processed audio will not be retained.
When a Macro is applied to files, the only option is to import and process the entire file. Thus the entire file will be exported unless an action or effect in the Macro (such as Cut or Truncate Silence) removes some audio.
If modifying the audio before exporting, the Select Time function may be useful to select audio to remove or modify.
Some optional have parameters to and Nyquist can do calculations too, so it may be helpful to use Nyquist plugins from within a macro.
It is recommended not to process more than 500 files at a time.

When looping is enabled, you can press Shift+Play to only play the looping region once.
Since it's conception in 2000, Audacity had cross-platform support of both Windows, macOS and Linux as it's goal. But macOS at the time didn't have a right-click, so to not hide features from mac users, Audacity didn't have any right-click context menus. The situation has changed since then, and there no longer is anything hindering right-click context menus, so they now have been added to a few places, such as in the waveform of clips and the empty (dark grey) space outside of tracks, providing relevant options right there.
In the preferences, is now disabled by default. This makes multi-track editing easier (even if you're not using Sync Lock). You may now see an error saying that there isn't enough space when pasting clips in-between other clips though, so if that happens to you too frequently, you may want to turn it back on.
The spectrogram defaults have been changed: scale type to Mel (was Linear), top of scale to 20000 Hz (was 8000 Hz), window size to 2048 (was 1024), and zero padding to 2 (was 1).
Since Audacity 3.0.3, there have been two hot-fix releases (3.0.4 and 3.0.5), both fixing a bug each which could lead to data corruption. Thanks to the automatic updates introduced in 3.0.3, we actually could make these hotfixes and be reasonably certain that they'd actually reach users and potentially avert data loss.
In addition, we fixed a number of bugs, from the very small (the play button had 1-2px cut off at the bottom) to some larger ones (especially crashes/bouncing balls of death). Some more details can be found below.
Context menus have been added in more places.
In the preferences, Tracks > Track behaviors > Editing a clip can move other clips is now disabled by default
The spectrogram defaults have been changed: scale type to Mel (was Linear), top of scale to 20000 Hz (was 8000 Hz), window size to 2048 (was 1024), and zero padding to 2 (was 1).
The main volume controls no longer change the system volume.
Raw Import now will remember the previously used settings. Automatic detection of the format now is a button.
A journaling feature has been added for QA purposes.
Generate > Tone now supports triangle waves.
There now exist "What's new" screens for the update and welcome dialogs.
Timeline Quick Play for regions and locked regions have been replaced by playback looping.
The shortcut to rename labels and clip names has temporarily been hardcoded to Ctrl+F2.
This conflicts with the default xfce shortcut to change workspaces.
FFMPEG now supports avformat 55, 57 and 58.
PortAudio has been updated to version 19.7 and devendored (so it can be built against 19.6).
Several libraries (expat, libsndfile, ...) have been devendored. The CMakeLists.txt lists which versions we build against.
There are some 50 issues closed labeled as bug. Among them:
AppImages support localization. #1382
Progress bars for Nyquist generators have been made more accurate. #1856
Rhythm tracks can no longer drift off-time by 2ms over 9 minutes; they're now sample-accurate. #1853
The play button has regained a pixel or two to become a triangle once more.
Auto Duck has been made way more accurate and should no longer miss sections above the threshold.
The manual now only is included in the executable once
Shift-clicking a menu item no longer opens the settings menu
FFMPEG no longer segfaults ALSA
Audacity no longer crashes when macros output directory is set to C:\
A bouncing ball of death problem has been fixed
Windows
Audacity 3.1 requires the CPU to support the SSE2 instruction set which should be available on any Intel hardware produced after 2001 and any AMD hardware produced after 2003.
To check what SSE levels your CPU supports, you can install CPU-Z.
If your hardware only supports SSE, you may download Audacity 2.0.6 see the Legacy Windows page on the Audacity Website.
3.1 does not support Windows XP.
You may try 2.2.2 on XP, but it is unsupported.
macOS / Mac OS X
Audacity 3.1 is for Intel Macs running OS X 10.7 and later and macOS.
There are legacy versions for older OS X at http://audacityteam.org/download/legacy-mac/.
Linux
In addition to the traditional update path via package managers, Audacity 3.0.3 and onwards are distributed as an AppImage. The AppImage gets updated at the same time as the Windows and macOS versions, so if you collaborate with users on those platforms, you may want to use the AppImage over your distribution's package manager.
Linux support is tested on Ubuntu Linux.
Other Linux distributions should work, but aren't tested by the Audacity team.


Audacity helps you to split a long recording into separate songs for export as one audio file per song. You can for example record an audio CD or LP and then export each song into a separate file.
Use the Selection tool to remove unnecessary audio (mostly silence) from the start of the recording.
Click the Skip to Start button
Zoom in until you can see from the start of the track to the start of the music
Click and drag from the start of the music to the start of the track
Click on Edit >
Similarly, remove unwanted audio from the end of the recording and from the middle (between sides 1 and 2 of the LP or cassette).
Save your work! Click on File > Save Project > .
Mark the start of the first song
Click the Skip to Start button
Click on Edit > Labels > , or use shortcut Ctrl + B.
A new label is created in a new underneath the audio track. The contents of the label are selected and ready for editing. If you need to play the track to decide where to place the split points, you can use Add Label at Playback Position instead (directly underneath , or use shortcut Ctrl + M (on Mac it is ⌘ + .).
Mark the rest of the songs
Using the Selection tool, click near the beginning of the second song
Repeatedly click the Zoom In button until you can see just the first few seconds of the song
Click as closely as possible to the start of the song
If you did the original recording properly and avoided clipping, the recording is probably not at the maximum possible volume. In order for the LP or CD to be burned at maximum volume and thus match other LPs or CDs in your collection we need to fix this.
Click on Select > , or use shortcut Ctrl + A
Click on Effect >
The default choice in this dialog is to amplify to a maximum of -1.0 dB. The maximum setting is 0 dB, but the default setting of -1.0 dB provides a little headroom as some players can have playback problems with audio at 0 dB.
Some consumer-level turntables, tape decks and/or amplifiers may well record stereo channels with a stronger signal in one channel than the other, which you will probably want to correct. In that case, check the box that says Normalize stereo channels independently.
One problem when copying records is that a loud click in one channel can cause Normalize to create an unwanted change in the stereo balance. In that case you should consider removing the click before the Normalize step, using .
The final step involves creating multiple audio files from the Audacity project.
Click on File > Export > .
Click the Choose... button and pick the place where your exported tracks will be saved.
Choose the export Format from the drop-down menu:
Backup your exported WAV or MP3 files - you do not want to lose all that valuable work and have to do it all over again. Computer hard drives can fail, destroying all data.
Ideally use a dedicated drive (1+ TB external magnetic drives are convenient and economical), or upload to an online (cloud) storage service to store the WAVs or MP3s. Better still is to make two copies on different external devices and even better is to hold an online backup as well as the local copies.
You may want to create a taxonomic file structure - for example each album can be stored in its own folder (named for the album) within a folder named for the artist (or, perhaps, composer for classical music) to make searching and retrieval easier.


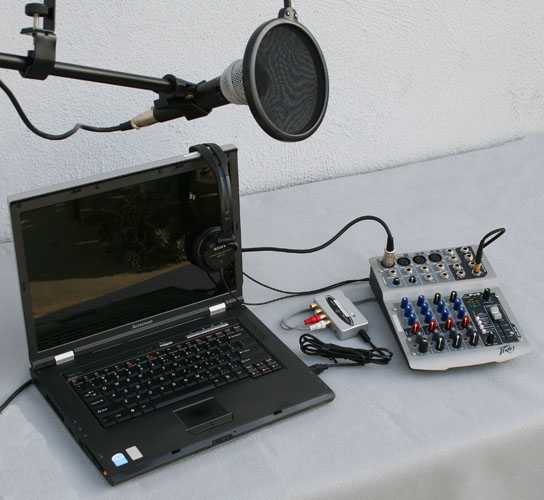
These are the rules designed to give the entire user guide a somewhat unified style. You may apply them with some freedom.
The goal of the user guide is to provide explanations on how to perform various tasks in Audacity.
Documenting features seems like the obvious thing to do: Audacity has various menus, so better have a list of what every option in that menu does. However, this leads to the situation where some pages are completely unfindable as a reader already needs to know where certain options are in the menu in order to find out what the page would be called. For example, the feature containing the slider for the recording and playback volumes is called Mixer Toolbar. But nobody except the people most intimately familiar with Audacity know it's called that!
To combat this, try to write your guides as a way towards a goal, or a task. The above example, instead of naming the page after the feature, name it after the task it does, so:
Tasks aren't necessarily tied to individual features. For example, can talk about several tools as once as they all are means towards a common goal.
A page showing the Markdown for all the basic and fancy options there are. Also compares it to Github's Markdown. This block is the page description.
Contrast this page to:
raw markdown:
Github's markdown renderer:
(shows up in the outline)


Type the title of the first song
Click on Edit > Labels > Add Label at Selection, or use shortcut Ctrl + B
Type the name of the song into the label
Repeatedly click the Zoom Out button until you can see the start of the third song
Continue in this manner adding a label to mark the start of each song
for loading into an MP3 player, choose MP3
for loading into Apple Music/iTunes/iPod you can export as WAV and use Apple Music/iTunes to convert the WAVs to AAC or MP3.
Under Split Files Based On:
Labels should be checked
Include audio before first label should be unchecked, as there is no audio before the first label
Under Name Files:
Using Label/Track Name should be checked.
Click the Export button.
Metadata Editor will appear for the first song. The Track Title and Track Number will be pre-filled from the labels, but you can enter any additional information for that song that you wish (for example, Artist Name and Album Title).
Click the OK button in the Metadata Editor (not the Save button).
Metadata Editor will appear for the next and the subsequent songs; as before, enter any additional information and click "OK" for each window. When you click "OK" on the window for the last song, all the files will export.
Later in this tutorial we mention that you can use the Analyze > Label Sounds... command to identify spaces between the songs, so when you are editing the transition between side 1 and side 2 be sure to leave 2 or 3 seconds of silence, similar to what you would find between songs.
You can save time by using Analyze > Label Sounds... to automatically label the regions to be exported for the songs. This method thus lets you exclude some or all of the areas between songs.
This tool depends on correctly detecting the "silences" between tracks and this depends on setting their parameters appropriately for your track.

If a feature has several ways to access it, use the most accessible option. For example, for an "how to play audio" article, simply mention the big green play button and the shortcut Space. Don't also mention Transport > Playing > Play/Stop.
There are some exceptions to this, especially when documenting more "advanced" features like Macros which need extensive guiding about how to operate it. Instead of a linear "go here, then here and there, and then you're done", split them up into sub-tasks (for macros: creating macros, editing macros, etc.) and keep these unrelated tasks on one page. Avoid breaking it down to the point where you are explaining individual buttons (don't say "the cancel button cancels the effect without applying it")
Audacity's user base consists largely of casual users. As such, you can't expect the readers of your guide to understand even fairly common audio terms (for example: compressor or loudness vs volume), unless it's directly connected to the topic you're writing about.
For example, if you write a guide about compressing and expanding audio, you don't need to hold yourself up on explaining what a compressor is, since the only people who'll ever end up reading that guide are people who already know about that. However, if you were to mention a compressor on a page about general audio editing, you would need to explain what a compressor is good for.
That said: If it's possible to describe a feature without needing to resort to lingo, use it even if it's slightly less accurate. For example, "punch-in repair" would be the accurate term for Re-recording a section, but also is way harder to understand and thus to find.
While there's a lot of things you can write about in relation to Audacity, keep in mind that this site is focused on user guides (or how-to guides, or tutorials - they all have the same idea). We want to minimize work on contributors while maximizing impact, so guides should be kept as general as possible. Only use qualifiers such as "for podcasters" or "for musicians" if their use case shares almost no resemblance to what everyone else would be doing anyway.
You can address the reader directly ("you"). You should remain impartial in the process though, so no "I" or "my".
The overall tone should be friendly but not patronizing, and the language should have a healthy middleground between casual and technical.
Titles should reflect the task you're trying to teach. For example, if you're teaching how to add reverb, the title should be "Adding reverb"
The title should be concise (try keeping it below 60 characters).
Page titles should be written in sentence case. So generally, the first is capitalized while everything else is not, except proper nouns and acronyms ("Audacity", "FFMPEG").
Underneath the title is a field for page descriptions. These descriptions are the first thing users see of the article when looking at Google, or seeing an embed to it somewhere.
As such, they should give a good summary of what the page is going to be: In a few words, how will a goal be achieved? What features will be used?
Instructions should be written in a step-by-step list where useful. For example:
Do This
then that
then a third thing
If you need to interrupt the steps for explanations, you can either do
Do this
then that (shift+enter) Note: This is an explanation on a new line
then a third thing
If instructions are different depending on the operating system or other factors, you can use tabs, like this:
Windows Instructions
MacOS instructions
Linux instructions
Tabs aren't part of standard Markdown, so they probably won't show up properly if you're using github or a local editor. They'll show up just fine on Gitbook though.
If a task has a main way of working, but may benefit from additional context, you can use the Expandable block:
You can take screenshots using the clipping tool or tools like ShareX. ShareX has the advantage that it has built-in tools like arrows, step-by-step bubbles and labels which can help you visualize several steps at once.
With images, there always is a tradeoff between easy maintainability, clarity and context. So crop them as much as possible without losing important context, and use them in a way that makes updating them as painless as possible.
Gitbook offers 4 types of info boxes.
These info boxes aren't part of standard markdown, so if you're not using gitbook itself, but edit through Github or a local editor, they will look a bit silly in your preview (but show up correctly here).
If an image is worth a thousand words, a video tutorial can be worth a million: At it's best, it can tell the entire story the written guide would make in a way that always has all necessary context and requires no lengthy description of where to find things.
However, video tutorials can go out-of-date incredibly quickly and then cause a lot of confusion among viewers.
Because of this, a video tutorial must follow these rules to be added to an Audacity Support page:
The video must clearly state what version of Audacity it's referring to in the beginning.
The video must be in the language of the Audacity Support page it's meant to be embedded in. Right now, that's English only.
The video must be a dedicated Audacity tutorial or how-to guide.
The video must refer to Audacity Support as the place to get up-to-date help from.
The video must not contain a sponsorship read, and it is preferred to have the video completely ad-free.
The video should be licensed Creative Commons-Attribution (see ). This way, if your video goes out of date, other people can update only the part of your video that goes out of date.
The video and the Audacity Support page it's supposed to be embedded in should match the steps they take. If the video tutorials goes on a tangent unrelated to the initial task, the written guide may omit the tangent and instead place the contents of the tangent in a "See also" section.
The following points are considered best practice for video tutorials:
Start with the purpose and version number and then go straight into the content: "To do XYZ in Audacity 4.2.0, first go to..."
Use a script which you follow when making your video. This will automatically eliminate the following two points, and also get you a long way towards making subtitles.
Avoid going off-topic, eg "hey guys, and welcome back to another video! my sister's aunt's nephew requested I make a tutorial so he can cook his eggs using Audacity to which I said..."
Go through your tutorial linearly step-by-step, and avoid jumping back to earlier sections much later in the video. For example, if you are in Step 9 already, jumping back with a "oh yeah, I forgot to add that in Step 3, you need to also do..." is majorly confusing.
Add subtitles to your videos. Not only do they make your tutorial more accessible to deaf people, they also are useful to people who have trouble understanding your dialect or accent, or who want to auto-translate the subtitles into their own language.
Use chapters on YouTube to mark major steps in your video. They work by putting the following in your video description:
This is a living document. It contains the best practices, as determined by the community. Feel free to discuss additions and changes on the discussions page, or in the discord.
0:00 Intro
0:30 Step 1. Clicking here
0:45 Step 2. Sliding there
1:00 Step 3. Cha-cha-cha
(note: the first timestamp must be 0:00)Rule of thumb: If a feature is easy to use, but hard to find, document it like a task, ie answering the question "how do I do x". If a feature is hard to use, document how to use the feature as a series of sub-tasks if possible.
Caution: The following topics are out of scope:
Audio-related content beyond Audacity, like: "how to build a quiet recording booth"
Note: When the title explicitly refers to an option within Audacity itself, use the spelling found inside Audacity. So for example, "Using the Noise Reduction effect" would have "noise reduction" capitalized, but "Reducing noise in Audacity" would not.
Note: Tabs are quite big blocks, visually speaking. When using them, make sure that what you're showcasing is worth this space. For example, if you're just saying that undo is Ctrl+z on Windows and Linux, you can just put brackets behind it for the mac instructions - "press Ctrl+z (Cmd+z)"
Info: Use these for information which is useful to know, but not necessary to fulfill the task. These boxes should be started with
Info:, Note: or Tip: for general additional information
Warning: Use these for information where things might go wrong and the user might get undesired results. These boxes should be started with
Caution: or Warning: depending on which feels more appropriate in terms of urgency
Danger: Use these for super important information only, where ignoring the danger box would lead the user to irreparable damages (lost data, broken audio, ...). These boxes should be started with
Danger: for super important info
Success: Use these for things the reader should do. These should be started with
Best practice: or Do: for best practices
(does not show up in the outline)
Headings can be used anywhere, including inside other blocks.
Bold,
Italics,
Code,
Strikethrough,
Link,
internal link,
anchor link,
page link: Style Guide,
page anchor link: Inline text formatting options,
colored text,
colored background,
both colored,
LaTeX: f(x)=x∗e2piiξx
These can be used anywhere.
Unordered
List
Ordered
List
List with
sub-items
can have
...
Lists can be used anywhere, including inside other blocks. They can only include inline content and other (nested) lists.
Infoboxes:
A quote block
These blocks can be used inside of Tabs. The code block can also be used in Expandables, but cannot have other blocks inside it. The quote block and infobox can have headings, inline content and lists inside it.
Inline image:
Image block:
Attached file:
Embeds cannot be used inside of other blocks except the Tabs block, nor can other blocks be placed inside them.
text
Tables cannot be used inside other blocks except the Tabs block, nor can other blocks be placed inside them. Inline content works inside of text columns only.
content of first tab
content of second tab
content of third tab
Tabs cannot be used inside other blocks. Tabs can have most other blocks inside them, except of other tabs, expandables, and API blocks.
Expandables cannot be inside other blocks. Expandables can have headings, lists, code blocks, and inline content inside them.
A Gitbook-specific drawing thing, generating SVGs. Likely useless when using Markdown.
Cannot be placed inside of other blocks except the Tabs block. That said, an inline variant is available which can go pretty much anywhere.
GET https://example.com/example
shows itself up in the outline. Example of all available parameters follows:
id
String
Description
id*
String
Description
id
String
Description
id
String
Description
id
String
Description
{
// good Response
}{
// not found Response
}{
// error Response
}Cannot be used inside other blocks. Can only contain plain text. Unfortunately very tailored towards web APIs only.
// a code blockcode blocks <b style="some_css: 23px;" class="and other things"> also supports syntax highlighting</b>Hint
Caution
Danger
Success
Select-option and files columns appear empty in Markdown. Avoid using them.
A Macro is a sequence of pre-configured commands (mainly effects) in a set order that can be applied automatically to projects or audio files.
Macros in Audacity can be used for:
Batch processing: Apply one or more effects to multiple audio files and export the processed audio into a new file.
To use this select the Apply Macro to: Files... button in the Macros Palette or the Manage Macros dialog.
For more detail on batch processing please see this page.
Effects automation: where the in the or tracks in the current project is subjected to the same prescribed sequence of effects, and optionally, a file exported from the entire audio.
Effect presets: where selected, commonly used, effects are stored with your preferred settings for quick re-use.
You can manage and apply Macros using the :
Tools > Macros... to manage Macros: them
Tools > Apply Macro > Palette... for a
Tools > Apply Macro > named Macro to
There are some and tips on using them.
Use Tools > Macros... if you need to create a new Macro or to edit an existing Macro.
Use the Shrink button to show a reduced dialog which lists the existing Macros.
This dialog is also available directly via Tools > Apply Macro > Palette...
Both the dialog and the dialog have Apply Macro to buttons:
Project applies the selected Macro to the current project.
Files... applies the selected Macro to selected external audio files that are in a single directory.
For more details see the page.
Commands that call Effects, Generators, Analyzers or Tools, use the same familiar graphical interface (GUI) as appears when they are used from the normal top level menus.
Many of the other commands provide a simple GUI comprised of checkboxes and text entry boxes. Typical examples can be seen in the and menus.
Please see for more details.
You can export a Macro as a TXT file using the Export button in and send it to another user, or copy it to another computer for use there
You can import another user's Macro, or a copied macro of your own, into your Macros folder by using the Import button in .
Each Macro is automatically saved as a separate text file with TXT in the Macros folder in Audacity's folder for application data:
Windows: Users\<username>\AppData\Roaming\audacity\Macros
Mac: ~/Library/Application Support/audacity/Macros
Linux: ~/.audacity-data/Macros
See the page for examples of using Macros
This page is an overview of prominent new functionality that has been introduced in Audacity 3.0.2
Version 3.0.2 is primarily a maintenance release.
Details of all the major changes since 3.0.0 can be found in Audacity 3.0.2.
Audacity 3.0.2 is about bugfixes for Audacity 3.0.0. Some bugs which didn't show up in our testing of 3.0.0 became apparent once 3.0.0 was being used by more users. We wanted to fix these and also to get more diagnostic information about what goes wrong when SQLite (the database we use) can't read or write a file. So we added more informative diagnostics for when there is an error.
One cluster of bugs we fixed relate to Unicode. Unicode is a system for representing many non-English letters and symbols. We, Microsoft and Apple all have made mistakes with Unicode that affected Audacity 3.0.0. One during 3.0.0 turned out to be a Windows update issue with Unicode input, which was resolved by a later Windows update. Disappearing checkmarks in macOS Big Sur release turned out to be a Unicode issue, believed to be in Apple code, which we in 3.0.2. A with Unicode prevented Audacity working in Korean and Japanese.
Some of our bug-fixes are small changes in areas where the previous Audacity behaviour was not as we wanted. 3.0.2 may only be a 'point' release, but we think it's one most people using 3.0.0 will want.
After 3.0.0 was launched a few users discovered a couple of mysterious bugs which we had not encountered in our extensive QA testing of alpha and Release Candidate builds. These two important bugs that 3.0.0 users saw were hard for us to track down as we could not replicate them. We added extra diagnostic information to help us do that:
Error: Failed to open database file
There was an error which only occurred occasionally for a few users but had us mystified. Usually this seemed to occur when trying to import an audio file, but there may have been other ways it could happen. It did not appear to be causing users to experience data loss or damaged projects. It was this bug:
We added a Show Log to this error message so we could gather more information about this to aid the developers in analyzing the issue. This led to what's probably a solution, as Jack L, with this extra logging, was able to get the problem sufficiently often for us to get a handle on it. This extra information told us that in some circumstances we were trying to access the disk before it was ready again, with back to back requests too quickly. Paul then changed the logic of opening a database so that two important requests were always one after the after. This should address the opening issue. Leland added a retry, so that if SQLite can't yet read the database, it tries again, but fractionally later. The retry timeout should benefit all code in Audacity that reads the database, not just at the time of opening. Jack L then ran his torture tests workload and the problem he experienced was gone.
Even so, because the original error was only occasional, we can't know for sure that it, or similar issues, are gone! We still have the extra logging in Audacity. If you do encounter the dialog indicating a problem, please click on the Show Log chevron to generate the log and send us a copy of the screenshot to the . You may see a variant of the message, "The project's database failed to reopen"
False recovery offered on launch
This is another mysterious issue which only occurred very occasionally and was foxing us.
Sometimes after exiting Audacity without saving the project when offered, on the next relaunch a false recovery can be offered when there is really nothing to be recovered as no crash has occurred to cause this. We think this error had the same underlying cause, but we don't know for sure.
This bug is . If you encounter this and accept this recovery it "recovers" an empty project and no damage is done.
If you do see this error, please let us know what you can of how it happened.
With the release of Audacity 3.0.0 the project file structure of Audacity was changed significantly with the entire project contained in a single unified database file.
If you have already updated to 3.0.0 you should already be aware of this.
But if you are updating from any earlier 2.x Audacity version please read .
The Manage Macros dialog has been improved for this release:
The Cancel button has been removed
It is replaced with a Close button
A new Save button has been added to enable you to save the results of editing a Macro.
The Save button is grayed-out until you edit a Macro.
We have extended the options in Directories Preferences to include a new entry for Macro output.
If you leave the entry for Macro output blank then Audacity will default to creating a folder called "macro-output" in:
Windows: C:\Users\<your username>\Documents\Audacity
Mac: /Users/<your username>/Documents
Nyquist effects fail silently with One hour plus stereo
Win: Vocal Reduction and Isolation most options fail
Noise Gate fails silently if "hold" is non-zero
Progress dialog interferes with scripting
(Japanese & Korean) "Unable to parse project information"
Noise Gate fails on a one hour stereo selection
VST_PATH environment variable fails for non-standard locations
Nyquist: Audacity crashes when running seq-write-smf
In Macros, Record New Track and Play with a selection do not wait for completion.
Noise Gate 'Level Reduction' has a minimum of -60 dB
Enh: Some preference changes are not written until Audacity exits
Linux: Internal Error at DBConnection.cpp line 275
- detailed release notes for this release of Audacity
Technical documentation about the internals of Audacity.
Key + Combinationfor shortcuts2720 Cannot open project that's in a read only folder - error message vague
2710 Compressor with audio before T=0 crashes Audacity
2703 Mac: EGAT preview dialog is hidden behind the EGAT dialog
2707 Opened projects not being removed from "audacity.cfg"
2697 Linux: AUP3 projects use incorrect char size on "differently" configured wxWidgets
2718 Failed to execute a project file command (on server)
2716 Cleared "Recent Files" are restored on next launch
2709 Mac: Missing sub-menu check marks in French
2696 Metadata Editor: changed size is not remembered/restored on next use
2699 Windows: Cannot edit labels with emoji in them correctly
2704 Mac: Stop button in EGATs with Preview does nor stop the preview
2676 Export: Incorrect handling over 0 dB
2694 Coloring of tracks in Mixer Board are awry
2692 Mac: VI users get trapped in radio buttons of Keyboard Preferences
2734 Apply macro may not create the macro-output folder in the source directory
2672 Plug-ins listed in reverse alphabetic order in Plug-ins Manager
2211 Mac: keyboard navigation problem in Libraries preferences dialog
2523 Audacity may suggest installing FFmpeg even when FFmpeg is installed
2721 Allegro (.gro files) cause crash with undo/redo
2684 Bitrot for Docimage script
2690 Move the actual build information to the top of the build information tab
2124 Import>Audio failure error message is misleading
2511 Enh: Remove the "Variable Speed: Fast / Standard" option from MP3 dialog
2736 Recent files list can be replaced by ExportCL commands
This can normally be resolved by simply exiting Audacity, relaunching and then making the required import of an audio file.
Note carefully that this diverges from previous behavior with 3.0.0 and earlier where a "macro-output" directory was created/used in the same directory as the files to be processed by the Macro.
We believe that a single rationalized folder for all Macro output from processing files with Macros is a more sensible approach.


text
text

Macros can contain Select commands to make their own selections as the Macro runs
Click Expand on the Macros Palette to return to the full Manage Macros dialog.
It is recommended not to process more than 500 files at a time.
It is strongly recommended that you set parameters for the commands that you use in a Macro. Otherwise Audacity will use the last-used parameter setting(s) when you ran the effect(s) manually.
Also note carefully that settings used in Macros will not affect or change the last-used parameter settings for any effect when next run manually.
Basically to paraphrase: "What happens in Macros stays in Macros".
You can also edit Exported Macros with a text editor and Import them back in if required.
In order to see the Macros folder on Windows, macOS or GNU/Linux, you must show hidden files and folders or type the folder location into your file manager's address bar.
Windows: In the tree on the left of Explorer, double-click "Users" then double-click your username, then on the right, double-click the AppData or Application Data folder and navigate through that. If necessary, show hidden files and folders on Windows or type %appdata%\audacity\Macros or shell:appdata\audacity\Macros into the Explorer address bar then press Enter on your keyboard.
macOS: Open Finder, use the Go menu, choose Go to Folder and type ~/Library/Application Support/audacity/Macros, or set Finder to .


Manage Macros allows you to edit, remove or rename existing Macros or add a new Macro. It also allows you to apply Macros to you project or a set of files.
Any , , , , or (Mac) effect shown in the can be added to a Macro. You can also add plugins in any format that are shown in the or Menus (including analysis effects), the built-in analyzer and a number of export commands.
Macros may be applied to either the entirety of the current project or to a selection of files using the Tools > command.
It is possible to use in Macros but see for how the Noise Profile is captured.
You can access the Manage Macros
The menu Tools > Manage Macros, or
The Expand button in the Macros Palette dialog.
Select Macro contains a list of already defined Macros. You can define the name of a new Macro and select which Macro is active.
The left hand box in the dialog (labeled Select Macro) contains a list of already defined Macros. Until you add a new Macro, it only has built-in MP3 Conversion and Fade Ends Macros.
Use left-click (or use the Up or Down keyboard arrows) to select the Macro you want to work on
New: Adds a new Macro to the list.
Remove: Remove the selected Macro from the list - grayed out when the Macros that ship as part of Audacity are selected.
Rename...: Rename the selected Macro - grayed out when the Macros that ship as part of Audacity are selected.
Restore: Resets any Audacity provided Macro to its default settings - grayed out when user-provided Macros are selected.
Import...: Enables you to import a Macro from a TXT file.
Export: Exports the selected Macro to a TXT file.
Edit Steps lists the sequence of commands in order of first to last (End) for the Macro selected in the Select Macro box to left.
The Macro can include a number of common Audacity functions and effects to be executed in any order you specify.
To create an audio file as part of the Macro process you must include an "Export" command (such as Export as WAV).
The Export command will use the settings you used the last time you used the same command from the File > Export > Export... menu command, or default settings if you have never used that command from the menu.
In many cases the parameters for each command in the Macro can be specified within the Manage Macros dialog.
You can:
Add or remove commands for the selected Macro
Change the order in which the commands execute in the Macro
Edit the parameters for some effects in the Macro
Insert: Insert a new command into the list
Edit...: Edit the parameters of the currently selected command
Delete: Delete the currently selected command in the list
Move Up: Move the currently selected command up in the list
Move Down: Move the currently selected command down in the list
Save: This button is only active when you have made edits to a Macro. It enables you to save those changes.
A few commands are intentionally omitted from the Macro Manager (such as Close:) because they are unsuitable for use in Macros.
To insert a new command in a Macro, left-click or use the Up or Down keyboard arrow to select an existing command and then press Insert. The new command will be placed above this selected command.
The Select Command dialog appears, listing all the available commands. Double-click a command from the list to insert it in the "Command" box, as shown in the image below after inserting "Normalize".
Alternatively, use the Up or Down keyboard arrow to select the command, then press Space.
The full list of all commands, with descriptions, is available at Scripting Reference.
Some scriptable commands are particularly useful for Macros. See these pages for details:
Extra Menu: Scriptables I - most commonly useful scriptables.
Extra Menu: Scriptables II - less commonly useful scriptables, but also including Select and Set Track, which combine functionality of several scriptables.
If the command has editable parameters, the Edit Parameters button will be active. Clicking this button will bring up the dialog box for the effect where you can set the parameters as if you were applying the standalone effect.
If you have previously created for an effect you can use the Use Preset to select one for use with that effect in the Macro.
Choose OK in the effect dialog to accept the parameters you entered, or Cancel to revert to the default parameters.
Choose OK in the Select Command dialog to add the command to the Macro.
Also note carefully that settings used in Macros will not affect or change the last-used parameter settings for any effect when next run manually.
This example shows the Set Track Status command.
The tick boxes on the left determines whether a feature should be used. When not selected, that feature does nothing.
The second tick box determines whether the feature is set to "on" or "off".
This shows:
The track name will not be changed
Track selectedness will be set to Not Selected
Track focus will be set to Focused
Commands that call Effects, Generators, Analyzers or Tools, use the same familiar graphical interface (GUI) as appears when they are used from the normal top level menus.
Many of the other commands provide a simple GUI comprised of checkboxes and text entry boxes. Typical examples can be seen in the Scriptables I and Scriptables II menus.
Macros will work on pre-existing selections you make in your project prior to running the Macro. But the selection can be over-ridden by your Macro itself as there are Macro commands available to effect selections in the audio.
In particular All(Select All) will select the entire project
Select which is parameterizable (see the provided Fade Ends Macro for an example where the first and last one seconds of the audio are selected for the fades).
When applying a Macro to files there is no pre-existing selection so you will need to create a selection in the Macro if your Macro requires audio to be selected to act on (and most Macros do).
There are four basic export commands available: Export as WAV, Export as MP3, Export as FLAC and Export as Ogg.
See Macros Palette for details of naming and location of exported files.
There is also a special Export command Export2 which enables you to export to a specific target file and format. When using Export2 you have to give the full file name (including path and filename extension).
Note carefully that the filename is not dynamically changeable when running the Macro, once set in the Export2 parameters, so you may wish to create several Macros the Export2 each targeting different file locations, names and filetype.
Example:
"C:\Users\<username>\Desktop\my file.flac" (this works)
Not: C:\Users\<username>\Desktop\my file.flac (the file name is not quoted)
Not: "my file.flac" (no path given)
Not: "C:\Users\<username>\Desktop\myfile" (no file extension)
The quote marks around the file pathing are supplied by Audacity once the Export2 command has been edited in setting up or editing the Macro
When entering the pathing data in the edit parameters dialog for the command you do not put the quote marks for example: C:\Users\<username>\Desktop\my file.flac
The following two commands are now deprecated and may well be removed in future versions of Audacity. They were part of "CleanSpeech" (which has long been removed from Audacity).
The Export as MP3 56k before and Export as MP3 56k after commands can be used respectively to export "before" and "after" MP3 files at 56 kbps bit rate at any point in the Macro processing. This allows you to compare the result of one or more effects, or provide files for different purposes with and without a particular effect.
Comments be added to Macros to enable you to document what is happening in the Macro.
Add a comment to your macro using the Comment command and edit its parameters to type the text of your comment.
Use the Shrink button to show a reduced Macros Palette dialog with a simple list of the existing Macros, enabling you to apply the Macros but not edit them.
This smaller version is useful for presets. It stays open after applying a macro, so it is a palette of custom functions, and you can pick another and apply that.
Using the Expand button on this reduced dialog will return you to the full Manage Macros dialog.
For more details see the Macros Palette page.
Apply Macro to enables you to make a Macro operate on either your current open Project or a set of selected external Files.
See Macros Palette for details of how these two buttons operate.
To dismiss the dialog simply click on the Close button.
If there any unsaved changes you will be asked if you want to save them or not.
See the Macros Examples page for examples of using Macros.
This error may sometimes occur for one or more commands in a Macro when updating from a previous Audacity version. The error may also occur if users sharing Macro have different Audacity versions or different versions of the plugins used in the Macro. The error will occur if:
any command in the Macro uses a different text format than that recognized by the version of Audacity in use
any plugins listed in the Macro are missing, in an incorrect location or are incompatible with the version of Audacity in use.
To resolve these errors, ensure you have compatible versions of all required plugins and that the plugins are installed correctly. If necessary, use the Manage Macros dialog to delete the command that fails then insert a replacement command for the same effect from the Select Command dialog.
The full list of all Macro commands, with descriptions, is available at Scripting Reference.
You can also edit an existing command by double-clicking it, or using the Up or Down keyboard arrow to select it and then pressing Space. The parameter settings dialog for that command will be displayed.
It is strongly recommended that you set parameters for the commands that you use in a Macro. Otherwise Audacity will use the last-used parameter setting(s) when you ran the effect(s) manually.
If you want to select all tracks, maintaining your current time selection, use "Select: First=0 Last=100". It will not waste time twiddling its thumbs on the tracks that are not there.
Parameters for export formats cannot be set in Manage Macros. To configure export parameters for the Macro, click File > Export > Export Audio... to access the Export Audio Dialog, click Options, set the parameters, press OK then Cancel the export. An audio track must be on screen in order to open the Export Audio Dialog.
The name of the MP3 exported by the "Export as MP3 56k before" command is prefixed by "MasterBefore_" followed by the date and time. The name of the MP3 exported by the "Export as MP3 56k after" command is prefixed by "MasterAfter_" followed by the date and time.
It is recommended not to process more than 500 files at a time


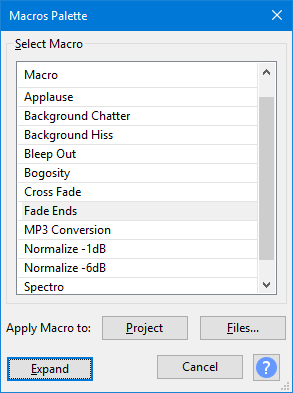
Most microphones are mono microphones, so they by default record on the left channel only. To hear your audio on both channels, make sure you record in mono.
If you connect an external audio device (such as a USB microphone or USB headset) to your computer while Audacity is already running, it won't be detected automatically by Audacity.
To solve this, make sure the device is detected by the operating system, then select Transport > Rescan Audio Devices from the Audacity Menu Bar. The new device should appear as an option on the Recording or Playback device selection dropdown in the Device toolbar.
Enable the Software Playthrough option to listen what is being recorded. You will hear the audio through the selected playback device.
You can turn Software Playthrough on and off in the Transport > Transport Options menu.
Note: you will hear what you are recording a noticeable time afterwards. This delay is called latency. You can somewhat reduce this latency as described in but it cannot be fully removed if you're using Software Playthrough - you will need an audio interface with realtime monitoring capabilities to completely remove latency when monitoring a recording.
If you want to listen to the input when not recording it first enable Software Playthrough and then click in the to turn on .
usually causes a delay (latency) of the live recording input due to the time it takes to reach your headphones. To prevent this, turn software playthrough off. This can be done by choosing Transport > Transport Options > and clicking it to remove the check (tick) mark.
To listen to the live recording input without playthrough latency requires hardware monitoring - that is; the input signal must be routed directly through the audio device from the input to the output rather than being passed through software from input to output.
Enabling hardware monitoring is not possible with all audio devices. In particular it can only be achieved when the same device is used for input and output. For example, monitoring a USB microphone through headphones that are plugged into a different audio device will always have latency. If hardware playthrough is not available with your hardware it may be necessary to listen to the audio source directly (acoustically) rather than through the computer.
For some typical examples of how to set up equipment to record without playthrough latency, see this Tutorial about .
If you hear crackles, pops, or distortion when the recording is loud, or if the waveform is clearly touching the top and bottom edges of the track, you probably have , which means that the signal has exceeded the maximum allowed level.
Try lowering the recording level using the Audacity or the slider in the operating system. You can also check to see if you can lower the volume on the input source itself (such as the tape deck, record player or microphone). Many sound cards and USB turntables or USB tape decks have an independent volume control for the playback signal level. See for more help with USB turntables or tape decks.
When recording, try to aim for a maximum peak of around –6 in the so as to prevent the meter's coming on. If the meters are set to , the equivalent level to aim for is 0.5. Clicking and dragging on the meter's right edge lets you expand the meter to gauge levels more easily. After recording, you can boost the level safely using the or effects.
This is a visual indication that your recording has . See the immediately previous question above.
The vertical red lines show where the clipping has occurred; these clipping indicators can be turned on and off (Audacity default setting is "off") by selecting View > .
The recording slider in is purposely disabled if it cannot directly manipulate the operating system's slider for the sound device, or if that device has no system slider. Turning down the Audacity slider to prevent distortion would be inadequate unless it also turned down the system slider. It would only make existing distortion quieter instead of removing it.
If the slider is disabled, check first in that you are selecting the correct device. Audacity should be able to control the recording level of most built-in sound devices subject to the device having appropriate .
If necessary look in the operating system mixer or in the audio interface's control panel for an input slider. For Windows see . To locate the system mixer for Mac and Linux see the help on our Wiki for or .
External recording devices such as or interfaces may not have an operating system slider, especially on Mac. For all cases where there is no system slider, try to adjust the playback level on the recording device itself.
Software Playthrough can also be enabled In the section of the Preferences window. Check the Software playthrough of input box and click OK.
Using Software Playthrough when is not recommended.
Help with repairing clipped recordings: If there is only a small amount of (just the tops of a few isolated peaks), Effect > can be applied to just the clipped sections. This will attempt to reconstruct the missing peaks by the lost signal. In other cases where there is mild distortion throughout a recording, using Effect > or Effect > to reduce the higher frequencies can help to mitigate the damage. Sometimes a bass cut will help also by making the result sound less "muddy".

This page is an overview of prominent new functionality that has been introduced in Audacity 3.0.0
Version 3.0.0 is primarily a release for a unitary, single self-contained, project file.
Details of all the major changes since 2.4.2 can be found in Audacity 3.0.0.
Audacity 3.0.0 introduces the new AUP3 project format. Project files saved with this version will have an aup3 extension, for example My-Project.aup3. We believe that this new project format will make life easier for Audacity users, as it replaces the previous project storage format - which used an AUP file and its associated _data folder full of little audio clips - with a single project file that integrates those two parts.
The old structure caused too many users to lose or damage their projects by moving or deleting the project components. The new single project file structure precludes that happening.
Saved Projects with the new unified file structure should not be larger than similar projects with the old multiple files structure.
As you work on a project, Audacity will consume additional temporary disk space. This is normally released on closing the project. This is not new with Unitary Project File, previous versions of Audacity also used to do this.
Extensive speed testing has shown that for most work in Audacity the new project file can be a little faster than the old project structure.
This is especially true of using the Effects and Generators which run faster with the new project file.
Automatic Recovery (following a crash) is different in Audacity 3.0.0. It is simpler with no orphan block-files or missing block-files to worry about
When Audacity is launched following a crash it will offer to recover the crashed projects.
You can choose to either accept the recovery or to discard the projects.
You can select projects for either action by clicking on their checkbox, or you can select all by clicking on Select.
In addition to the single database project file the database also creates two temporary work files WAL & SHM files. For example My-Project.aup3-wal and My-Project.aup3-shm. On Mac there is only the WAL file.
These are deleted on closure of the project or on exit from Audacity.
There is a new backup command for projects: File > Save Project > Backup Project.
This saves a copy of the current project as an AUP3 file, but with a new name. It is the safe and recommended way to make a safety backup copy of a project as you work on it.
This could serve either as a single backup copy of the project, or as one of several incremental copies of the project in the state it had at a particular date and time.
Unlike "Save Project As..." using this command will leave your current project open enabling you to continue working on it.
Corsican language has been added for 3.0.0, thanks to Patriccollu.
Marathi language has been added for 3.0.0, thanks to Mukul Kulkarni.
Thanks also to all our regular translators who brought translations up to date for 3.0.0.
A new analyzer has been introduced called Label Sounds. It supersedes and replaces the old Sound Finder and Silence Finder analyzers.
Label Sounds is a tool which can useful to label the different songs or sections (or silences) in a long recording, such as the tracks from an LP or cassette.
This analyzer is an upgrade of the old Sound Finder from previous versions of Audacity. It is more accurate, and more versatile than previous versions, supporting both region labels and point labels.
Accessed by: Analyze > Label Sounds...
It detects the audio level in the selected track(s). When the track level exceeds a specified threshold level, the audio is considered to be "sound", and when below the level it is considered to be "silence".
There are options to add point labels before or after each detected sound, region labels around each sound, or region labels between each sound (effectively labeling the silences).
You can still continue to use this Sound Finder if it is present in your Audacity app as a result of an earlier Audacity version download.
Default folder locations have been added enabling you to specify the folders to be used for each of the Audacity actions: Open, Save, Import and Export.
If you set a default folder for any of those actions Audacity will always offer that folder location when you invoke that action.
If a particular action's default folder is left blank (default setting) then Audacity will offer the last-used location for that action.
The default setting is for all to be blank.
See Directories Preferences for more details.
Import and Export of Macros has been added to the Manage Macros dialog.
Only one Macro can be imported or exported at a time.
Comments can now be added to Macros to enable you to document what is happening in the Macro.
There is a new command "Comment" in the Macro command set. Editing its parameters enables you to type the text of your comment.
The Noise Gate effect has been improved for version 3.0.0 of Audacity. It now supports faster Attack times (down to 1ms), and provides separate controls for Attack, Hold and Decay. The effect can also process much longer selections in one pass (up to 13.5 hours at a sample rate of 44,100 Hz.)
In Tracks preferences you can now set Multi-view as your preferred user-default view for tracks.
We realized that we had a couple of settings in Tracks Behaviors Preferences that affect the operation of the Cut, Paste, and Delete editing commands in perhaps unexpected ways:
Editing a clip can move other clips
Enable Cut lines
So a new page was added to the Manual to explain the subtleties of these behaviors. See .
We have changed Mixer Board so that its window always remains on top when it is in use.
Many users have requested this and the original developer always wanted to do this but could not at the time because of issues with the libraries used for this feature.
These libraries have been updated by the provider and we can now make Mixer Board a top window on all three platforms.
A Repeat last used command has been added for Generators, Analyzers and Tools. These are not in the menus but are "ghost" commands that you can assign custom shortcuts to.
This enables you to simply repeat the last generator, analyzer or tool that you used, with the last settings that you used.
Nyquist has been updated to the latest Nyquist Version 3.16
This has enabled us to clear a lot of long-standing Nyquist-related Audacity bugs.
A large number of bugs were fixed for this release.
Here is a small selection of some of the most important.
P1 - Some effects (including equalization effects) delete Envelope Control Points, or do not move them when timeline changes
P1 - Change Pitch effect may create spurious clip at end
P1 - Linux: Crash when applying or previewing Sliding Stretch effect on stereo track
P2 - Mac: COMMAND + V paste limitations in standard file save dialogs
P2 - Mac: Cut/Copy from file save dialogs using shortcuts does not work
P2 - No error/warning message when using a missing aliased audio file
P3 - Noise Reduction preview failure when track rate is different from project rate
P3 - Sound Activated Recording fails when recording meter disabled
P3 - Equalization effects ignore and remove any amplitude envelope
- detailed release notes for this release of Audacity
You can discard just some and then the recovery dialog will remain open enabling you to select others for recovery.
P1 2544 - "Editing a clip can move other clips" turned off can cause corruption when copying and pasting audio
P1 2630 - A project saved with an imported MP3 with Unicode metadata cannot be opened
P1 2656 - Cannot horizontal scroll when paused in Play-at-Speed
P1 2669 - Win: Save As can be used to overwrite the existing project without warning
P2 2296 - There is no Import or Export for Macros
P2 2464 - Cannot drag just the selected audio and label with Time Shift Tool
P2 2437 - Mac: "Open with" fails when Audacity is running
P2 2473 - Linux: Numbers on meters have opaque backgrounds
P2 2487 - Playback meters do not respond during preview of non-real-time effects
P2 2491 - Reset Configuration does not reset Extended Import preferences
P2 2509 - Filter curve and Graphic EQ help links are broken in release version
P2 2527 - Reset Configuration does not reset Project rate or selection timers
P2 2573 - High / Low Pass filters limited to ~94 mins stereo at 44100 Hz
P2 2581 - Inconsistent behavior when pasting and not enough room
P2 2593 - Play-at-Speed does not play unless you have used normal Play first
P2 2616 - Labelled Audio Cut and Delete disabled by Sync-Lock
P3 2295 - ENH: cannot add a comment in a Macro with Audacity
P3 2366 - Macros: Run does "Select All" ignoring setting in Tracks Behaviors Preferences
P3 2460 - Enh: Can't select "Multi-view" as default view mode in Tracks preferences
P3 2510 - Mac: Drag&Drop of a project file onto Audacity in Apps bar or Finder fails if Audacity is active in the Apps bar
P3 2534 - Change Speed merges selected clip with adjacent clips - residual fix to be tested
P3 2564 - Metadata: Artist and Year tags missing on M4A(AAC) exports
P3 2611 - Mixer Board does not stay on top of main window
AUP projects from previous versions of Audacity can be opened or imported in Audacity 3.0.0 (Audacity converts them to the new unified file format).
Note that saving as AUP3 will leave behind the old AUP file and its associated _data folder which you will probably want to delete to recover disk space.
Once you have saved the project in the new AUP3 format they can then no longer be opened in previous versions of Audacity.
The workaround is to Export as WAV files, exporting individual tracks using and then Importing those into older Audacity versions.
Active projects cannot be saved to a FAT/FAT32 formatted drive as FAT is subject to a maximum file size of 4GB which can easily be temporarily exceeded when editing.
You can, if you wish, compress your project removing the temporary storage with:
File > Save Project
File > Exit
Relaunch Audacity
File > Open...
But note carefully that this will remove your Undo History and the contents of your Audacity clipboard.
Closing a project can now take a little longer as Audacity clears up the unused temporary disk space in the file.
You will get a progress dialog informing you about the Compaction progress.
Do not delete them or move these temporary files while the project is open as this will destroy the project.
Windows blocks you from doing this but macOS and Linux do not.
You are strongly advised to make backup versions of your project at key stages in your project so you can return to that stage if you mess up.
This new command replaces the two previous commands:
File > Save Project > Save Lossless Copy of Project
File > Save Project > Save Compressed Copy of Project
You can losslessly compress an AUP3 project with standard utilities such as ZIP, WinZip or 7-Zip.
By default, Macro' commands cannot be applied either from a main menu or from a shortcut. They are not "Tool menu" items, and they do not respond to Repeat Last Tool.
However, if a Macro has a shortcut, then it becomes listed in and it will now respond to "Repeat Last Tool", but only if it has been launched via the shortcut. The macro is still not a "Tool menu item", even though the shortcut effectively is.


This page lists all commands in the Audacity menus and all pre-defined keyboard shortcuts.
The default Standard set of shortcuts is a reduced set, compared to earlier versions of Audacity, to simplify the set of shortcuts somewhat and to provide greater flexibility for users who wish to create their own shortcuts. There is also an extended Full set of keyboard shortcuts that can be selected from the Defaults button on the Keyboard Preferences dialog. This Full set is the set that was available in Audacity 2.1.3 and earlier. You can use Keyboard Preferences to change or remove existing shortcuts or to assign a shortcut to commands that lack a default shortcut.
Standard shortcuts are shown like so: Ctrl + A.
Shortcuts that are only in the Full set are shown like so: Ctrl + # Extra.
Shortcuts that have not been assigned, that you can assign using keyboard preferences, are shown like so (unassigned).
Some less commonly used commands are not in the default menus but they can be accessed by menu by enabling Show extra menus in Interface Preferences
Other Tips and hints:
Mac users: Ctrl = ⌘ and Alt = Option. So, for example, Ctrl + Alt + K = ⌘ + Option + K.
See Audacity Selection for examples of changing track focus and selection.
PAGE UP scrolls the project rightwards and PAGE DOWN scrolls the project leftwards, equivalent to a single click in the white area either side of the horizontal scrollbar. These shortcuts cannot be configured in Keyboard Preferences.
The File Menu provides commands for creating, opening and saving Audacity projects and importing and exporting audio files
Lists the full path to the twelve most recently saved or opened projects or most recently imported audio files
Various ways to save a project.
For exporting audio files
For importing audio files or label files into your project
The Edit Menu provides standard edit commands (Undo, Redo, Cut, Copy, Paste and Delete) plus many other commands specific to editing audio or labels
For more "advanced" removal of audio
Create or remove separate clips in the audio track. A clip inside an audio track is a separate section of that track which has been split so that it can be manipulated somewhat independently of the other clips in the track.
These commands are to add and edit labels.
Labeled Audio commands apply standard Edit Menu commands to the audio of one or more regions that are labeled. The labels themselves are not affected.
Select Menu has commands that enable you make selections of tracks or parts of the tracks in your project.
Tracks
For modifying, saving and restoring a selection.
For making a selection of a frequency range.
For modifying a selection, taking account of clips.
View Menu has commands that determine the amount of detail you see in all the tracks in the project window. It also lets you show or hide Toolbars and some additional windows such as Undo History.
Zoom in/out on the horizontal axis. Show more detail or show a longer length of time.
Controls the sizes of tracks.
Move forward/backwards through the audio
Toolbars can be used to determine which of the Audacity toolbars are displayed. By default all toolbars are shown except Spectral Selection and Scrub
Transport Menu commands let you play or stop, loop play, scrub play or record (including timed and sound activated recordings).
These commands control playback in Audacity. You can Start, Stop or Pause playback of the audio in your project.
These commands control recording in Audacity. You can Start, Stop or Pause recording in your project. You can either start a recording on your existing track or an a new track.
Scrubbing is the action of moving the mouse pointer right or left so as to adjust the position, speed or direction of playback, listening to the audio at the same time - a convenient way to quickly navigate the waveform to find a particular event of interest. Speed changes are made by rotating the mouse wheel while scrubbing.
These commands let you move the cursor to the start or end of the selection, track or any adjacent Clip that you may have
This submenu lets you manage and set various options for transport (playing and recording) in Audacity
Tracks Menu provides commands for creating and removing tracks, applying operations to selected tracks such as mixing, resampling or converting from stereo to mono, and lets you add or edit labels.
Adds a new track
Mixes down selected tracks to mono or stereo tracks
Mutes or unmutes audio tracks in the project
Pans left right or center audio tracks in the project
Commands that provide an automatic way of aligning selected tracks with the cursor, the selection, or with the start of the project.
Sorts all tracks in the project from top to bottom in the project window, by Start Time or by Name.
Generate Menu lets you create audio containing tones, noise or silence.
Audacity includes many built-in effects and also lets you use a wide range of plugin effects.
The Analyze Menu contains tools for finding out about the characteristics of your audio, or labeling key feature.
The Tools Menu contains customisable tools.
Displays a menu with list of all your Macros. Selecting any of these Macros by clicking on it will cause that Macro to be applied to the current project.
The Extra menu provides access to additional Commands that are not available in the normal default Audacity menus.
Extra commands related to play and record
Extra commands to select the tool, for example time-shift, envelopes, multi-tool.
Extra commands related to volume
Extra commands related to editing
Extra commands related to play at speed
Extra commands related to seeking
Extra commands related to selecting a device
Extra commands related to selecting.
Extra commands to set focus, usually focus on one track
Extra commands to move the cursor
Extra commands to operate on a track that has focus
These commands were originally written for scripting Audacity, e.g via a Python script that uses mod-script-pipe. The commands though are also present in the menu, available from macros, and available from within Nyquist using (AUD-DO "command")
Like Scriptables I, but these ones are less commonly used from the menu.
The Help Menu lets you find out more about the Audacity application and how to use it. It also includes some diagnostic tools.
A set of diagnostic tools
These are commands which do not appear in any menu.
There are a number of key combinations that can be used in combination with mouse clicks. These cannot be configured. They are listed on Mouse Preferences
Recent Files
(unassigned)
Lists the full path to the twelve most recently saved or opened projects or most recently imported audio files
Close
Ctrl+W
Closes the current project window, prompting you to save your work if you have not saved.
Save Project
(unassigned)
Various ways to save a project.
Compact Project
Shift+A
Compacts your project, saving disk space. Using this command will delete your Undo/Redo History and your Audacity clipboard contents.
Export
(unassigned)
For exporting audio files
Import
(unassigned)
For importing audio files or label files into your project
Page Setup...
(unassigned)
Opens the standard Page Setup dialog box prior to printing
Print...
(unassigned)
Prints all the waveforms in the current project window (and the contents of Label Tracks or other tracks), with the Timeline above. Everything is printed to one page.
Exit
Ctrl+Q
Closes all project windows and exits Audacity. If there are any unsaved changes to your project, Audacity will ask if you want to save them.
Backup Project...
(unassigned)
Saves a backup copy of your project in .AUP3 format to a different name or location
Export as OGG
(unassigned)
Exports to an OGG file
Export Audio...
Ctrl+Shift+E
Exports to an audio file.
Export Selected Audio...
(unassigned)
Exports selected audio to a file.
Export Labels...
(unassigned)
Exports audio at one or more labels to file(s).
Export Multiple...
Ctrl+Shift+L
Exports multiple audio files in one process, one file for each track if there are multiple audio tracks, or labels can be added which then define the length of each exported file.
Export MIDI...
(unassigned)
Exports MIDI (note tracks) to a MIDI file.
MIDI...
(unassigned)
Imports a MIDI (MIDI or MID extension) or Allegro (GRO) file to a Note Track where simple cut-and-paste edits can be performed. The result can be exported with the File > Export> > Export MIDI command. Note: Currently, MIDI and Allegro files cannot be played.
Raw Data...
(unassigned)
Attempts to import an uncompressed audio file that might be "raw" data without any headers to define its format, might have incorrect headers or be otherwise partially corrupted, or might be in a format that Audacity is unable to recognize. Raw data in textual format cannot be imported.
Cut
Ctrl+X
Removes the selected audio data and/or labels and places these on the Audacity clipboard. By default, any audio or labels to right of the selection are shifted to the left.
Delete
Ctrl+K
Removes the selected audio data and/or labels without copying these to the Audacity clipboard. By default, any audio or labels to right of the selection are shifted to the left.
Copy
Ctrl+C
Copies the selected audio data to the Audacity clipboard without removing it from the project.
Paste
Ctrl+V
Inserts whatever is on the Audacity clipboard at the position of the selection cursor in the project, replacing whatever audio data is currently selected, if any.
Duplicate
Ctrl+D
Creates a new track containing only the current selection as a new clip.
Remove Special
(unassigned)
For more "advanced" removal of audio
Clip Boundaries
(unassigned)
Create or remove separate clips in the audio track. A clip inside an audio track is a separate section of that track which has been split so that it can be manipulated somewhat independently of the other clips in the track.
Labels
(unassigned)
These commands are to add and edit labels.
Labeled Audio
(unassigned)
Labeled Audio commands apply standard Edit Menu commands to the audio of one or more regions that are labeled. The labels themselves are not affected.
Metadata...
(unassigned)
The Metadata Editor modifies information about a track, such as the artist and genre. Typically used with MP3 files.
Preferences...
Ctrl+P
Preferences let you change most of the default behaviors and settings of Audacity. On Mac, Preferences are in the Audacity Menu and the default shortcut is ⌘ + ,.
Silence Audio
Ctrl+L
Replaces the currently selected audio with absolute silence. Does not affect label tracks.
Trim Audio
Ctrl+T
Deletes all audio but the selection. If there are other separate clips in the same track these are not removed or shifted unless trimming the entire length of a clip or clips. Does not affect label tracks.
Join
Ctrl+J Extra
If you select an area that overlaps one or more clips, they are all joined into one large clip. Regions in-between clips become silence.
Detach at Silences
Ctrl+Alt+J Extra
In a selection region that includes absolute silences, creates individual non-silent clips between the regions of silence. The silence becomes blank space between the clips.
Add Label at Playback Position
Ctrl+M (⌘ + . on Mac)
Creates a new, empty label at the current playback or recording position.
Paste Text to New Label
Ctrl+Alt+V Extra
Pastes the text on the Audacity clipboard at the cursor position in the currently selected label track. If there is no selection in the label track a point label is created. If a region is selected in the label track a region label is created. If no label track is selected one is created, and a new label is created.
Type to Create a Label (on/off)
(unassigned)
When a label track has the yellow focus border, if this option is on, just type to create a label. Otherwise you must create a label first.
Split Cut
Alt+Shift+X
Same as the Split Cut command, but operates on labeled audio regions.
Split Delete
Alt+Shift+K
Same as the Split Delete command, but operates on labeled audio regions.
Silence Audio
Alt+L Extra
Same as the Silence Audio command, but operates on labeled audio regions.
Copy
Alt+Shift+C
Same as the Copy command, but operates on labeled audio regions.
Split
Alt+I Extra
Same as the Split command, but operates on labeled audio regions or points.
Join
Alt+J Extra
Same as the Join command, but operates on labeled audio regions or points. You may need to select the audio and use Edit > Clip Boundaries > Join, to join all regions or points.
Detach at Silences
Alt+Shift+J
Same as the Detach at Silences command, but operates on labeled audio regions.
Tracks
(unassigned)
Tracks
Region
(unassigned)
For modifying, saving and restoring a selection.
Spectral
(unassigned)
For making a selection of a frequency range.
Clip Boundaries
(unassigned)
For modifying a selection, taking account of clips.
Cursor to Stored Cursor Position
(unassigned)
Selects from the position of the cursor to the previously stored cursor position
Store Cursor Position
(unassigned)
Stores the current cursor position for use in a later selection
At Zero Crossings
Z
Moves the edges of a selection region (or the cursor position) slightly so they are at a rising zero crossing point.
Track Start to Cursor
Shift+J
Selects a region in the selected track(s) from the start of the track to the cursor position.
Cursor to Track End
Shift+K
Selects a region in the selected track(s) from the cursor position to the end of the track.
Track Start to End
(unassigned)
Selects a region in the selected track(s) from the start of the track to the end of the track.
Store Selection
(unassigned)
Stores the end points of a selection for later reuse.
Retrieve Selection
(unassigned)
Retrieves the end points of a previously stored selection.
Next Lower Peak Frequency
(unassigned)
When in Spectrogram views snaps the center frequency to the next lower frequency peak, moving the spectral selection downwards.
Previous Clip on selected track
Alt+,
Moves the selection to the previous clip.
Next Clip on selected Track
Alt+.
Moves the selection to the next clip.
Previous Clip on focused Track
Shift+Tab (not in menu - cannot be reassigned)
Moves the selection to the previous clip.
Next Clip on focused Track
Tab (not in menu - cannot be reassigned)
Moves the selection to the next clip.
Skip to
(unassigned)
Move forward/backwards through the audio
History...
(unassigned)
Brings up the History window which can then be left open while using Audacity normally. History lists all undoable actions performed in the current project, including importing.
Karaoke...
(unassigned)
Brings up the Karaoke window, which displays the labels in a "bouncing ball" scrolling display
Mixer Board...
(unassigned)
Mixer Board is an alternative view to the audio tracks in the main tracks window. Analogous to a hardware mixer board, each audio track is displayed in a Track Strip.
Toolbars
(unassigned)
Toolbars can be used to determine which of the Audacity toolbars are displayed. By default all toolbars are shown except Spectral Selection and Scrub
Extra Menus (on/off)
(unassigned)
Shows extra menus with many extra less-used commands.
Show Clipping (on/off)
(unassigned)
Option to show or not show audio that is too loud (in red) on the wave form.
Zoom Out
Ctrl+3
Zooms out displaying less detail over a greater length of time.
Zoom to Selection
Ctrl+E
Zooms in or out so that the selected audio fills the width of the window.
Zoom Toggle
Shift+Z
Changes the zoom back and forth between two preset levels.
Advanced Vertical Zooming
(unassigned)
Enable for left-click gestures in the vertical scale to control zooming.
Collapse All Tracks
Ctrl+Shift+C
Collapses all tracks to take up the minimum amount of space.
Expand Collapsed Tracks
Ctrl+Shift+X
Expands all collapsed tracks to their original size before the last collapse.
Tools Toolbar
(unassigned)
Chooses various tools for selection, volume adjustment, zooming and time-shifting of audio
Recording Meter Toolbar
(unassigned)
Displays recording levels and toggles input monitoring when not recording
Playback Meter Toolbar
(unassigned)
Displays playback levels
Mixer Toolbar
(unassigned)
Adjusts the recording and playback volumes of the devices currently selected in Device Toolbar
Edit Toolbar
(unassigned)
Cut, copy, paste, trim audio, silence audio, undo, redo, zoom tools
Play-at-Speed Toolbar
(unassigned)
Plays audio at a slower or faster speed than normal, affecting pitch
Scrub Toolbar
(unassigned)
Controls playback and recording and skips to start or end of project when neither playing or recording
Device Toolbar
(unassigned)
Selects audio host, recording device, number of recording channels and playback device
Selection Toolbar
(unassigned)
Controls the sample rate of the project, snapping to the selection format and adjusts cursor and region position by keyboard input
Spectral Selection Toolbar
(unassigned)
Displays and lets you adjust the current spectral (frequency) selection without having to be in Spectrogram view
Scrubbing
(unassigned)
Scrubbing is the action of moving the mouse pointer right or left so as to adjust the position, speed or direction of playback, listening to the audio at the same time - a convenient way to quickly navigate the waveform to find a particular event of interest. Speed changes are made by rotating the mouse wheel while scrubbing.
Cursor to
(unassigned)
These commands let you move the cursor to the start or end of the selection, track or any adjacent Clip that you may have
(unassigned)
These commands enable you to control looping playback
Rescan Audio Devices
(unassigned)
Rescan for audio devices connected to your computer, and update the playback and recording dropdown menus in Device Toolbar
Transport Options
(unassigned)
This submenu lets you manage and set various options for transport (playing and recording) in Audacity
Play Once/Stop
Shift+Space
Plays the loop region only once when looping is enabled.
Pause
P
Temporarily pauses playing or recording without losing your place.
Timer Record...
Shift+T
Brings up the Timer Record dialog.
Punch and Roll Record
Shift+D
Re-record over audio, with a pre-roll of audio that comes before.
Pause
P
Temporarily pauses playing or recording without losing your place.
Scrub Ruler
(unassigned)
Shows (or hides) the scrub ruler, which is just below the timeline.
Track Start
J
Moves the cursor to the start of the selected track.
Track End
K
Moves the cursor to the end of the selected track.
Previous Clip Boundary
(unassigned)
Moves the cursor position back to the right-hand edge of the previous clip
Next Clip Boundary
(unassigned)
Moves the cursor position forward to the left-hand edge of the next clip
Project Start
Home
Moves the cursor to the beginning of the project.
Project End
End
Moves the cursor to the end of the project.
Set Loop to Selection
Shift+L
Sets the current selection range as the new looping region.
Set Loop In
(unassigned)
Sets the start of the looping region to the current selection.
Set Loop Out
(unassigned)
Sets the end of the looping region to the current selection.
Pinned Play/Record Head (on/off)
(unassigned)
You can change Audacity to play and record with a fixed head pinned to the Timeline. You can adjust the position of the fixed head by dragging it
Overdub (on/off)
(unassigned)
Toggles on and off the Overdub option.
Software Playthrough (on/off)
(unassigned)
Toggles on and off the Software Playthrough option.
Resample...
(unassigned)
Allows you to resample the selected track(s) to a new sample rate for use in the project
Remove Tracks
(unassigned)
Removes the selected track(s) from the project. Even if only part of a track is selected, the entire track is removed.
Mute/Unmute
(unassigned)
Mutes or unmutes audio tracks in the project
Pan
(unassigned)
Pans left right or center audio tracks in the project
Align Tracks
(unassigned)
Commands that provide an automatic way of aligning selected tracks with the cursor, the selection, or with the start of the project.
Sort Tracks
(unassigned)
Sorts all tracks in the project from top to bottom in the project window, by Start Time or by Name.
Sync-Lock Tracks (on/off)
(unassigned)
Ensures that length changes occurring anywhere in a defined group of tracks also take place in all audio or label tracks in that group.
Label Track
(unassigned)
Adds an empty label track to the project
Time Track
(unassigned)
Adds an empty time track to the project. Time tracks are used to speed up and slow down audio.
Mix and Render to New Track
Ctrl+Shift+M Extra
Same as Tracks > Mix and Render except that the original tracks are preserved rather than being replaced by the resulting "Mix" track.
Mute Tracks
Ctrl+Alt+U
Mutes the selected tracks.
Unmute Tracks
Ctrl+Alt+Shift+U
Unmutes the selected tracks.
Center
(unassigned)
Pan selected audio to right speaker.
Start to Zero
(unassigned)
Aligns the start of selected tracks with the start of the project.
Start to Cursor/Selection Start
(unassigned)
Aligns the start of selected tracks with the current cursor position or with the start of the current selection.
Start to Selection End
(unassigned)
Aligns the start of selected tracks with the end of the current selection.
End to Cursor/Selection Start
(unassigned)
Aligns the end of selected tracks with the current cursor position or with the start of the current selection.
End to Selection End
(unassigned)
Aligns the end of selected tracks with the end of the current selection.
Move Selection with Tracks (on/off)
(unassigned)
Toggles on/off the selection moving with the realigned tracks, or staying put.
Nyquist
(unassigned)
Shows the list of available Nyquist effects but only if the user has effects "Grouped by Type" in Effects Preferences.
Noise...
(unassigned)
Generates 'white', 'pink' or 'brown' noise.
Silence...
(unassigned)
Creates audio of zero amplitude, the only configurable setting being duration.
Tone...
(unassigned)
Generates one of four different tone waveforms: Sine, Square, Sawtooth or Square (no alias), and a frequency between 1 Hz and half the current project rate.
Risset Drum...
(unassigned)
Produces a realistic drum sound.
Repeat Last Effect
Ctrl+R
Repeats the last used effect at its last used settings and without displaying any dialog.
Built-in
(unassigned)
no tip string.
LADSPA
(unassigned)
Shows the list of available LADSPA effects but only if the user has effects "Grouped by Type" in Effects Preferences.
Nyquist
(unassigned)
no tip string.
Bass and Treble...
(unassigned)
Increases or decreases the lower frequencies and higher frequencies of your audio independently; behaves just like the bass and treble controls on a stereo system.
Change Pitch...
(unassigned)
Change the pitch of a selection without changing its tempo.
Change Speed...
(unassigned)
Change the speed of a selection, also changing its pitch.
Change Tempo...
(unassigned)
Change the tempo and length (duration) of a selection without changing its pitch.
Click Removal...
(unassigned)
Click Removal is designed to remove clicks on audio tracks and is especially suited to declicking recordings made from vinyl records.
Compressor...
(unassigned)
Compresses the dynamic range by two alternative methods. The default "RMS" method makes the louder parts softer, but leaves the quieter audio alone. The alternative "peaks" method makes the entire audio louder, but amplifies the louder parts less than the quieter parts. Make-up gain can be applied to either method, making the result as loud as possible without clipping, but not changing the dynamic range further.
Distortion...
(unassigned)
Use the Distortion effect to make the audio sound distorted. By distorting the waveform the frequency content is changed, which will often make the sound "crunchy" or "abrasive". Technically this effect is a . The result of waveshaping is equivalent to applying non-linear amplification to the audio waveform. Preset shaping functions are provided, each of which produces a different type of distortion.
Echo...
(unassigned)
Repeats the selected audio again and again, normally softer each time and normally not blended into the original sound until some time after it starts. The delay time between each repeat is fixed, with no pause in between each repeat. For a more configurable echo effect with a variable delay time and pitch-changed echoes, see Delay.
Fade In
(unassigned)
Applies a linear fade-in to the selected audio - the rapidity of the fade-in depends entirely on the length of the selection it is applied to. For a more customizable logarithmic fade, use the Envelope Tool on the Tools Toolbar.
Fade Out
(unassigned)
Applies a linear fade-out to the selected audio - the rapidity of the fade-out depends entirely on the length of the selection it is applied to. For a more customizable logarithmic fade, use the Envelope Tool on the Tools Toolbar.
Filter Curve...
(unassigned)
Adjusts the volume levels of particular frequencies
Graphic EQ...
(unassigned)
Adjusts the volume levels of particular frequencies
Invert
(unassigned)
This effect flips the audio samples upside-down. This normally does not affect the sound of the audio at all. It is occasionally useful for vocal removal.
Loudness Normalization...
(unassigned)
Changes the perceived loudness of the audio.
Noise Reduction...
(unassigned)
This effect is ideal for reducing constant background noise such as fans, tape noise, or hums. It will not work very well for removing talking or music in the background. More details here.
Normalize...
(unassigned)
Use the Normalize effect to set the maximum amplitude of a track, equalize the amplitudes of the left and right channels of a stereo track and optionally remove any DC offset from the track
Paulstretch...
(unassigned)
Use Paulstretch only for an extreme time-stretch or "stasis" effect, This may be useful for synthesizer pad sounds, identifying performance glitches or just creating interesting aural textures. Use Change Tempo or Sliding Time Scale rather than Paulstretch for tasks like slowing down a song to a "practice" tempo.
Phaser...
(unassigned)
The name "Phaser" comes from "Phase Shifter", because it works by combining phase-shifted signals with the original signal. The movement of the phase-shifted signals is controlled using a Low Frequency Oscillator (LFO).
Repair
(unassigned)
Fix one particular short click, pop or other glitch no more than 128 samples long.
Repeat...
(unassigned)
Repeats the selection the specified number of times.
Reverb...
(unassigned)
A configurable stereo reverberation effect with built-in and user-added presets. It can be used to add ambience (an impression of the space in which a sound occurs) to a mono sound. Also use it to increase reverberation in stereo audio that sounds too "dry" or "close".
Reverse
(unassigned)
Reverses the selected audio; after the effect the end of the audio will be heard first and the beginning last.
Sliding Stretch...
(unassigned)
This effect allows you to make a continuous change to the tempo and/or pitch of a selection by choosing initial and/or final change values.
Truncate Silence...
(unassigned)
Automatically try to find and eliminate audible silences. Do not use this with faded audio.
Wahwah...
(unassigned)
Rapid tone quality variations, like that guitar sound so popular in the 1970's.
Crossfade Clips
(unassigned)
Use Crossfade Clips to apply a simple crossfade to a selected pair of clips in a single audio track.
Crossfade Tracks...
(unassigned)
Use Crossfade Tracks to make a smooth transition between two overlapping tracks one above the other. Place the track to be faded out above the track to be faded in then select the overlapping region in both tracks and apply the effect.
Delay...
(unassigned)
A configurable delay effect with variable delay time and pitch shifting of the delays.
High-Pass Filter...
(unassigned)
Passes frequencies above its cutoff frequency and attenuates frequencies below its cutoff frequency.
Limiter...
(unassigned)
Limiter passes signals below a specified input level unaffected or gently reduced, while preventing the peaks of stronger signals from exceeding this threshold. Mastering engineers often use this type of dynamic range compression combined with make-up gain to increase the perceived loudness of an audio recording during the audio mastering process.
Low-Pass Filter...
(unassigned)
Passes frequencies below its cutoff frequency and attenuates frequencies above its cutoff frequency.
Notch Filter...
(unassigned)
Greatly attenuate ("notch out"), a narrow frequency band. This is a good way to remove mains hum or a whistle confined to a specific frequency with minimal damage to the remainder of the audio.
Spectral edit multi tool
(unassigned)
When the selected track is in spectrogram or spectrogram log(f) view, applies a notch filter, high pass filter or low pass filter according to the spectral selection made. This effect can also be used to change the audio quality as an alternative to using Equalization.
Spectral edit parametric EQ...
(unassigned)
When the selected track is in spectrogram or spectrogram log(f) view and the spectral selection has a center frequency and an upper and lower boundary, performs the specified band cut or band boost. This can be used as an alternative to Equalization or may also be useful to repair damaged audio by reducing frequency spikes or boosting other frequencies to mask spikes.
Spectral edit shelves...
(unassigned)
When the selected track is in spectrogram or spectrogram log(f) view, applies either a low- or high-frequency shelving filter or both filters, according to the spectral selection made. This can be used as an alternative to Equalization or may also be useful to repair damaged audio by reducing frequency spikes or boosting other frequencies to mask spikes.
Studio Fade Out
(unassigned)
Applies a more musical fade out to the selected audio, giving a more pleasing sounding result.
Tremolo...
(unassigned)
Modulates the volume of the selection at the depth and rate selected in the dialog. The same as the tremolo effect familiar to guitar and keyboard players.
Vocal Reduction and Isolation...
(unassigned)
Attempts to remove or isolate center-panned audio from a stereo track. Most "Remove" options in this effect preserve the stereo image.
Vocoder...
(unassigned)
Synthesizes audio (usually a voice) in the left channel of a stereo track with a carrier wave (typically white noise) in the right channel to produce a modified version of the left channel. Vocoding a normal voice with white noise will produce a robot-like voice for special effects.
Plot Spectrum...
(unassigned)
Takes the selected audio (which is a set of sound pressure values at points in time) and converts it to a graph of frequencies against amplitudes.
Find Clipping...
(unassigned)
Displays runs of clipped samples in a Label Track, as a screen-reader accessible alternative to View > Show Clipping. A run must include at least one clipped sample, but may include unclipped samples too.
Nyquist
(unassigned)
no tip string.
Apply Macro
(unassigned)
Displays a menu with list of all your Macros. Selecting any of these Macros by clicking on it will cause that Macro to be applied to the current project.
Screenshot...
(unassigned)
A tool, mainly used in documentation, to capture screenshots of Audacity.
Run Benchmark...
(unassigned)
A tool for measuring the performance of one part of Audacity.
Nyquist Prompt...
(unassigned)
Brings up a dialog where you can enter Nyquist commands. Nyquist is a programming language for generating, processing and analyzing audio. For more information see .
Nyquist Plugin Installer...
(unassigned)
A Nyquist plugin that simplifies the installation of other Nyquist plugins.
Regular Interval Labels...
(unassigned)
Places labels in a long track so as to divide it into smaller, equally sized segments.
Sample Data Export...
(unassigned)
Reads the values of successive samples from the selected audio and prints this data to a plain text, CSV or HTML file.
Sample Data Import...
(unassigned)
Reads numeric values from a plain ASCII text file and creates a PCM sample for each numeric value read.
MP3 Conversion
(unassigned)
Converts MP3.
Mixer
(unassigned)
Extra commands related to volume
Edit
(unassigned)
Extra commands related to editing
Play-at-Speed
(unassigned)
Extra commands related to play at speed
Seek
(unassigned)
Extra commands related to seeking
Device
(unassigned)
Extra commands related to selecting a device
Selection
(unassigned)
Extra commands related to selecting.
Focus
(unassigned)
Extra commands to set focus, usually focus on one track
Cursor
(unassigned)
Extra commands to move the cursor
Track
(unassigned)
Extra commands to operate on a track that has focus
Scriptables I
(unassigned)
These commands were originally written for scripting Audacity, e.g via a Python script that uses mod-script-pipe. The commands though are also present in the menu, available from macros, and available from within Nyquist using (AUD-DO "command")
Scriptables II
(unassigned)
Like Scriptables I, but these ones are less commonly used from the menu.
Full Screen (on/off)
F11
Toggle full screen mode with no title bar
Play One Second
(unassigned)
Plays for one second centered on the current mouse pointer position (not from the current cursor position). See this page for an example.
Play to Selection
B
Plays to or from the current mouse pointer position to or from the start or end of the selection, depending on the pointer position. See this page for more details.
Play Before Selection Start
Shift+F5 Extra
Plays a short period before the start of the selected audio, the period before shares the setting of the cut preview.
Play After Selection Start
Shift+F6 Extra
Plays a short period after the start of the selected audio, the period after shares the setting of the cut preview.
Play Before Selection End
Shift+F7 Extra
Plays a short period before the end of the selected audio, the period before shares the setting of the cut preview.
Play After Selection End
Shift+F8 Extra
Plays a short period after the end of the selected audio, the period after shares the setting of the cut preview.
Play Before and After Selection Start
Ctrl+Shift+F5 Extra
Plays a short period before and after the start of the selected audio, the periods before and after share the setting of the cut preview.
Play Before and After Selection End
Ctrl+Shift+F7 Extra
Plays a short period before and after the end of the selected audio, the periods before and after share the setting of the cut preview.
Play Cut Preview
C
Plays audio excluding the selection
Draw Tool
F3
Chooses Draw tool.
Zoom Tool
F4
Chooses Zoom tool.
Multi Tool
F6
Chooses the Multi-Tool
Previous Tool
A Extra
Cycles backwards through the tools, starting from the currently selected tool: starting from Selection, it would navigate to Multi-tool to Time Shift to Zoom to Draw to Envelope to Selection.
Next Tool
D Extra
Cycles forwards through the tools, starting from the currently selected tool: starting from Selection, it would navigate to Envelope to Draw to Zoom to Time Shift to Multi-tool to Selection.
Decrease Playback Volume
(unassigned)
Each key press will decrease the playback volume by 0.1.
Adjust Recording Volume...
(unassigned)
Displays the Recording Volume dialog. You can type a new value for the recording volume (between 0 and 1), or press Tab, then use the left and right arrow keys to adjust the slider.
Increase Recording Volume
(unassigned)
Each key press will increase the recording volume by 0.1.
Decrease Recording Volume
(unassigned)
Each key press will decrease the recording volume by 0.1.
Time Shift Left
(unassigned)
Moves the currently focused audio track (or a separate clip in that track which contains the editing cursor or selection region) one screen pixel to left.
Time Shift Right
(unassigned)
Moves the currently focused audio track (or a separate clip in that track which contains the editing cursor or selection region) one screen pixel to right.
Play Cut Preview-at-Speed
(unassigned)
Combines cut preview and play at speed
Adjust Playback Speed...
(unassigned)
Displays the Playback Speed dialog. You can type a new value for the playback volume (between 0 and 1), or press Tab, then use the left and right arrow keys to adjust the slider.
Increase Playback Speed
(unassigned)
Each key press will increase the playback speed by 0.1.
Decrease Playback Speed
(unassigned)
Each key press will decrease the playback speed by 0.1.
Move to Previous Label
Alt+Left
Moves selection to the previous label
Move to Next Label
Alt+Right
Moves selection to the next label
Long Seek Left During Playback
Shift+Left
Skips the playback cursor back 15 seconds by default.
Long Seek Right During Playback
Shift+Right
Skips the playback cursor forward 15 seconds by default.
Change Audio Host...
Shift+H Extra
Displays the Select Audio Host dialog for choosing the particular interface with which Audacity communicates with your chosen playback and recording devices.
Change Recording Channels...
Shift+N Extra
Displays the Select Recording Channels dialog for choosing the number of channels to be recorded by the chosen recording device.
Snap-To Prior
(unassigned)
Equivalent to setting the Snap To control in Selection Toolbar to "Prior".
Selection to Start
Shift+Home
Select from cursor to start of project
Selection to End
Shift+End
Select from cursor to end of track
Selection Extend Left
Shift+Left
Increases the size of the selection by extending it to the left. The amount of increase is dependent on the zoom level. If there is no selection one is created starting at the cursor position.
Selection Extend Right
Shift+Right
Increases the size of the selection by extending it to the right. The amount of increase is dependent on the zoom level. If there is no selection one is created starting at the cursor position.
Set (or Extend) Left Selection
(unassigned)
Extend selection left a little. This command only works during Playback or Recording.
Set (or Extend) Right Selection
(unassigned)
Extend selection right a little. This command only works during Playback or Recording.
Selection Contract Left
Ctrl+Shift+Right
Decreases the size of the selection by contracting it from the right. The amount of decrease is dependent on the zoom level. If there is no selection no action is taken.
Selection Contract Right
Ctrl+Shift+Left
Decreases the size of the selection by contracting it from the left. The amount of decrease is dependent on the zoom level. If there is no selection no action is taken.
Move Focus to Previous Track
Up
Focus one track up
Move Focus to Next Track
Down
Focus one track down
Move Focus to First Track
Ctrl+Home Extra
Focus on first track
Move Focus to Last Track
Ctrl+End Extra
Focus on last track
Move Focus to Previous and Select
Shift+Up
Focus one track up and select it
Move Focus to Next and Select
Shift+Down
Focus one track down and select it
Toggle Focused Track
Return
Toggle selectedness of the track that has focus
Toggle Focused Track
NUMPAD_ENTER
Toggle selectedness of the track that has focus
Cursor Short Jump Left
,
When not playing audio, moves the editing cursor one second left by default. When playing audio, moves the playback cursor one second left by default. The default value can be changed by adjusting the "Short Period" under "Seek Time when playing" in Playback Preferences.
Cursor Short Jump Right
.
When not playing audio, moves the editing cursor one second right by default. When playing audio, moves the playback cursor one second right by default. The default value can be changed by adjusting the "Short Period" under "Seek Time when playing" in Playback Preferences.
Cursor Long Jump Left
Shift+,
When not playing audio, moves the editing cursor 15 seconds left by default. When playing audio, moves the playback cursor 15 seconds left by default. The default value can be changed by adjusting the "Long Period" under "Seek Time when playing" in Playback Preferences.
Cursor Long Jump Right
Shift+.
When not playing audio, moves the editing cursor 15 seconds right by default. When playing audio, moves the playback cursor 15 seconds right by default. The default value can be changed by adjusting the "Long Period" under "Seek Time when playing" in Playback Preferences.
Pan Right on Focused Track
Alt+Shift+Right Extra
Controls the pan slider on the focused track. Each keypress changes the pan value by 10% right.
Change Gain on Focused Track...
Shift+G
Brings up the Gain dialog for the focused track where you can enter a gain value, or use the slider for finer control of gain than is available when using the track pan slider.
Increase Gain on Focused Track
Alt+Shift+Up Extra
Controls the gain slider on the focused track. Each keypress increases the gain value by 1 dB.
Decrease Gain on Focused Track
Alt+Shift+Down Extra
Controls the gain slider on the focused track. Each keypress decreases the gain value by 1 dB.
Open Menu on Focused Track...
Shift+M
Opens the Audio Track Dropdown Menu on the focused audio track or other track type. In the audio track dropdown, use Up, and Down, arrow keys to navigate the menu and Enter, to select a menu item. Use Right, arrow to open the "Set Sample Format" and "Set Rate" choices or Left, arrow to leave those choices.
Mute/Unmute Focused Track
Shift+U
Toggles the Mute button on the focused track.
Solo/Unsolo Focused Track
Shift+S
Toggles the Solo button on the focused track.
Close Focused Track
Shift+C Extra
Close (remove) the focused track only.
Move Focused Track Up
(unassigned)
Moves the focused track up by one track and moves the focus there.
Move Focused Track Down
(unassigned)
Moves the focused track down by one track and moves the focus there.
Move Focused Track to Top
(unassigned)
Moves the focused track up to the top of the track table and moves the focus there.
Move Focused Track to Bottom
(unassigned)
Moves the focused track down to the bottom of the track table and moves the focus there.
Select Tracks...
(unassigned)
Modifies which tracks are selected. First and Last are track numbers. High and Low are for spectral selection. The Mode parameter allows complex selections, e.g adding or removing tracks from the current selection.
Set Track Status...
(unassigned)
Sets properties for a track or channel (or both).Name is used to set the name. It is not used in choosing the track.
Set Track Audio...
(unassigned)
Sets properties for a track or channel (or both). Can set pan, gain, mute and solo.
Set Track Visuals...
(unassigned)
Sets visual properties for a track or channel (or both). SpectralPrefs=1 sets the track to use general preferences, SpectralPrefs=1 per track prefs. When using general preferences, SetPreferences can be used to change a preference and so affect display of the track.
Get Preference...
(unassigned)
Gets a single preference setting.
Set Preference...
(unassigned)
Sets a single preference setting. Some settings such as them changes require a reload (use Reload=1), but this takes time and slows down a script.
Set Clip...
(unassigned)
Modify a clip by stating the track or channel a time within it. Color and start position can be set. Try to avoid overlapping clips, as Audacity will allow it, but does not like them.
Set Envelope...
(unassigned)
Modify an envelope by specifying a track or channel and a time within it. You cannot yet delete individual envelope points, but can delete the whole envelope using Delete=1.
Set Label...
(unassigned)
Modifies an existing label. You must give it the label number.
Set Project...
(unassigned)
Sets the project window to a particular location and size. Can also change the caption - but that is cosmetic and may be overwritten again later by Audacity.
Get Info...
(unassigned)
Gets information in a list in one of three formats.
Message...
(unassigned)
Used in testing. Sends the Text string back to you.
Help...
(unassigned)
This is an extract from GetInfo Commands, with just one command.
Import...
(unassigned)
Imports from a file. The automation command uses a text box to get the file name rather than a normal file-open dialog.
Export...
(unassigned)
Exports to a named file. This version of export has the full set of export options. However, a current limitation is that the detailed option settings are always stored to and taken from saved preferences. The net effect is that for a given format, the most recently used options for that format will be used.
Open Project...
(unassigned)
Opens a project.
Save Project...
(unassigned)
Saves a project.
Move Mouse...
(unassigned)
Experimental command (called Drag in scripting) that moves the mouse. An Id can be used to move the mouse into a button to get the hover effect. Window names can be used instead. If To is specified, the command does a drag, otherwise just a hover.
Compare Audio...
(unassigned)
Compares selected range on two tracks. Reports on the differences and similarities.
Screenshot (short format)...
(unassigned)
A version of Tools -> Screenshot with a more minimal GUI. One of the most useful options is All_Tracks. The _Plus suffix includes the timeline.
Diagnostics
(unassigned)
A set of diagnostic tools
Check for Updates...
(unassigned)
Checks online to see if this is the latest version of Audacity.
About Audacity...
(unassigned)
Brings a dialog with information about Audacity, such as who wrote it, what features are enabled and the GNU GPL v2 license.
Show Log...
(unassigned)
Launches the "Audacity Log" window, the log is largely a debugging aid, having timestamps for each entry
Generate Support Data...
(unassigned)
Selecting this will generate a Debug report which could be useful in aiding the developers to identify bugs in Audacity or in third-party plugins
Check Dependencies...
(unassigned)
Lists any WAV or AIFF audio files that your project depends on, and allows you to copy these files into the project
New
Ctrl+N
Creates a new empty project window, to start working on new or imported tracks.
Open...
Ctrl+O
Clear
(unassigned)
Clears the list of recently used files.
Save Project
Ctrl+S
Saves the current Audacity project .AUP3 file.
Save Project As...
(unassigned)
Export as MP3
(unassigned)
Exports to an MP3 file
Export as WAV
(unassigned)
Audio...
Ctrl+Shift+I
Similar to 'Open', except that the file is added as a new track to your existing project.
Labels...
(unassigned)
Undo
Ctrl+Z
Undoes the most recent editing action.
Redo
Ctrl+Y
Split Cut
Ctrl+Alt+X
Same as Cut, but none of the audio data or labels to right of the selection are shifted.
Split Delete
Ctrl+Alt+K
Split
Ctrl+I
Splits the current clip into two clips at the cursor point, or into three clips at the selection boundaries.
Split New
Ctrl+Alt+I Extra
Edit Labels...
(unassigned)
Brings up a dialog box showing all of your labels in a keyboard-accessible tabular view. Handy buttons in the dialog let you insert or delete a label, or import and export labels to a file. See Labels Editor for more details.
Add Label at Selection
Ctrl+B
Cut
Alt+X Extra
Same as the Cut command, but operates on labeled audio regions.
Delete
Alt+K Extra
All
Ctrl+A
Selects all of the audio in all of the tracks.
None
Ctrl+Shift+A Extra
In All Tracks
Ctrl+Shift+K
Extends the current selection up and/or down into all tracks in the project.
In All Sync-Locked Tracks
Ctrl+Shift+Y
Left at Playback Position
[
When Audacity is playing, recording or paused, sets the left boundary of a potential selection by moving the cursor to the current position of the green playback cursor (or red recording cursor).
Otherwise, opens the "Set Left Selection Boundary" dialog for adjusting the time position of the left-hand selection boundary. If there is no selection, moving the time digits backwards creates a selection ending at the former cursor position, and moving the time digits forwards provides a way to move the cursor forwards to an exact point.
Right at Playback Position
]
Toggle Spectral Selection
Q Extra
Changes between selecting a time range and selecting the last selected spectral selection in that time range. This command toggles the spectral selection even if not in Spectrogram view, but you must be in Spectrogram view to use the spectral selection in one of the Spectral edit effects.
Next Higher Peak Frequency
(unassigned)
Previous Clip Boundary to Cursor
(unassigned)
Selects from the current cursor position back to the right-hand edge of the previous clip.
Cursor to Next Clip Boundary
(unassigned)
Zoom
(unassigned)
Zoom in/out on the horizontal axis. Show more detail or show a longer length of time.
Track Size
(unassigned)
Zoom In
Ctrl+1
Zooms in on the horizontal axis of the audio displaying more detail over a shorter length of time.
Zoom Normal
Ctrl+2
Fit to Width
Ctrl+F
Zooms out until the entire project just fits in the window.
Fit to Height
Ctrl+Shift+F
Selection Start
Ctrl+[ Extra
When there is a selection, moves the cursor to the start of the selection and removes the selection.
Selection End
Ctrl+] Extra
Reset Toolbars
(unassigned)
Using this command positions all toolbars in default location and size as they were when Audacity was first installed
Transport Toolbar
(unassigned)
Playing
(unassigned)
These commands control playback in Audacity. You can Start, Stop or Pause playback of the audio in your project.
Recording
(unassigned)
Play/Stop
Space
Starts and stops playback or stops a recording (stopping does not change the restart position). Therefore using any play or record command after stopping with "Play/Stop" will start playback or recording from the same Timeline position it last started from. You can also assign separate shortcuts for Play and Stop.
Play/Stop and Set Cursor
X
Record
R
Starts recording at the end of the currently selected track(s).
Record New Track
Shift+R
Scrub
(unassigned)
Scrubbing is the action of moving the mouse pointer right or left so as to adjust the position, speed or direction of playback, listening to the audio at the same time.
Seek
(unassigned)
Selection Start
(unassigned)
Moves the left edge of the current selection to the center of the screen, without changing the zoom level.
Selection End
(unassigned)
Loop on/off
L
Toggles playback looping on/off.
Clear Loop
Alt+Shift+L
Sound Activation Level...
(unassigned)
Sets the activation level above which Sound Activated Recording will record.
Sound Activated Recording (on/off)
(unassigned)
Add New
(unassigned)
Adds a new track
Mix
(unassigned)
Mono Track
Ctrl+Shift+N Extra
Creates a new empty mono audio track.
Stereo Track
(unassigned)
Mix Stereo Down to Mono
(unassigned)
Converts the selected stereo track(s) into the same number of mono tracks, combining left and right channels equally by averaging the volume of both channels.
Mix and Render
(unassigned)
Mute All Tracks
Ctrl+U
Mutes all the audio tracks in the project as if you had used the mute buttons from the Track Control Panel on each track.
Unmute All Tracks
Ctrl+Shift+U
Left
(unassigned)
Pan selected audio to left speaker
Right
(unassigned)
Align End to End
(unassigned)
Aligns the selected tracks one after the other, based on their top-to-bottom order in the project window.
Align Together
(unassigned)
By Start Time
(unassigned)
Sort tracks in order of start time.
By Name
(unassigned)
Plugin Manager
(unassigned)
Selecting this option from the Effect Menu (or the Generate Menu or Analyze Menu) takes you to a dialog where you can enable or disable particular Effects, Generators and Analyzers in Audacity. Even if you do not add any third-party plugins, you can use this to make the Effect menu shorter or longer as required. For details see Add / Remove Effects, Generators and Analyzers.
Built-in
(unassigned)
Chirp...
(unassigned)
Generates four different types of tone waveforms like the Tone Generator, but additionally allows setting of the starting and ending amplitude and frequency.
DTMF Tones...
(unassigned)
Pluck...
(unassigned)
A synthesized pluck tone with abrupt or gradual fade-out, and selectable pitch corresponding to a MIDI note.
Rhythm Track...
(unassigned)
Plugin Manager
(unassigned)
Selecting this option from the Effect Menu (or the Generate Menu or Analyze Menu) takes you to a dialog where you can enable or disable particular Effects, Generators and Analyzers in Audacity. Even if you do not add any third-party plugins, you can use this to make the Effect menu shorter or longer as required. For details see Add / Remove Effects, Generators and Analyzers.
Add Realtime Effects
E
Amplify...
(unassigned)
Increases or decreases the volume of the audio you have selected.
Auto Duck...
(unassigned)
Adjustable Fade...
(unassigned)
enables you to control the shape of the fade (non-linear fading) to be applied by adjusting various parameters; allows partial (that is not from or to zero) fades up or down.
Clip Fix...
(unassigned)
Plugin Manager
(unassigned)
Selecting this option from the Effect Menu (or the Generate Menu or Analyze Menu) takes you to a dialog where you can enable or disable particular Effects, Generators and Analyzers in Audacity. Even if you do not add any third-party plugins, you can use this to make the Effect menu shorter or longer as required. For details see Add / Remove Effects, Generators and Analyzers.
Contrast...
Ctrl+Shift+T Extra
Beat Finder...
(unassigned)
Attempts to place labels at beats which are much louder than the surrounding audio. It's a fairly rough and ready tool, and will not necessarily work well on a typical modern pop music track with compressed dynamic range. If you do not get enough beats detected, try reducing the "Threshold Percentage" setting.
Label Sounds...
(unassigned)
Plugin Manager
(unassigned)
Selecting this option from the Effect Menu (or the Generate Menu or Analyze Menu) takes you to a dialog where you can enable or disable particular Effects, Generators and Analyzers in Audacity. Even if you do not add any third-party plugins, you can use this to make the Effect menu shorter or longer as required. For details see Add / Remove Effects, Generators and Analyzers.
Macros...
(unassigned)
Palette...
(unassigned)
Displays a menu with list of all your Macros which can be applied to the current project or to audio files..
Fade Ends
(unassigned)
Transport
(unassigned)
Extra commands related to play and record
Tools
(unassigned)
Play
(unassigned)
Play (or stop) audio
Stop
(unassigned)
Selection Tool
F1
Chooses Selection tool.
Envelope Tool
F2
Adjust Playback Volume...
(unassigned)
Displays the Playback Volume dialog. You can type a new value for the playback volume (between 0 and 1), or press Tab, then use the left and right arrow keys to adjust the slider.
Increase Playback Volume
(unassigned)
Delete Key
Backspace
Deletes the selection. When focus is in Selection Toolbar, BACKSPACE is not a shortcut but navigates back to the previous digit and sets it to zero.
Delete Key2
Delete
Normal Play-at-Speed
(unassigned)
Play audio at a faster or slower speed
Loop Play-at-Speed
(unassigned)
Short Seek Left During Playback
Left
Skips the playback cursor back one second by default.
Short Seek Right During Playback
Right
Change Recording Device...
Shift+I Extra
Displays the Select recording Device dialog for choosing the recording device, but only if the "Recording Device" dropdown menu in Device Toolbar has entries for devices. Otherwise, an recording error message will be displayed.
Change Playback Device...
Shift+O Extra
Snap-To Off
(unassigned)
Equivalent to setting the Snap To control in Selection Toolbar to "Off".
Snap-To Nearest
(unassigned)
Move Backward from Toolbars to Tracks
Ctrl+Shift+F6
Move backward through currently focused toolbar in Upper Toolbar dock area, Track View and currently focused toolbar in Lower Toolbar dock area. Each use moves the keyboard focus as indicated.
Move Forward from Toolbars to Tracks
Ctrl+F6
Cursor Left
Left
When not playing audio, moves the editing cursor one screen pixel to left. When a Snap To option is chosen, moves the cursor to the preceding unit of time as determined by the current selection format. If the key is held down, the cursor speed depends on the length of the tracks. When playing audio, moves the playback cursor as described at "Cursor Short Jump Left"
Cursor Right
Right
Change Pan on Focused Track...
Shift+P Extra
Brings up the Pan dialog for the focused track where you can enter a pan value, or use the slider for finer control of panning than is available when using the track pan slider.
Pan Left on Focused Track
Alt+Shift+Left Extra
Select Time...
(unassigned)
Modifies the temporal selection. Start and End are time. FromEnd allows selection from the end, which is handy to fade in and fade out a track.
Select Frequencies...
(unassigned)
Select...
(unassigned)
Selects audio. Start and End are time. First and Last are track numbers. High and Low are for spectral selection. FromEnd allows selection from the end, which is handy to fade in and fade out a track. The Mode parameter allows complex selections, e.g adding or removing tracks from the current selection.
Set Track...
(unassigned)
Quick Help...
(unassigned)
A brief version of help with some of the most essential information.
Manual...
(unassigned)
Audio Device Info...
(unassigned)
Shows technical information about your detected audio device(s).
MIDI Device Info...
(unassigned)
Previous Window
Alt+Shift+F6 Extra
Moves focus to previous window.
Next Window
Alt+F6 Extra
Note: You can change all shortcuts via Preferences > Keyboard. This includes adding new shortcuts, or removing shortcuts existing by default.
Presents a standard dialog box where you can select either audio files, a list of files (.LOF) or an Audacity Project file to open.
Same as "Save Project" above, but allows you to save a copy of an open project to a different name or location
Exports to a WAV file
Launches a file selection window where you can choose to import a single text file into the project containing point or region labels. For more information about the syntax for labels files, see Importing and Exporting Labels.
Redoes the most recently undone editing action.
Same as Delete, but none of the audio data or labels to right of the selection are shifted.
Does a Split Cut on the current selection in the current track, then creates a new track and pastes the selection into the new track.
Creates a new, empty label at the cursor or at the selection region.
Same as the Delete command, but operates on labeled audio regions.
Deselects all of the audio in all of the tracks.
Extends the current selection up and/or down into all sync-locked tracks in the currently selected track group.
When Audacity is playing, recording or paused, sets the right boundary of the selection, thus drawing the selection from the cursor position to the current position of the green playback cursor (or red recording cursor).
Otherwise, opens the "Set Right Selection Boundary" dialog for adjusting the time position of the right-hand selection boundary. If there is no selection, moving the time digits forwards creates a selection starting at the former cursor position, and moving the time digits backwards provides a way to move the cursor backwards to an exact point.
When in Spectrogram view, snaps the center frequency to the next higher frequency peak, moving the spectral selection upwards.
Selects from the current cursor position forward to the left-hand edge of the next clip.
Controls the sizes of tracks.
Zooms to the default view which displays about one inch per second.
Adjusts the height of all the tracks until they fit in the project window.
When there is a selection, moves the cursor to the end of the selection and removes the selection.
Controls playback and recording and skips to start or end of project when neither playing or recording
These commands control recording in Audacity. You can Start, Stop or Pause recording in your project. You can either start a recording on your existing track or an a new track.
Starts playback like "Play/Stop", but stopping playback sets the restart position to the stop point. When stopped, this command is the same as "Play/Stop". When playing, this command stops playback and moves the cursor (or the start of the selection) to the position where playback stopped.
Recording begins on a new track at either the current cursor location or at the beginning of the current selection.
Seeking is similar to Scrubbing except that it is playback with skips, similar to using the seek button on a CD player.
Moves the right edge of the current selection to the center of the screen, without changing the zoom level.
Clears the looping region.
Toggles on and off the Sound Activated Recording option.
Mixes down selected tracks to mono or stereo tracks
Adds an empty stero track to the project
Mixes down all selected tracks to a single mono or stereo track, rendering to the waveform all real-time transformations that had been applied (such as track gain, panning, amplitude envelopes or a change in project rate).
Unmutes all the audio tracks in the project as if you had released the mute buttons from the Track Control Panel on each track.
Pan selected audio centrally.
Align the selected tracks so that they start at the same (averaged) start time.
Sort tracks in order by name.
Shows the list of available Audacity built-in effects but only if the user has effects "Grouped by Type" in Effects Preferences.
Generates dual-tone multi-frequency (DTMF) tones like those produced by the keypad on telephones.
Generates a track with regularly spaced sounds at a specified tempo and number of beats per measure (bar).
Open the Realtime effects pane for the focused track. If the pane is already open, then it is closed.
Reduces (ducks) the volume of one or more tracks whenever the volume of a specified "control" track reaches a particular level. Typically used to make a music track softer whenever speech in a commentary track is heard.
Clip Fix attempts to reconstruct clipped regions by interpolating the lost signal.
Analyzes a single mono or stereo speech track to determine the average RMS difference in volume (contrast) between foreground speech and background music, audience noise or similar. The purpose is to determine if the speech will be intelligible to the hard of hearing.
Label Sounds is a tool which can useful to label the different songs or sections (or silences) in a long recording.
Creates a new macro or edits an existing macro.
Fades in the first second and fades out the last second of a track.
Extra commands to select the tool, for example time-shift, envelopes, multi-tool.
Stop audio
Chooses Envelope tool.
Each key press will increase the playback volume by 0.1.
Deletes the selection.
Combines looped play and play at speed
Skips the playback cursor forward one second by default.
Displays the Select Playback Device dialog for choosing the playback device, but only if the "Playback Device" dropdown menu in Device Toolbar has entries for devices. Otherwise, an error message will be displayed.
Equivalent to setting the Snap To control in Selection Toolbar to "Nearest".
Move forward through currently focused toolbar in Upper Toolbar dock area, Track View and currently focused toolbar in Lower Toolbar dock area. Each use moves the keyboard focus as indicated.
When not playing audio, moves the editing cursor one screen pixel to right. When a Snap To option is chosen, moves the cursor to the following unit of time as determined by the current selection format. If the key is held down, the cursor speed depends on the length of the tracks. When playing audio, moves the playback cursor as described at "Cursor Short Jump Right"
Controls the pan slider on the focused track. Each keypress changes the pan value by 10% left.
Modifies what frequencies are selected. High and Low are for spectral selection.
Sets properties for a track or channel (or both). Setting one channel of a stereo track can lead to interesting results. That's most used when setting relative sizing of the two channels. SpectralPrefs=1 sets the track to use general preferences, SpectralPrefs=1 per track prefs. When using general preferences, SetPreferences can be used to change a preference and so affect display of the track. Name is used to set the name. It is not used in choosing the track.
Opens the manual in the default browser.
Shows technical information about your detected MIDI device(s).
Moves focus to next window.
Audacity 3.2.2 was released on 06 Dec 2022
This is a patch release for Audacity 3.2. It enables use of VST2 as realtime effects and fixes some bugs.
#2850 VST2 effects are now realtime capable. Additional plugins have been added to plugins.audacityteam.org
#3696 Improved accessibility of the meters
Fixed a crash when editing some macro parameters
Fixed some play commands getting stuck in play mode
Audacity no longer quietly discards changes in realtime effects but instead asks if you want to save before quitting
Plugin scanning now lets you skip individual plugins if scanning gets stuck on them
Plugin scanning no longer produces "Audacity crashed" windows when a plugin fails validation, and no longer shows the plugins in the macOS dock during validation
Fixed an issue with labels losing focus on macOS Ventura
Fixed various plugin-specific issues
A full list of changes can be found .
Windows
Audacity 3.2 supports Windows 10 & 11
Windows Vista, 7 and 8.1 should still work, but are no longer tested.
Downloads for older versions are available on the page on the Audacity Website.
macOS / Mac OS X
Audacity 3.2 supports OS X 10.9 and later, and macOS.
There are legacy versions for older OS X at .
Linux
In addition to the traditional update path via package managers, Audacity 3.0.3 and onwards are distributed as an AppImage. The AppImage gets updated at the same time as the Windows and macOS versions, so if you collaborate with users on those platforms, you may want to use the AppImage over your distribution's package manager.
Linux support is tested on Ubuntu 20.04.
Other Linux distributions should work, but aren't tested by the Audacity team.